background image

bondur

a.no

2/ 

bondura® 6.1

2.2  pin removal / demontering av bolt

6

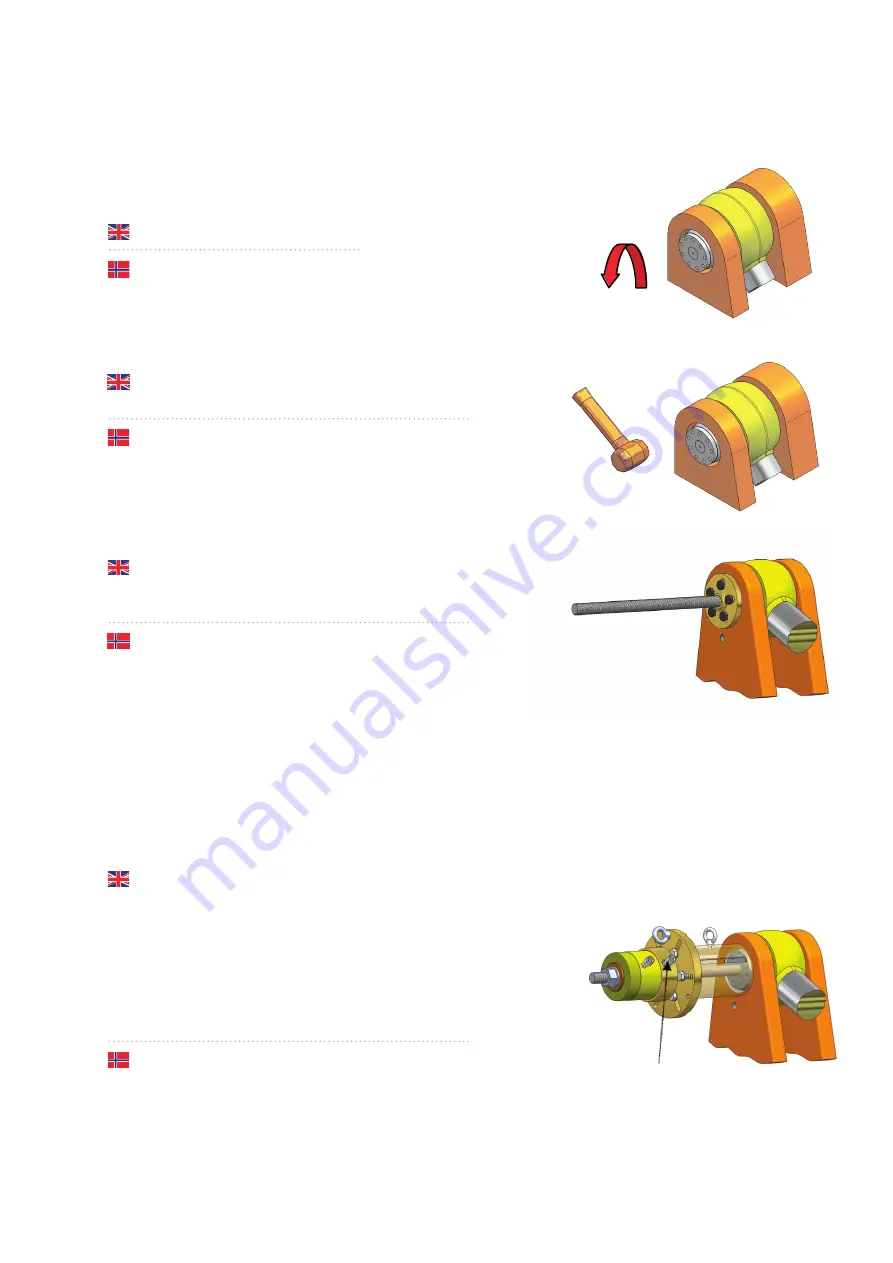
2.2.1/


Loosen the axle with the axle plate.


Løsne aksling med aksling plate.

2.2.2/


Use a rubber mallet and hit on the axle to loosen the  


inner conical sleeve.   


Bruk en gummiklubbe og slå på akslingen for å løsne  


den indre konhylsen.


2.2.3/


Fasten the appropriate Adapter Plate (17-22) to the pin  


using existing screws. Attach the Threaded Rod M48  


(13) to the center hole in the Adapter Plate (17-22).


Fest passende adapterplate (17-22) til bolten ved å  


bruke eksisterende skruer. Gjengestang M48 (13) skrus  


inn i senterhullet på adapterplaten (17-22).

Inner coupling

2.2.4/


Assemble the tool as shown using the appropriate Casing (8-10).


Connect the Hydraulic Hose (26) with the Manometer (24-25) to  


the inner coupling (see fig.), and the other Hydraulic Hose (26) 


to the outer coupling. 


The Hydraulic Pump and Hoses (23-27) should now be connected  


to the Hydraulic Puller (1).


Pull out the pin.


Monter verktøyet som vist ved å bruke passende casing (8-10).


Koble hydraulikkslangen (26) og manometer (24-25) til den 


innerste koblingen (se fig.), og den andre hydaulikkslangen (26) 


til den ytre koblingen.


Hydraulisk pumpe og slanger (23-27) skal nå være koblet til den    


hydrauliske jekken (1).


Trekk ut bolten.

If the assembly does not contain an axle plate, please jump to step 2.2.3.

Dersom sammenstillingen ikke inneholder en akslingplate, vennligst hopp til punkt 2.2.3.

NOTE

MERK

Please read the Enerpac Instruction Sheet before attempting to assemble/operate the Hydraulic Puller.

Vennligst les Instruksjonsmanualen til Enerpac før du starter montering/bruk av hydraulisk jekk.

NOTE

MERK

Содержание Multi Tool 200

Страница 1: ...u s e r m a n u a l f o r d i s a s s e m b l y art 108344 rev 18 12 2019 A bondura Multi Tool 200 pin and conical sleeve removal 140mm 320mm...

Страница 2: ...20 05 Washer 25 45x4 06 Screw M24x70 07 Casing 200 08 Casing 250 09 Casing 320 10 Lifting Eye M16 11 Lifting Eye M20 12 Threaded Rod M48 13 Washer 50 92x8 14 Nut M48 15 Adapter M30 M48 16 Adapter Plat...

Страница 3: ...and the other Hydraulic Hose 26 to the inner coupling The Hydraulic Pump and Hoses 23 27 should now be connected to the Hydraulic Puller 1 Pull out the conical sleeve Monter verkt yet som vist Avtrek...

Страница 4: ...casing 8 10 Koble hydraulikkslangen 26 og manometer 24 25 til den innerste koblingen se fig og den andre hydaulikkslangen 26 til den ytre koblingen Hydraulisk pumpe og slanger 23 27 skal n v re koblet...

Страница 5: ...Remove screws and plate Demonter skruer og plate 4 If the assembly contains an axle plate please skip step 2 1 3 Dersom sammenstillingen inneholder en akslingplate vennligst hopp over punkt 2 1 3 2 1...

Страница 6: ...ut the conical sleeve Monter verkt yet som vist Avtrekkskl rne for 140 195 4 eller 200 320 5 skal skyves inn bak avtrekksflensen p konhylsen Koble hydraulikkslangen 26 manometer 24 25 til den ytterste...

Страница 7: ...Hose 26 with the Manometer 24 25 to the inner coupling see fig and the other Hydraulic Hose 26 to the outer coupling The Hydraulic Pump and Hoses 23 27 should now be connected to the Hydraulic Puller...

Страница 8: ...bondura technology AS Vardheivegen 56b 4340 Bryne Norway support tel 47 51 77 20 20 post bondura no bondura no...

Отзывы: