background image

Pour Over Manual Brew Coffee

Pour over, or manual brew coffee preperation is a great way to control your cof-
fee quality. It does require more time than just flipping a switch, but for many the 
higher level of engagement is part of the pleasure of consuming coffee.

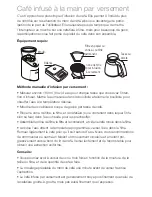
Equipment needed:

Brewing manual pour over method:

• Measure 6 ounces of water for each cup you intend to brew. Place  
measured water in kettle and turn on kettle to heat the water to your desired set 
temperature.

• Grind two tablespoons of coffee beans per cup.

• Rinse the filter cone, filter, and coffee pot (or whatever you are brewing into) 
with hot water to preheat them.

• Assemble the filter cone, filter and vessel.

• Once the water reaches the set point pour it into the filter. We recommend 
starting in the center and pouring in a circular pattern, moving gradually towards 
the edge of the coffee bed. A slow steady pour allows for even extraction.

Tips:

• We recommend preheating the filter and cone. Pour a couple of ounces 
~60ml of hot water into the filter and discard prior to adding coffee.

• If you have access to a scale you can measure the amount of water while 
pouring.

• Pre-wetting the coffee grounds a minute before starting to pour over helps 
extraction.

• Pour-over coffee is ground finer than drip, but not as fine as espresso.

MAX

Grinder

Scale

Paper, cloth 
or permanent 
filter

Pour over  
filter  
basket

Carafe or  
coffee cup

Содержание BV382510V

Страница 1: ...in Fahrenheit or Celsius Displays real time water temperature Allows user to set and hold water temperature for up to one hour Preset temperatures for the most popular hot beverages Easy grip handle for comfortable handling Gooseneck spout for better pour control Commercial UL USA Only Brushed Stainless finish 1000 Watts Cord wraps in Base READ THE MANUAL BEFORE USE AND SAVE FOR FUTURE REFERENCE K...

Страница 2: ...ildren Unplug from outlet when not in use when empty and before cleaning Allow to cool before putting on or taking off parts and before cleaning the appliance Do not operate any appliance with a damaged cord or plug after the appli ance has malfunctioned or has been damaged in any manner Call our toll free Customer Assistance Number for examination repair or replacement Do not use a base unit othe...

Страница 3: ...s proof of purchase is required to make a warranty claim The product must be purchased at an authorized retailer for the warranty to be valid 2 Defects that occurred due to improper connection improper handling or repair attempts by non authorized persons are not covered by the warranty The same applies for failure to comply with the use of consumables e g cleaning and decalcifying agents that do ...

Страница 4: ... a grounding type 3 wire cord The longer cord should be arranged so that it will not drape over the counter top or tabletop where it can be tripped over snagged or pulled on unintentionally especially by children CAUTION This appliance must be grounded when in use To ensure protec tion against risk of electric shock connect to properly ground outlets only GROUNDING INSTRUCTIONS The appliance has a...

Страница 5: ... On Off switch Display degree F C button Hold function indicator light Hold temperature button To maintain a set temperature 2 C button button Count up timer start Water level indicator inside of kettle on handle side Handle Lid Spout Rated voltage 120 V 60 Hz Rated current 8 3 A Rated power input 1000 W Capacity max 33 8 oz 1 0 L Base ...

Страница 6: ...g towards handle Plug the power cord into the standard wall outlet ill C 5 Put the kettle firmly on the base and press the on off button The power on indicator light will turn on The display flashes the set temperature for 3 seconds ill D The factory default temperature is 185 F 85 C PREPARING THE KETTLE FOR FIRST TIME USE 1 Fill the kettle to Max fill line with cold water and then heat at the max...

Страница 7: ... to change the set point During the heating cycle the LED display shows the current water temperature After the set temperature is reached the heater will turn off but the display will continue to show water temperature for up to 1 hour if the kettle isn t removed from the base If the kettle is removed from base during a heating cycle the heating cycle and power on indicator light turn off The LED...

Страница 8: ...ter returning the kettle to base the display will show current water temperature for 7 minutes and then the unit will power off HIGH ALTITUDE USE At higher elevations water boils at lower temperatures Use the graph below to set your kettle temperature COUNT UP TIMER FEATURE Note when you lift the kettle the LED display will show the count up timer The first number indicates the minutes and the las...

Страница 9: ... 175 F 80 C White Tea 185 F 85 C Oolong Tea 190 F 88 C Black Tea Herbal Tea Tea Bags 208 F 98 C Cocoa 190 F 88 C ADJUSTING KETTLE LID TENSION If you feel the kettle lid is too hard or too easy to remove from the kettle please follow the steps below to adjust the tension 1 Take the lid off the kettle 2 Use a tool to adjust the three tabs of the kettle lid If you push in the tab the lid tension will...

Страница 10: ...rmance Bonavita recommends descaling the kettle when mineral build up is visible inside the kettle Note Vinegar many not effectively descale the kettle and can be difficult to thoroughly rinse Vinegar may also leave behind an odor that could affect future uses Bonavita recommends using Full Circle Descaler HOW TO USE FULL CIRCLE DESCALER 1 Mix 1 bottle or 1 packet Full Circle Descaler with 32 oz o...

Страница 11: ...ing into with hot water to preheat them Assemble the filter cone filter and vessel Once the water reaches the set point pour it into the filter We recommend starting in the center and pouring in a circular pattern moving gradually towards the edge of the coffee bed A slow steady pour allows for even extraction Tips We recommend preheating the filter and cone Pour a couple of ounces 60ml of hot wat...

Страница 12: ......

Страница 13: ...ns la bouilloire même après qu elle est mise hors tension Permet à l utilisateur de programmer la température de l eau et la maintenir jusqu à une heure Températures préprogrammées pour la plupart des breuvages chauds populaires Poignée à prise ergonomique pour une manipulation confortable Bec en col de cygne pour un contrôle plus précis Évaluation commerciale UL États Unis uniquement Construction...

Страница 14: ...nd il est vide en le remplis sant avec de l eau et avant de le nettoyer Laisser refroidir avant d ajouter ou enlever des parties et avant le nettoyage de l appareil N utiliser aucun appareil dont le cordon ou la fiche est en mauvais état qui ne fonctionne pas convenablement ou qui a été endommagé de quelque façon que ce soit Composer le numéro sans frais de notre service à la clientèle pour une vé...

Страница 15: ...a facture comme preuve d achat en cas de demande de service sous garantie Ce produit doit être acheté chez un détaillant autorisé pour que la garantie soit valide 2 Les défauts causés par un branchement inapproprié une manipulation inappropriée ou une tentative de réparation par une personne non autorisée ne sont pas couverts par la garantie Ceci s applique également au non respect de l usage de b...

Страница 16: ... devrait être disposé de sorte qu il ne pende pas d un comptoir ou d une table pour éviter que quelqu un en particulier des enfants ne trébuche ne l accroche ou ne le tire par in advertance MISE EN GARDE Pour éviter les risques de décharges électriques brancher seulement dans une prise de courant mise à la terre DIRECTIVES RELATIVES À LA MISE À LA TERRE Cet appareil est muni d une fiche semblable ...

Страница 17: ...egrés F C Voyant de maintien de la température Bouton de maintien de la température Pour maintenir la température programmée à 2 C bouton bouton minuterie de départ Indicateur du niveau d eau à l intérieur de la bouilloire du côté de la poignée Poignée Couvercle Bec verseur Tension nominale 120 V 60 Hz Courant nominal 8 3 A Puissance d entrée nominale 1000 W Capacité maximale 1 0 l 33 8 oz liq Bas...

Страница 18: ...r le cordon d ali mentation dans la prise de courant murale standard ill C 5 Presser fermement la bouilloire sur la base et appuyer sur le bouton marche arrêt Le voyant d alimentation s allume L afficheur fait clignoter la température programmée pendant 3 secondes ill D La température sélectionnée par défaut par le fabri cant est 85 C 185 F PRÉPARER LA BOUILLOIRE POUR LA PREMIÈRE UTILISATION 1 Rem...

Страница 19: ...difier la température désirée Durant le cycle de chauffage l afficheur DEL indique la température de l eau en temps réel Lorsque la température programmée est atteinte l élément chauffant s éteint mais l afficheur continue d indiquer la température pendant une heure lorsque la bouilloire est sur la base Si la bouilloire est enlevée de la base durant le processus de chauffage l élément chauffant et...

Страница 20: ...avoir retourné la bouilloire à la base l af ficheur affiche la température actuelle de l eau pendant 7 minutes puis l appareil s éteint UTILISATEURS EN HAUTES ALTITUDES L eau bout à des températures plus basses dans les hautes altitudes Utiliser le graphique ci dessous pour programmer la température de votre bouilloire CARACTÉRISTIQUE DE LA MINUTERIE Remarque lorsque vous soulevez la bouilloire l ...

Страница 21: ...g 88 C 190 F Thé noir tisane sachets de thé 98 C 208 F Cacao 88 C 190 F PERSONNALISATION DE TENSION DU COUVERCLE DE LA BOUILLOIRE S il vous semble que le couvercle de la bouilloire est trop difficile ou trop facile à retirer de la bouilloire suivez les étapes ci dessous pour ajuster la tension 1 Enlever le couvercle de la bouilloire 2 Utiliser un outil pour ajuster les trois onglets du couvercle d...

Страница 22: ...t visible à l intérieur de la bouilloire Remarque Le vinaigre peut ne pas détartrer adéquatement la bouilloire et il peut être difficile à rincer complètement Le vinaigre peut aussi laisser une odeur dans la bouilloire qui peut rendre désagréables les utilisations ul térieures Bonavita recommande l utilisation de Full Circle Descaler COMMENT UTILISER FULL CIRCLE DESCALER 1 Mélanger une bouteille o...

Страница 23: ...t dans lequel l infu sion se fera dans l eau chaude pour les préchauffer Assembler le cône de filtre le filtre et le contenant et vider le café moulu dans le filtre Lorsque l eau atteint la température programmée verser l eau dans le filtre Remuer légèrement le café pour qu il soit saturé d eau Nous vous recommandons de commencer au centre en faisant un mouvement circulaire et en allant pro gressi...

Страница 24: ...Printed in China Imprimé en Chine ...

Отзывы: