background image


User Manual 

10 of 26


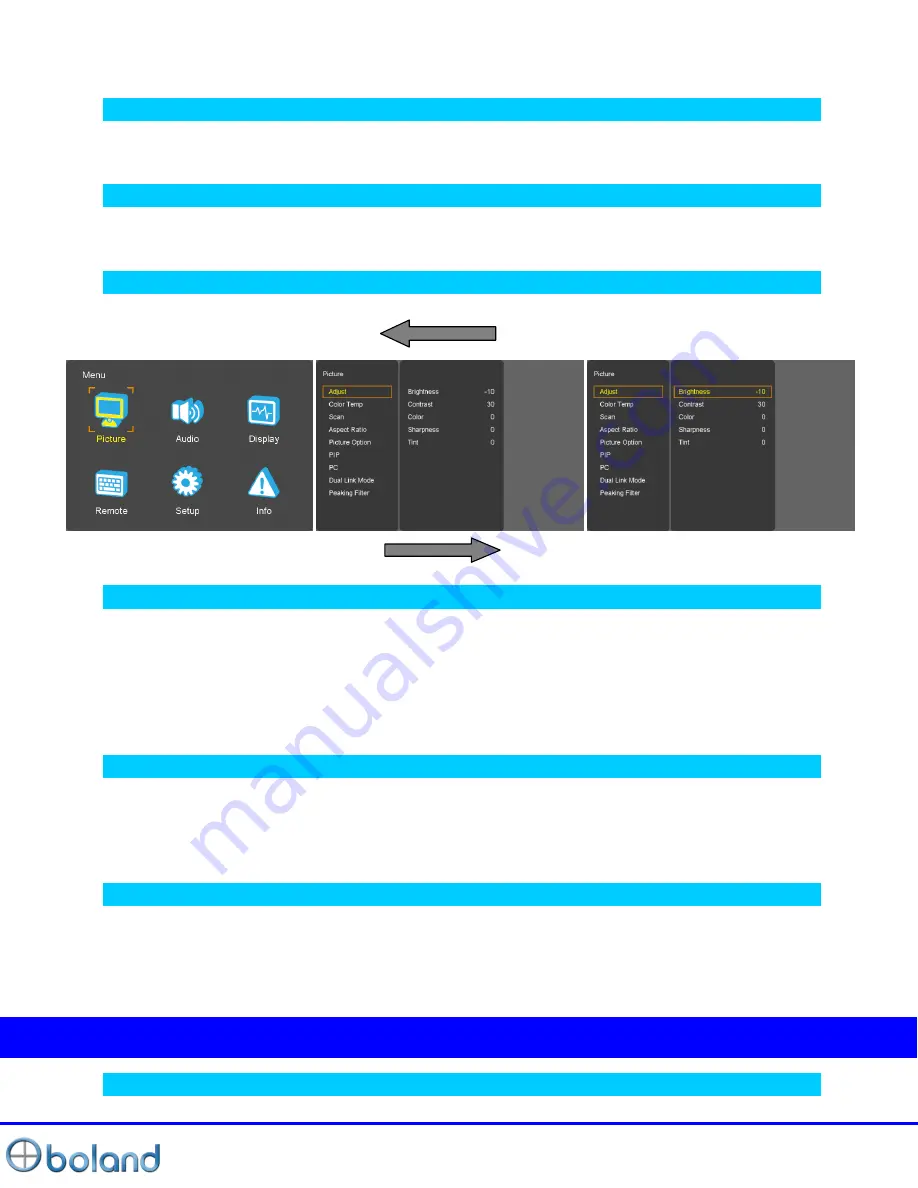
Most menus consist of three levels to set up the options, but some require greater depth for the variety of 
settings. If you press the 

MENU

 button, only the first and second level of the menu system will appear on 

the monitor screen. The third level can be displayed by pressing 

SEL/INPUT

. If a menu has more than 

three levels, the pop-up dialogue box will be displayed as the fourth or fifth level.


  To show and remove the Menu 

Press the 

MENU

 button to display the menu. A second press of the 

MENU

 button will take you back to 

monitor viewing. 

  To go to the next level   

Press 

SEL/INPUT

 button. 


  To go back to the previous level 

Press 

MENU

 button 


  Typical Menu Operation 

1. Press 

MENU

 button: The main menu will appear. 

2. Use 

UP/DOWN

 button to select the desired menu option (icon). 

3. While the desired menu option is selected, press 

SEL/INPUT

 to move to the second level. 

4. Use

 UP/DOWN

 button to select the second menu option. 

5. Press 

SEL/INPUT

 to move to the third level: Some menu options require additional steps. 

6. Press 

MENU

 to return to the previous menu to return to monitor viewing. 

Turning On the Monitor 

1. First, connect power cord correctly. At this moment, the monitor switches to standby or power on mode. 
In standby mode, in order to turn monitor on, press the 

ST-BY

 button. 

2. Select the viewing source by using 

SEL/INPUT 

button on Keypad in front of monitor 


Volume Adjustment 

1. Press the 

UP/DOWN

 button on Keypad. 

2. If you want to switch the sound off, press the 

FUNCTION (Audio mute)


button. 

3. You can cancel this function by pressing the 

FUNCTION (Audio mute)

 or volume control button. 


MENU Basic Operation 

  On Screen Menus Language Selection 

Содержание BVB Series

Страница 1: ...User Manual 1 of 26 High Definition Serial Digital Interface Multi Format LCD Monitor User Manual BVB Series ver 2 4 25 15...

Страница 2: ...26 CAUTION 3 FEATURES 5 CONTROLS INDICATORS AND CONNECTIONS 5 MENU BASIC OPERATION 9 PICTURE MENU 11 AUDIO MENU 15 DISPLAY MENU 16 GPI MENU 19 SETUP MENU 20 INFO MENU 22 INPUT SUPPORT MODE 23 MECHANI...

Страница 3: ...ting instructions should be retained for future reference Heed Warnings All warnings on the product and in the operating instructions should be adhered to Cleaning Disconnect the unit from the electri...

Страница 4: ...ning or removing covers may expose you to dangerous voltages or other hazards Refer all servicing to qualified service personnel If the Set does not operate properly switch it off and call your dealer...

Страница 5: ...Meter Display Lever Meter Size display selectable Small or Large Dual Link MODE 1080p 60 Compatible OPTION Closed Caption Analog Signal only CEA608 708 H V Delay Audio De embedder Internal Speaker He...

Страница 6: ...I F1 F2 I R UP BVB17 Rear SDI 1 OUT CVBS2 Y G Y I N CVBS3 Pb B C I N CVBS1 Pr R I N DVI H DMI RS 232 OUT RS 232 I N SDI 2 OUT SDI 2 I N SDI 1 I N CVBS1 Pr R OUT CVBS2 Y G Y OUT CVBS3 Pb B C OUT A UDI...

Страница 7: ...F2 I R UP BVB24 Rear SDI 1 OUT CVBS2 Y G Y I N CVBS3 Pb B C I N CVBS1 Pr R I N DVI H DMI RS 232 OUT RS 232 I N SDI 2 OUT SDI 2 I N SDI 1 I N CVBS1 Pr R OUT CVBS2 Y G Y OUT CVBS3 Pb B C OUT A UDI O OUT...

Страница 8: ...ine Select MENU Activates main OSD menu Navigates higher menu in main OSD menu Exits OSD menu DOWN Decreases sound volume of speaker Decreases values of user menu in main OSD menu Executes function by...

Страница 9: ...2 Y G Y In CVBS 2 Component Y GBR SOG sync G S Video Y Input CVBS3 Pb B C In CVBS 3 Component Pb GBR SOG sync B S Video C Input AUDIO IN DVI I Component GBR CVBS1 2 3 S Video Sound Input AUDIO OUT AUD...

Страница 10: ...ear 2 Use UP DOWN button to select the desired menu option icon 3 While the desired menu option is selected press SEL INPUT to move to the second level 4 Use UP DOWN button to select the second menu o...

Страница 11: ...se German French Italian How to Select Video Source by OSD 1 Press the SET INPUT button and then UP DOWN button to select each video source 2 Press the SET INPUT button to go to desired video source 3...

Страница 12: ...Offset value directly User User setting RGB gain value VAR 3200K 11000K Often used value 11000K 9300K 6500K 5400K 3200K and 3D LUT Calibration value D65 6504K C 6774K D Cinema 6302K Color Space Native...

Страница 13: ...ler inter Field Field Merge function on off Gamma Select Gamma Level Select 0 8 3 0 Back Light Inverter dimming Level select 0 100 Color Only Mono Color Blue only Function on off Mono color For select...

Страница 14: ...BLE SDI 1 SDI 2 HDMI DVI PC_YPbPr_RGB_YC_CVBS SDI 1 X O O O SDI 2 O X O O HDMI DVI O O X O PC_YPbPr_RGB_YC_CVBS O O O X Aspect Ratio Choose PIP size of Small POP1 POP2 Position Choose the pip position...

Страница 15: ...ative PC video timings Auto 1024x 1280x 1360x 1366x Dual Link Mode SDI only Dual Link Mode select Auto Off RGB444 YCbCr444 YCbCr422 Peaking Filter Peaking Filter Peaking Filter On Off Peaking Color Re...

Страница 16: ...ut Channel source select Channel1 16 Channel1 2 3 4 5 6 7 8 9 10 11 12 13 14 15 16 off SD2 Gr Ch Audio output Group source select Group1 2 3 4 Audio output Channel source select Channel1 16 Channel1 2...

Страница 17: ...er wants Marker size setting Below panel size Waveform Enable Off Y VT Y Cb Cr G B R Double Key Format Press the W F button to display the WAVEFORM Mode Rotation Y VC Y Cb Cr G B R Double Line Select...

Страница 18: ...TC Line Auto Line 1 31 Caption Caption 608 Line21 608 ANC 608 Transcoded 708 mode Select 608 Caption 608 Caption mode Select C C1 C C2 C C3 C C4 TEXT1 TEXT2 TEXT3 TEXT4 OFF 708 Caption 708 Service mod...

Страница 19: ...28_0_Transpareut Input I D Input ID source Message display ID Style select Input Format Custom Label Input Label Display user made name instead of input source name on source OSD and message OSD Video...

Страница 20: ...el Aspect Sets the aspect ratio of the images Waveform Activates WAVRFORM Vector Scope SDI Only Aspect Marker Marker size Select Area Marker Area Marker size Select Center Marker Displays the center m...

Страница 21: ...rea Marker Select PIP func Input PIP func input Select Zoom Zoom function on off Gamma Select Gamma Select WFM Line Select WFM Line select function on off Control Front LED Front LED on off Local Enab...

Страница 22: ...Select gray level on besides display picture 0 7 Power Save DPMS Display Power Management Signaling Power Save Mode Fan Control Fan Control Internal Fan Controls driving option by temperature sensor A...

Страница 23: ...720P 1080i 1080p SOG sync support ANALOG Component DTV DVD 1080p 1080i 720P 480i 576i 480P 576P CVBS NTSC PAL SECAM Support Timings SDI Input SMPTE 428 1M 2048x1080P 24 25 SMPTE 425M 3G 1920x1080P 50...

Страница 24: ...0 75 029 78 75 1024x768 68 677 84 997 94 5 1024x768 72 810 90 0 100 187 1152x864 53 700 60 0 81 624 1152x864 62 932 69 924 96 663 1152x864 67 500 75 0 104 993 1152x870 68 681 75 062 100 0 1152x900 61...

Страница 25: ...of 26 1280x720 37 500 50 0 60 466 1920x1080 33 750 60 0 74 25 Interlaced 1920x1080 28 125 50 0 70 723 Interlaced 1920x1080 31 250 50 0 72 000 Interlaced 1920x1080 67 5 60 148 5 Progressive Mechanical...

Страница 26: ...User Manual 26 of 26 BVB24...

Отзывы: