background image

14

                                                                                        Owner’s  Manual


SPEED ADJUSTMENTS


There are two ways to adjust speed during workout. FAST and SLOW will adjust speed 

by increments of 0.1Km/H or you may hold the button to ramp up or down. If the speed 

adjustment increment is large, it is easier to use the direct speed buttons, which function 

as direct speed control buttons during the workout. There are three direct speed buttons,   

WALK (4 km/H), JOG (8Km/H), RUN (12Km/H)   


ELEVATION ADJUSTMENTS


For safety reasons, elevation is designed to be manually adjusted only. At no time will the 

treadmill automatically adjust elevation except during one of the following three programs: 

elevation program, METS program, HRC control program. 


Elevation may be adjusted even while the running belt is not moving. However, during 

the program setup mode, elevation will not be adjustable. 


There are two ways to adjust elevation during workout by using the UP and DOWN on 

the console or the direct elevation buttons on the console 


PULSE FUNCTION 


This treadmill (T561 only) features wireless heart rate monitoring, the most advanced 

technology to date for accurate monitoring of your heartbeat. For convenience, this 

treadmill is also designed to pick up heart rate info via the contact sensors located on the 

horizontal handlebar. Treadmill will look for wireless pulse signal first. If no wireless pulse 

signal is present, then treadmill will look for the signal from contact sensors. 


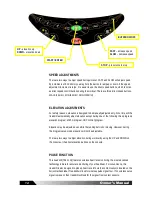
STOP – press twice to stop 

UP – elevation up 

DOWN – elevation down 

FAST – increase speed 

SLOW – decrease speed 


START / ENTER 

BUZZER ON/OFF 

Содержание PDG0002 - T560

Страница 1: ...T560 PDG0003 T561 T56X Foldable Treadmill Owner s Manual Retain this owner s manual for future reference Retain this owner s manual for future reference Read and follow all instructions in this owner...

Страница 2: ...you feel like a rest during the workout Running belt always aligned in the center Safety key treadmill will not activate unless the safety key is secured in place Running belt adjustment to adjust bel...

Страница 3: ...s assisted lift makes folding and unfolding of the deck safe and easy The folding lock release mechanism is located at the end of the deck so that when folded it s out of reach to small children Wirel...

Страница 4: ...e Base Use Dedicated Circuit IV HANDLING YOUR TREADMILL 10 Folding and Unfolding the Treadmill Moving the Treadmill V OPERATING THE TREADMILL 11 Turn Power on Safety Tether Key and Clip Getting on and...

Страница 5: ...4 Owner s Manual Error Codes Trouble Shooting Guide X WARRANTY 27...

Страница 6: ...ther the product is properly grounded Do not modify the plug provided with the product if it will not fit the outlet have a proper outlet installed by a qualified electrician ELECTRICAL SAFETY To redu...

Страница 7: ...any opening ONLY one person may use the treadmill at a time NEVER activate the speed when someone else is standing on the treadmill APPROPRIATE ATTIRE Always wear appropriate clothing DO NOT wear clo...

Страница 8: ...1 For operating treadmill Power cable 1 For operating treadmill 8 B A 4 D 6 Description Qty When to use HARDWARE KIT CONTENT Screw dome M8x55mm Step 1 Washer star OD15xID8 4x0 8T Step 1 x 4pcs Step 2...

Страница 9: ...pright post to base frame with two M8x55mm dome screws A and two star washers B on both sides 3 Then secure the tube with one M8x15mm dome screw C and one curve washer D on each side 4 Tighten the six...

Страница 10: ...with six M8x15 bolts C and two star washers B and four curve washers D Be careful not to pinch or damage the cables 2 Tighten all bolts as tightly as possible 3 Do not pull on the cable L Carefully co...

Страница 11: ...hat you can easily get on and off the treadmill without getting trapped during an emergency Occasionally after extended use you will find a fine black dust below your treadmill This is normal wear and...

Страница 12: ...he deck gets closer to the ground it will drop at a faster rate and feel heavier Please handle with caution MOVING THE TREADMILL This treadmill is easy to move around safely To move the treadmill 1 Tu...

Страница 13: ...e treadmill Try to use the handlebars while getting on or off While you are preparing to use the treadmill do not stand on the running belt Straddle the running belt by placing your feet on both side...

Страница 14: ...240 1 ELEVATION XX 0 12 1 DISTANCE Miles XX XX 0 01 99 99 0 01 DISTANCE Km XX XX 0 01 99 99 0 01 SPEED Miles H XX X 0 6 10 0 0 1 SPEED Km H XX X 1 0 16 0 0 1 TIME XX XX 00 01 99 59 00 01 CALORIES XXX...

Страница 15: ...rogram Elevation may be adjusted even while the running belt is not moving However during the program setup mode elevation will not be adjustable There are two ways to adjust elevation during workout...

Страница 16: ...in treadmill console can make interference Therefore when using HRC program to measure the heartbeat we recommend you put on chest strap and adjust volume of your MP3 CD Player to medium level PAUSE F...

Страница 17: ...ress both the STOP and SLOW buttons together 2 LCD window will display U 16 Metric or U 10 English 3 You can select U 16 or U 10 using START ENTER button 4 Push STOP button to confirm Once you have be...

Страница 18: ...You may increase decrease speed or elevation at any time during your workout To end workout simply press the STOP button to stop the treadmill During your workout time will count up 1 Turn power on 2...

Страница 19: ...he STOP button to stop the treadmill During workout time counts down from target workout time 1 Turn power on 2 Check safety key is secured to treadmill and clip secured to user clothing 3 Press to se...

Страница 20: ...dmill During workout time counts down from target workout time 1 Turn power on 2 Check safety key secured to treadmill and clip secured to user clothing 3 Press to select P4 P5 or P6 to set up the spe...

Страница 21: ...clothing 3 Press to select P7 P8 or P9 to set up the METs program 4 Press START ENTER to confirm 5 Press buttons to input workout duration 6 Press START ENTER to confirm 7 Press buttons to input max...

Страница 22: ...able to adjust speed or elevation To use the heart rate control programs user must wear the wireless transmitter chest strap Signals from contact heart rate sensors may not be used in heart rate contr...

Страница 23: ...22 Owner s Manual NOTE...

Страница 24: ...is most often recommended that you exercise at least three to four times a week to maintain cardiovascular fitness If you have other goals such as weight loss or fat loss you will achieve your goal f...

Страница 25: ...R TARGET HEART RATE ZONE The most common method for calculating your target heart rate is to find your maximum heart rate The standard formula is 220 your age maximum heart rate You DO NOT want to wor...

Страница 26: ...r loose clothing neckties or loose jewelry while making this adjustment 2 NEVER turn the bolt more than 1 4 turn at a time 3 Always tighten one side and loosen the other to prevent over tightening or...

Страница 27: ...ed on the intensity of the treadmill use level To check the lubrication level simply lift the running belt and put your hand as far into the center of the belt as you can reach If your hand shows sign...

Страница 28: ...rn on many times to reset the treadmill check the communication cable between console and motor controller First make sure the connections are good and that the cable is not pinched or damaged If defe...

Страница 29: ...arts must be directed to our Freecall 1800 465 070 For efficient processing of your enquiry please have relevant date of purchase retailer name you purchased the item from and the brand on the product...

Отзывы: