background image

6

1

2

3

4

5

6

7

8

9

10

11

12

13

20

29

29

20

12

32

32

22

22

53

12

53

15L

16R

A

B

B

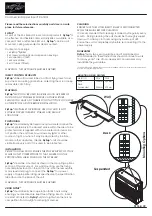
STEP  3  Guide Rod Assembly

1. Loosen the 5/16" X 1/4" Set Screws (53) on the ringlet welded to the Base

Bearing Housings (15L, 16R) and insert the two Vertical Guide Rods (12).  Slide
the Safety Spotter (22), then the 1" Spring (32), then the 1" ID Big Washer (29)
and finally, the Vertical Bearing Housing (20) over the top of Vertical Guide Rod
(12) as shown.  Make sure the Handle of the Safety Spotter (22) is oriented
toward the inside of the machine (as shown in A and B).

FRONT

REAR

Содержание Jones Club Machine

Страница 1: ...your Product Registration Info here Serial Number __________________________ Purchase Date __________________________ Dealer Name ___________________________ Register your product at www bodycraft com Click the link at the top of the page 514 ...

Страница 2: ......

Страница 3: ... program consult your physician This is especially important for individuals over the age of 35 or persons with pre existing health problems Recreation Supply Inc assumes no responsibility for personal injury or property damage sustained by or through use of this product 1 This product must be assembled on a flat level surface to assure its proper function 2 Clean pads and frame on a regular basis...

Страница 4: ...6 56 37 55 59 55 25 34 50 31 30 27 55 49 51 51 60 60 60 60 52 53 23 54 54 48 48 54 58 64 28 26 25 56 31 64 50 34 4 4 26 44 43 43 54 37 59 24 65 64 27 56 49 37 55 20 23 23 23 22 20 55 46 37 30 63 46 36 55 8 47 55 59 52 51 39 33 41 53 53 3 40 57 38 38 57 3 42 9R 5 8 54 54 53 53 54 54 14 17L 18R 43A 42A 43A 43A 43A 42A 43A 43A 43A 10L 16R 46A 39 35 13 43 43 43 54 54 43 43 54 43 54 54 54 1 51 58 58 58...

Страница 5: ... Bar 19 X 13 X 15L CONNECT ROD pre assembled in Safety Spotter 1 ID WASHER R10 BEARING 38mm FOAM COVER BINDER pre assembled in Foam Pad 1 SPRING 2 SPRING 2 OLYMPIC SPRING CLIP RUBBER STOPPER pre assembled at Base Housing POP PIN pre assembled at Base Housing 28mm BEARING pre assembled at factory 25mm BEARING pre assembled at factory 30mm BEARING pre assembled at Base Housing SQUARE BASE FOR BAR RA...

Страница 6: ... Assembly requirestwo people To easetheassembly process do not tighten boltsuntil instructed Assembleon a flat level floor 1 Slide an Upright Frame 3 onto each end of the Left and Right Base Frame 1 and attach the two Base Connectors 4 using three 1 2 X 4 Hex Bolts 43 six 1 2 Washers 54 and three 1 2 Nylon Nuts 58 at each corner ...

Страница 7: ... secure using one 3 8 X 3 Hex Bolt 47 two 3 8 Washers 55 and one 3 8 Nylon Nut 59 in each Tighten these bolts now 2 Insert a Bar Rack Support 11 into each Bar Rack 9R 10L Slide a 2 Spring 33 onto the bottom of each Bar Rack Support 11 and then attach this assembly to the Square Base for Bar Rack 40 using one 3 8 X 2 3 4 Hex Bolt 48 two 3 8 Washers 55 and one 3 8 Nylon Nut 59 Be sure to verify prop...

Страница 8: ...d to the Base Bearing Housings 15L 16R and insert the two Vertical Guide Rods 12 Slide the Safety Spotter 22 then the 1 Spring 32 then the 1 ID Big Washer 29 and finally the Vertical Bearing Housing 20 over the top of Vertical Guide Rod 12 as shown Make sure the Handle of the Safety Spotter 22 is oriented toward the inside of the machine as shown in A and B FRONT REAR ...

Страница 9: ... over the top of the Vertical Guide Rod 12 and Upright Frame 3 Secure the T op Frame 2 to the T op Bearing Housing 17L 18R using two 1 2 X 3 1 4 Hex Bolts 45 four 1 2 Washers 54 and two 1 2 Nylon Nuts 58 Repeat for the other side 2 Attach the Chin Up Bar 6 Rear T op Frame 7 and the two Logo Panels 8 to the T op Frames 2 using four 1 2 X 4 1 4 Hex Bolts 42A eight 1 2 X 3 3 4 Hex Bolt 43A sixteen 1 ...

Страница 10: ...of the Weight Bar 19 and secure with a 5 8 X 1 1 2 Inner Hex Bolt 50 Use the 2 Olympic Spring Clip 34 to hold weights in place during use 3 Attach the Top Bearing Housing Connector 5 to the Right and Left Top Guide Rod Holders 17L 18R using two 1 2 X 3 1 4 Hex Bolts 45 four 1 2 Washers 54 and two 1 2 Nylon Nuts 58 Tighten all bolts Start at Baseand work toward top If horizontal movement isnot comp...

Страница 11: ...by rotating thebar toward thechromed hooks Becertain that both hooksarefully engaged before removing your handsfrom thelifting bar Inspect themachinebeforeevery use Do NOT use themachineif you find any irregularities Besureto register your warranty by submitting a completed warranty registration form Thisproduct must beassembled on aflat level surface to assureitsproper function If unsureabout the...

Страница 12: ...10 ...

Отзывы: