Body Solid S2MP Скачать руководство пользователя страница 17

S 2 M P   P a r t s   L i s t / I l l u s t r a t i o n

PART #77--SHAFT PIN, 3 PCS

ij;

PART #79--END CAP, 8 PCS

PART #83--RUBBER DONUT

3&6

3$57

SHAFT COLLAR

3&6

PART #78--SHAFT PIN

3&6

ij;

3$57

REGULATION BUSHING

3&6

ij;

3$57

NYLON BUSHING

3&6

ij;

3$57

LONGER HANDLE SLEEVE

3&6

ij;ij;

Содержание S2MP

Страница 1: ...O W N E R S M A N U A L ...

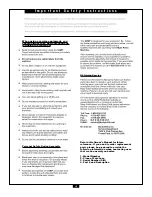
Страница 2: ...W a r n i n g S a f e t y M a i n t e n a n c e DWRULE 4 ...

Страница 3: ...T a b l e o f C o n t e n t s ...

Страница 4: ...m m m m m m m m m m m m Personal Safety During Assembly m m m Obtaining Service Retain this Owner s Manual for future reference If you need to order replacement parts please be prepared to provide the following information when contacting us so that we can assist you better 1 Model Number 2 Place of Purchase 3 Serial Number S N 4 Part and Description ...

Страница 5: ...P r e p a r a t i o n Required Tools m m m m m m Installation Requirements Assembly Tips ...

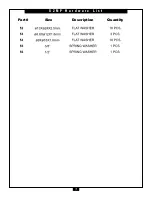
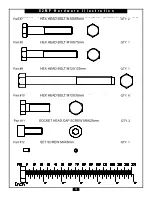
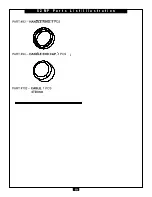
Страница 6: ...Part Size Description Quantity S 2 M P H a r d w a r e L i s t ...

Страница 7: ...Part Size Description Quantity S 2 M P H a r d w a r e L i s t ...

Страница 8: ...REW M10X25 FULL THREAD NL QTY 8 PART 2 HEX HEAD BOLT M10X30 FULL THREAD QTY 6 PART 5 HEX HEAD BOLT M10X50 PARTIAL THREAD QTY 8 PART 3 HEX HEAD BOLT M10X35 PARTIAL THREAD QTY 1 PART 4 HEX HEAD BOLT M10X45 PARTIAL THREAD QTY 1 PART 6 HEX HEAD BOLT M10X60 PARTIAL THREAD QTY 1 ...

Страница 9: ... PART 7 HEX HEAD BOLT M10X65 PARTIAL THREAD NL QTY PART 8 HEX HEAD BOLT M10X75 PARTIAL THREAD NL QTY 1 PART 10 HEX HEAD BOLT M12X35 PARTIAL THREAD QTY 8 PART 11 SOCKET HRAD CAP SCREW M8X25 FULL THREAD QTY 2 PART 12 ALLEN SCREW M4X8 FULL THREAD QTY 1 ...

Страница 10: ...AD QTY 3 PART 13 ALLEN SCREW M6X6 FULL THREAD QTY 4 PART 14 ALLEN SCREW M8X8 FULL THREAD QTY 4 3 57 6 7 2 7 ij 3 57 7 5 QTY 4 PART 17 BUTTON HEAD CAP SCREW M8X25 FULL THREAD QTY 4 PART 18 SOCKET HRAD CAP SCREW 3 8 16X50 8 FULL THREAD QTY PART 19 ALLEN SCREW 10 32 3 2 FULL THREAD QTY 16 ...

Страница 11: ...l u s t r a t i o n PART 41 NYLON LOCK NUT M10 QTY 11 PART 42 NYLON LOCK NUT M12 QTY 9 PART 44 NYLON LOCK NUT M8 QTY 10 PART 45 HEX NUT 1 2 13X11 QTY 1 PART 40 FLANGE NUT M16 QTY 1 ij ij ij ij PART 50 SPRING WASHER ij10 QTY 7 ij ij ij ij ij ...

Страница 12: ... s t r a t i o n PART 51 FLAT WASHER ij11Xij20X2 QTY 31 PART 52 FLAT WASHER ij13Xij24X2 5 QTY 18 PART 53 FLAT WASHER ij6 6Xij12X1 6 QTY 3 PART 54 FLAT WASHER ij9Xij16X1 6 QTY 10 PART 56 SPRING WASHER 1 2 QTY 1 PART 55 SPRING WASHER 3 8 QTY 1 ...

Страница 13: ...S 2 M P P a r t s L i s t I l l u s t r a t i o n PART E FRAME E 1 PCS PART F FRAME F 1 PCS PART G FRAME G 1 PCS PART H FRAME H 1 PCS ...

Страница 14: ...E G PART 60 TOP PLATE 1 PCS 1 1 1162 7X286 6X2 1212 7X286 6X2 ij S 2 M P P a r t s L i s t I l l u s t r a t i o n ...

Страница 15: ... u s t r a t i o n PART 63 CABLE LOCK 1 PCS PART 61 SELECTOR ROD 1 PCS PART 62 TOP PLATE BOLT 1 PCS PART 64 SEAT PAD 1 PCS PART 65 BACK PAD 1 PCS PART 66 SHORTER POP PIN 1 PCS PART 68 LONGER POP PIN 1 PCS PART 67 SELECTOR PLATE 1 PCS ...

Страница 16: ... t I l l u s t r a t i o n ij ij 3 57 FOOT PAD 4 PCS 3 57 SELECTOR PIN 3 6 3 57 BEARING 3 6 3 57 BUSHING 3 6 3 57 ROLLING WHEEL 4 PCS 3 57 NYLON BUSHING 3 6 ij ij 3 57 REGULATION BUSHING 4 PCS 3 57 LONGER HANDLE SLEEVE 3 6 ij ij ij ...

Страница 17: ...l l u s t r a t i o n PART 77 SHAFT PIN 3 PCS ij PART 79 END CAP 8 PCS PART 83 RUBBER DONUT 3 6 3 57 SHAFT COLLAR 3 6 PART 78 SHAFT PIN 3 6 ij 3 57 REGULATION BUSHING 3 6 ij 3 57 NYLON BUSHING 3 6 ij 3 57 LONGER HANDLE SLEEVE 3 6 ij ij ...

Страница 18: ...l u s t r a t i o n PART 91 ADJUSTING PAD 1 PCS PART 85 PLASTIC END CAP 2 PCS PART 87 END CAP 1 PCS PART 90 PULLEYS 7 PCS PART 86 PLASTIC END CAP 1 PCS Ƒ Ƒ PART 88 BUSHING 2 PCS ij ij PART 89 BUSHING 6 PCS ij ij PART 92 RUBBER PAD 1 PCS ...

Страница 19: ...S 2 M P P a r t s L i s t I l l u s t r a t i o n PART 94 HANDLE END CAP 4 PCS 4855mm PART 102 CABLE 1 PCS PART 93 HANDLE RING 4 PCS ...

Страница 20: ... in the sequence they are presented NOTE Finger tighten all hardware in this step DO NOT wrench tighten unless instructed Some components may be pre assembled Nylon lock nuts will not fully screw onto bolts they must be wrench tighten to fully go on ...

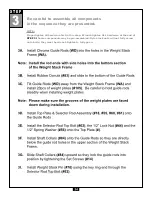
Страница 21: ...S T E P 1 1 1 H G B 79 77 79 10 52 42 42 10 52 A ...

Страница 22: ...sequence they are presented NOTE Finger tighten all hardware first in this step Wrench tighten ALL hardware at the end of STEP 2A Some components may be pre assembled Nylon lock nuts will not fully screw onto bolts they must be wrench tighten to fully go on ...

Страница 23: ...S T E P 2 WA 42 52 52 52 B 10 52 10 ...

Страница 24: ...sequence they are presented NOTE Finger tighten all hardware first in this step Wrench tighten ALL hardware at the end of STEP 3I Some components may be pre assembled Nylon lock nuts will not fully screw onto bolts they must be wrench tighten to fully go on ...

Страница 25: ...S T E P 3 84 14 14 84 WD WD 62 44 56 61 70 105 83 83 WA 18 55 60 ...

Страница 26: ...sequence they are presented NOTE Finger tighten all hardware first in this step Wrench tighten ALL hardware at the end of STEP 4E Some components may be pre assembled Nylon lock nuts will not fully screw onto bolts they must be wrench tighten to fully go on ...

Страница 27: ...S T E P 4 I 41 51 4 51 5 51 41 51 90 41 51 90 51 5 5 51 90 51 41 5 51 90 51 41 41 51 90 5 51 41 51 51 51 5 51 90 90 102 WA G A 61 60 18 55 I 1 5 75 87 G 62 63 41 3 12 ...

Страница 28: ...all components in the sequence they are presented NOTE Wrench tighten ALL hardware at the end of Each Step Some components may be pre as sembled Nylon lock nuts will not fully screw onto bolts they must be wrench tighten to fully go on ...

Страница 29: ...S T E P 5 15 WF WG 15 17 53 53 54 54 WC WB 17 54 54 54 43 54 43 54 54 43 WE WA 53 ...

Страница 30: ...sequence they are presented NOTE Finger tighten all hardware first in this step Wrench tighten ALL hardware at the end of STEP 6B Some components may be pre assembled Nylon lock nuts will not fully screw onto bolts they must be wrench tighten to fully go on ...

Страница 31: ...S T E P 6 65 F 64 C 51 50 2 2 50 51 2 50 51 50 51 5 50 51 51 50 2 51 50 2 ...

Страница 32: ...N o t e s ...

Страница 33: ...S 2 M P E x p l o d e d V i e w ...

Страница 34: ...erved Body Solid reserves the right to change design and specifications when we feel it will improve the product Body Solid machines maintain several patented and patent pending features and designs All rights reserved on all design patents and utility patents ...

Отзывы: