
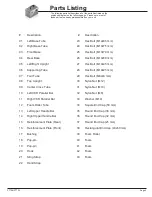

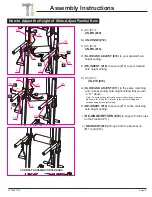


Assembly Instructions
PT728/PT730
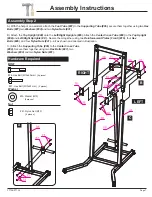
B.) Align and attach the
Rear Base (#04)
to the
Left Base Tube
(#01)
as illustrated in the diagram. Insert two
Hex Bolts (#25)
through two
Washers (#33)
followed by the
Left Base Tube (#01)
and
Rear Base (#04)
;
secure them together using two
Nylon Nuts
(#31).
Page 6
NOTE:
C.) Align and attach the
Left Upright (#05)
to the
Left Base Tube
(#01).
Next, align and attach the
Front Base (#03)
to the
Left Base
Tube (#01)
as illustrated in the diagram. Insert two
Hex Bolts (#24)
through the
Left Upright (#05)
followed by the
Left Base Tube
(#01)
and
Front Base (#03)
secure them together using two
Nylon
Nuts (#31).
Repeat STEP B and STEP C on the other side.
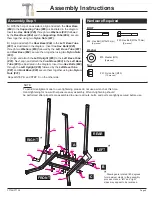
Assembly Step 1
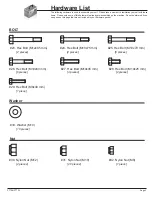
Hardware Required
A
A.) With the help of an assistant, align and attach the
Rear Base
(#04)
to the
Supporting Tube (#06)
as illustrated in the diagram.
Insert two
Hex Bolts (#25)
through two
Washers (#33)
followed
by the
Rear Base (#04)
and the
Supporting Tube (#06);
secure
them together using two
Nylon Nuts (#31).
#33. Washer (M10)
[6 pieces]
Nut
BOLT
#24. Hex Bolt (M10x75 mm)
[4 pieces]
#25. Hex Bolt (M10x70 mm)
[6 pieces]
Washer
#31. Nylon Nut (M10)
[10 pieces]
To avoid misalignment due to over-tightening, please do not use a wrench at this time.
Hand-tightening for now will help ensure easy assembly. Wrench-tightening should
be performed after all parts are assembled to ensure all nuts, bolts, and parts are tightly secured before use.
C
B
LEFT
RIGHT
FRONT
REAR
*
*
*
Drawings are rotated 180 degrees
for maximum clarity in the assembly
process. Hence, “left” and “right”
sides may appear to be reversed.
A


