background image

Drop-In Installation:

www.BOCCHIUSA.com

6

•  Locate the drop-in template in the sink box.
•  Cut along the appropriate line for your sink and installation. NOTE: Keep the inside of the template.
•  Place the template on the countertop and fix it in place using the painter’s tape.
•  Trace the template with a pencil or marker to draw the mark where the sink will set. Remove the template.
•  Make certain there is adequate clearance for the faucet and backsplash. 

NOTE: the center faucet hole is 

predrilled on the sink and will be in a fixed position once installed. 

•  Add painter’s tape around the outside edge of the marked line for protection of the countertop before 

starting your cut. 

•  Using the power drill, drill a starting hole for the saw in the area of the countertop to be cut out.
•  Carefully cut out the needed section using the appropriate type of saw for your countertops.

continued on next page

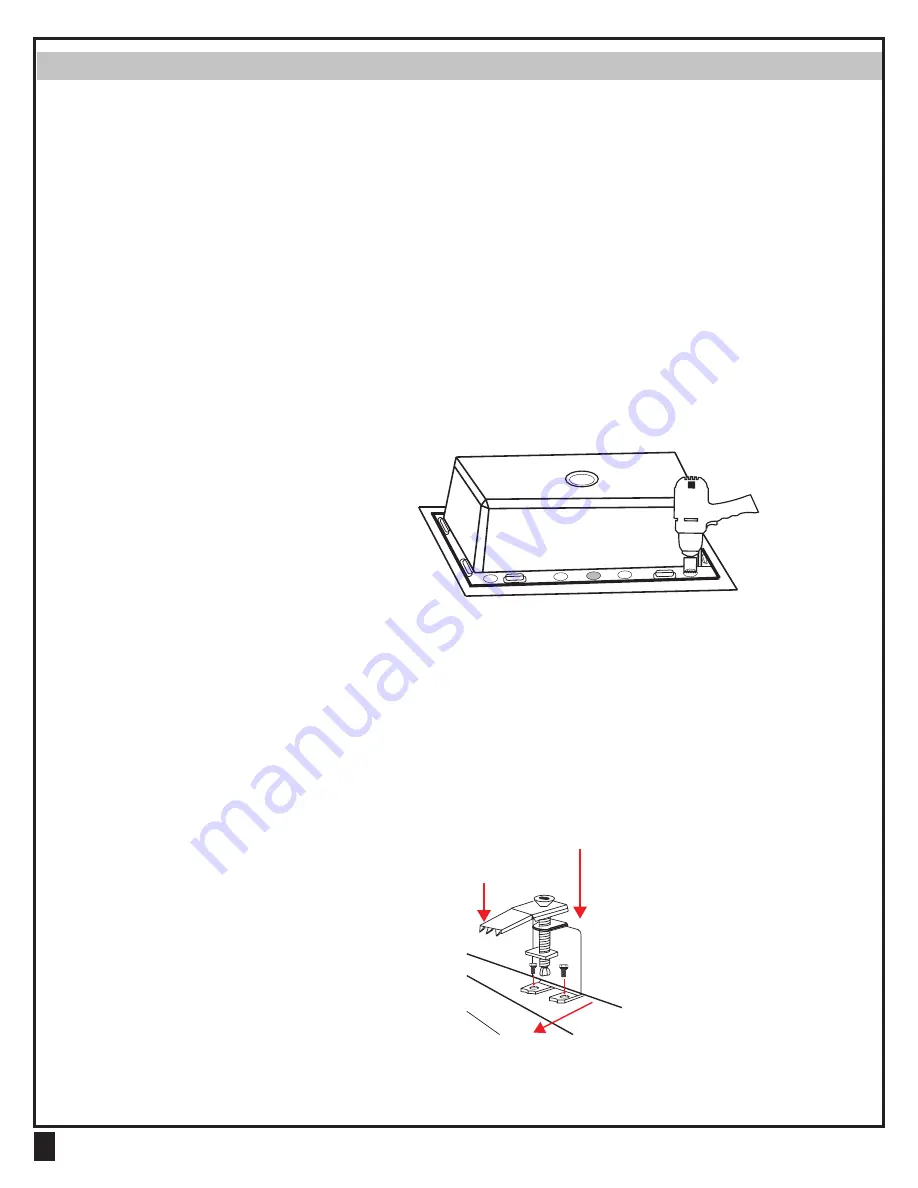
•  Determine the location of the faucet and add additional faucet holes in the sink if needed. The underside of 

the sink has pre-scored holes to mark the locations where these should be drilled if necessary. 

•  If drilling extra holes, carefully place the 

sink upside down on a suitable and stable 

surface. Use a 1 3/8 inch diamond hole saw 

to drill in the pre-scored area(s) where extra 

holes are needed.

•  Depending on your selected faucets, you may prefer to install the faucets and strainers now, before 

placing the sink into the countertop. You may do so now following the instructions provided by the faucet 

manufacturer. 

•  Clean and dry the surface around the opening of sink.
•  Test to make sure that the sink fits in the opening.
•  Carefully, turn the sink upside down and install the mounting brackets provided for a drop-in installation. 

Set the bracket so that the back wall of the bracket is towards the outside edge of the sink and the toes of 

the bracket feet are faced towards the center of the sink. Tighten only the two small screws at this time.

back wall of bracket faced 

towards the outside of the 

sink

“toes” of the bracket 

should face towards 

the sink bowl

Claw grip of the bracket should swing to the center, 

or parallel to the sink edge, when dropping the sink 

into position. Then swing away from the bowl’s center, 

towards the outside, to grip the underside of the counter, 

during the final steps of installation.

Содержание 1602-0126 Series

Страница 1: ...www BOCCHIUSA com 1 INSTALLATION INSTRUCTIONS GRANITE KITCHEN SINKS DUAL MOUNT DROP IN or UNDERMOUNT Models 1602 XXX 0126 1604 XXX 0126 1606 XXX 0126 1608 XXX 0126...

Страница 2: ...e drain and supply tubing Replace if necessary Prior to installation unpack the new sink and inspect for damage Carefully return the sink to its protective carton until you are ready to install it Due...

Страница 3: ...by your faucet manufacturer to install the faucet A template for the sink is included for easy cutout planning NOTE It is important to locate the correct line on the cutout for your model AND your ins...

Страница 4: ...will install the sink Make sure there is enough clearance for the faucet and backsplash With the template in the correct spot for installation use painter s tape to secure it to the countertop Trace...

Страница 5: ...y place the sink upside down on a suitable and stable surface Use a 1 3 8 inch diamond hole saw to drill in the pre scored area s where extra holes are needed Apply silicone sealant to the sink ledge...

Страница 6: ...ere these should be drilled if necessary If drilling extra holes carefully place the sink upside down on a suitable and stable surface Use a 1 3 8 inch diamond hole saw to drill in the pre scored area...

Страница 7: ...claws of the bracket face away from the sink s center and towards the outside edge Tighten the long center screws of each bracket so that the claws tightly grip the underside of the countertop NOTE DO...

Страница 8: ...pectez le drain et le tube d alimentation Remplacez si n cessaire Avant l installation d ballez le nouvel vier et v rifiez s il n y a pas de dommages Retournez soigneusement l vier son carton de prote...

Страница 9: ...r installer le robinet Un mod le pour l vier est inclus pour faciliter la planification des d coupes REMARQUE Il est important de localiser la ligne correcte sur la d coupe pour votre mod le ET votre...

Страница 10: ...l emplacement o vous allez installer l vier Assurez vous qu il y a suffisamment de d gagement pour le robinet et le dosseret Avec le mod le au bon endroit pour l installation utilisez du ruban adh si...

Страница 11: ...soigneusement l vier l envers sur une surface appropri e et stable Utilisez une scie trou diamant de 1 3 8 pouce pour forer dans la ou les zones pr not es o des trous suppl mentaires sont n cessaires...

Страница 12: ...vent tre for s si n cessaire Si vous percez des trous suppl mentaires placez soigneusement l vier l envers sur une surface appropri e et stable Utilisez une scie trou diamant de 1 3 8 pouce pour forer...

Страница 13: ...du support soient loign es du centre de l vier et vers le bord ext rieur Serrez les longues vis centrale de chaque support afin que les griffes saisissent fermement le dessous du comptoir REMARQUE NE...

Страница 14: ...ministro Reempl celo si es necesario Antes de la instalaci n desempaquete el nuevo fregadero e inspeccione si hay da os Devuelva cuidadosamente el fregadero a su caja protectora hasta que est listo pa...

Страница 15: ...instalar el grifo Se incluye una plantilla para el fregadero para facilitar la planificaci n del recorte NOTA Es importante localizar la l nea correcta en el recorte para el modelo y el m todo de ins...

Страница 16: ...n la ubicaci n en la que instalar el fregadero Aseg rese de que haya suficiente espacio libre para el grifo y el salpicadero Con la plantilla en el lugar correcto para la instalaci n utilice la cinta...

Страница 17: ...bajo en una superficie adecuada y estable Utilice una sierra de agujero de diamante de 1 3 8 de pulgada para perforar en el rea s pre puntuada s donde se necesitan agujeros adicionales Aplique sellado...

Страница 18: ...perfora agujeros adicionales coloque cuidadosamente el fregadero boca abajo en una superficie adecuada y estable Utilice una sierra de agujero de diamante de 1 3 8 de pulgada para perforar en el rea p...

Страница 19: ...o y se dirijan hacia el borde exterior Apriete los tornillos centrales largos de cada soporte para que las garras agarre firmemente la parte inferior de la encimera NOTA NO agarres demasiado los torni...

Отзывы: