3.
Installation menu
This section will guide you through setting up your thermostat for the first time.
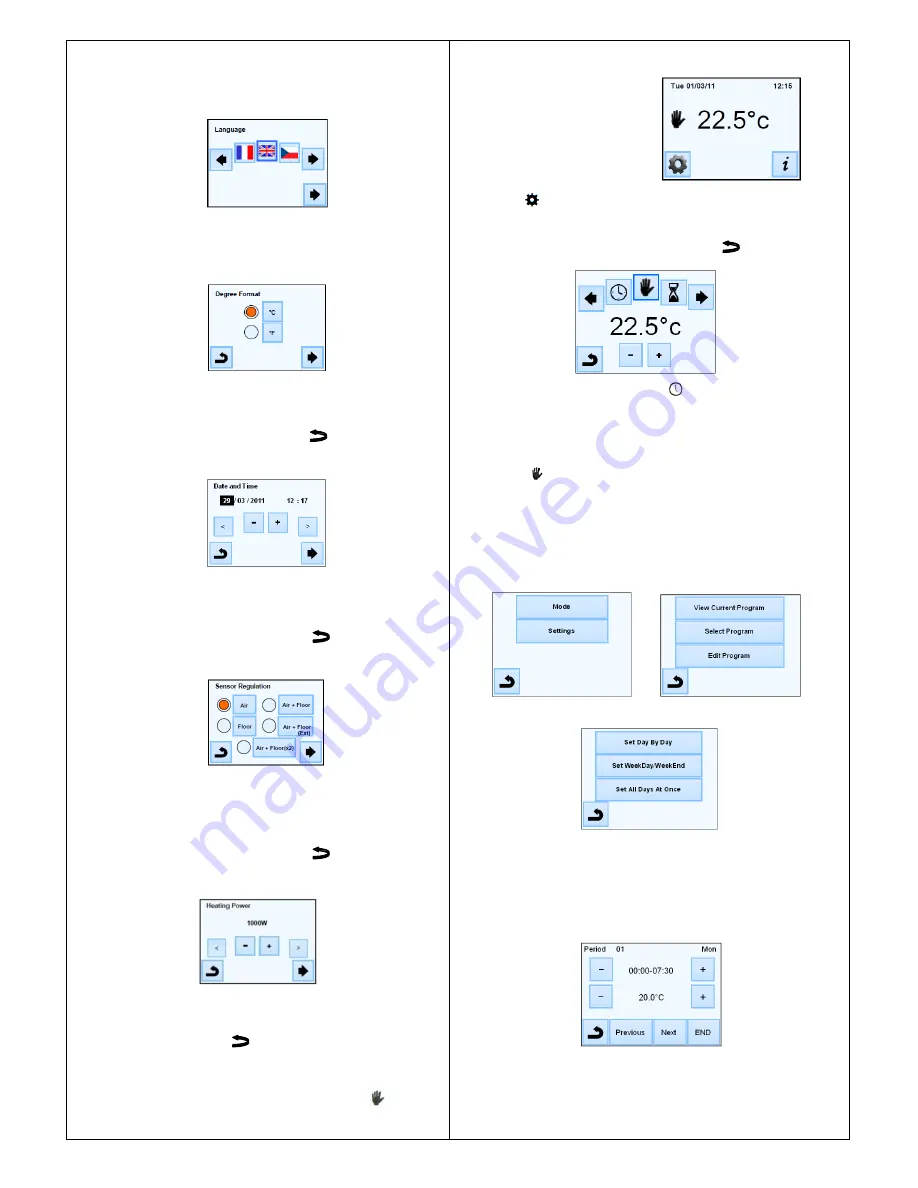
3.1. Language
Press the
(◄)
or
(►)
keys near the flags to select the chosen
language. The active language is framed.
Press the
►
key in the bottom right corner to continue the settings of the installation.
3.2. Degree format
Select the degree format chosen by pressing on the touch button near the
degrees. The active option is coloured red
Press the
►
key in the bottom right corner to continue to the next part of the
installation
You can return to the previous menu by pressing the
key.
3.3. Date and Time
Select the time format 12H or 24H using the same method as above.
Press the
(◄)
or
(►)
keys to activate the value to be modified.
Each time a value is highlighted, it can be modified by pressing the (
+
) or (
-
) keys.
Press the
►
key in the bottom right corner to continue to the next part of the
installation
You can return to the previous menu by pressing the
key.
3.4. Sensor Regulation
Select the chosen sensor regulation by pressing on the touch button near the
sensor regulation possibilities
The active touch is
coloured red
Press the
►
key in the bottom right corner to continue to the next part of the
installation
You can return to the previous menu by pressing the
key.
3.5.
Heating power
Press the
(◄)
or
(►)
keys to select a unit, press the (+) or (-) keys to modify the
heating power.
This value is used to estimate the running cost of the system. You can return to
the previous menu by pressing the
key.
Press the
►
key in the bottom right corner to continue.
The main screen is displayed.
The default working mode will automatically be set to manual mode.
4. Mode of operation
Main screen
How to change the current mode?
Press on the
key on the main screen and then press on the
“Mode” button to
access to the operating modes.
You can now press the
(◄) or (►) keys to scroll and select a mode.
The selected mode is framed, to select a mode press the
key to return to the
main screen.
4.1 Programmable mode
In this mode the thermostat will follow the chosen program (Built-in or customized)
according to the actual time
You can temporarily override the selected program, by pressing the temperature
displayed on the main screen.
The small hand
logo will be displayed when the override function is active. To exit
override mode, switch to manual then back to automatic mode
You will have the choice between 4 built-in programs that
can’t be modified and 3 user
programs that you can customize.
1- How to customize a user program
Press on the
“Mode” button then on “Edit Program” button and choose a user
program.
Then you will have to choose between 3 configurations:
a- Set day by day
You will set a new program for each day.
Automatically, the first day you will program is Monday.
The minimum program step is 15 minutes.
You will have to configure several periods.
The first period begins at 00:00. Then, choose the end time period with the (+) and (-)
keys and the temperature to be followed during this period.
Press
“Next” button to continue the program. The next period will start at the end of
the last period.
For all periods you will define, you have to choose the end period and the
temperature. The last period stops at 24:00. Then press on the Next button.


