background image

Clean the windshield, headlamps

Pull the lever.
The system sprays washer fluid on the wind‐
shield and activates the wipers briefly.

In addition, the headlamps are cleaned at regular
intervals when the vehicle lights are switched
on.

Do not use the washer system at freezing
temperatures

Do not use the washers if there is any danger
that the fluid will freeze on the windshield; oth‐
erwise, your vision could be obscured. For this
reason, use antifreeze.
Avoid using the washer when the reservoir is
empty; otherwise, you could damage the
pump.◀

Windshield washer nozzles

The washer jets are automatically heated when‐
ever the ignition is switched on.

Switching on the rear window wiper

Press the lever forward: intermittent wipe. When
reverse gear is engaged, the system switches to
continuous operation.
To clean the rear window, press the lever further
forward.

Fold-out position of the wipers

Required when changing the wiper blades or
under frosty conditions, for example.

1.

Switch off the ignition.

2.

Under frosty conditions, ensure that the
wiper blades are not frozen onto the wind‐
shield.

3.

Press the wiper lever up beyond the point of
resistance and hold it for approx. 3 seconds,
until the wiper remains in a nearly vertical
position.

After the wipers are folded back down, the wiper
system must be reactivated.

Fold the wipers back down
Before switching the ignition on, fold the

wipers back down to the windshield; otherwise,
the wipers may become damaged when they are
switched on.◀

1.

Switch on the ignition.

2.

Press the wiper levers down. The wipers
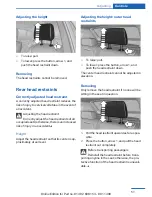
move to their resting position and are ready
for operation.

Washer fluid

General information

Antifreeze for washer fluid
Antifreeze is flammable. Therefore, keep

it away from sources of ignition.
Only keep it in the closed original container and
inaccessible to children.
Follow the instructions on the container.◀

Seite 64

Controls

Driving

64

Online Edition for Part no. 01 40 2 608 153 - 09 11 490

Содержание X3 xDrive28i

Страница 1: ...Owner s Manual for Vehicle THE BMW X3 OWNER S MANUAL The Ultimate Driving Machine THE BMW X3 OWNER S MANUAL Contents A Z Online Edition for Part no 01 40 2 608 153 09 11 490 ...

Страница 2: ......

Страница 3: ...ll help you make full use of the technical features available in your BMW The manual also contains information designed to enhance operating reliability and road safety and to contribute to maintaining the value of your BMW Any updates made after the editorial deadline for the printed or integrated Owner s Manual are located in the appendix of the printed quick reference for the vehicle Supplement...

Страница 4: ... Germany Reprinting including excerpts only with the written consent of BMW AG Munich US English VIII 11 09 11 490 Printed on environmentally friendly paper bleached without chlorine suitable for recycling Online Edition for Part no 01 40 2 608 153 09 11 490 ...

Страница 5: ...Interior equipment 122 Storage compartments Driving tips 128 Things to remember when driving 131 Loading 134 Saving fuel Navigation 138 Navigation Entertainment 156 Tone 158 Radio 166 CD multimedia Communication 188 Professional mobile phone preparation package 198 Office 207 Contacts 209 ConnectedDrive Mobility 218 Refueling 220 Fuel 221 Wheels and tires 229 Engine compartment 231 Engine oil 234 ...

Страница 6: ...on on a particular part or assembly Vehicle equipment This Owner s Manual describes all models and all standard country specific and optional equipment that is offered in the model series Therefore in this Owner s Manual equipment is also described and illustrated that is not availa ble in your vehicle e g because of the selected optional equipment or the country specific var iants This also appli...

Страница 7: ...for additional information Maintenance re placement or repair of the emission control de vices and systems may be performed by any au tomotive repair establishment or individual using any certified automotive part California Proposition 65 Warning California laws require us to state the following warning Engine exhaust and a wide variety of automobile components and parts including components foun...

Страница 8: ...ash or could cause injury or death you should immediately inform the Na tional Highway Traffic Safety Administration NHTSA in addition to notifying BMW of North America LLC P O Box 1227 Westwood New Jersey 07675 1227 Telephone 1 800 831 1117 If NHTSA receives similar complaints it may open an investigation and if it finds that a safety defect exists in a group of vehicles it may order a recall and...

Страница 9: ...Notes 9 Online Edition for Part no 01 40 2 608 153 09 11 490 ...

Страница 10: ...Online Edition for Part no 01 40 2 608 153 09 11 490 ...

Страница 11: ...ws of buttons switches and displays are intended to familiarize you with your vehicle You will also become quickly acquainted with the available control concepts and options Online Edition for Part no 01 40 2 608 153 09 11 490 ...

Страница 12: ...t This also applies for safety related functions and systems All around the steering wheel 1 Rear window safety switch 43 2 Power windows 42 3 Exterior mirror operation 52 4 Lamps Front fog lamps 83 Parking lamps 80 Low beams 80 Automatic headlamp con trol 81 Adaptive light control 82 High beam Assistant 82 Instrument lighting 84 5 Steering column stalk left Turn signal 62 High beams head lamp fla...

Страница 13: ...e Voice activation 22 Professional mobile phone prepa ration package 188 9 Steering column stalk right Windshield wipers 62 Rain sensor 63 Clean the windshields and head lamps 64 Rear window wiper 64 10 Start stop the engine and switch the ignition on off 59 11 Horn 12 Steering wheel heating 54 13 Adjust the steering wheel 54 14 Open the tailgate 37 15 Unlock hood 229 Cockpit At a glance 13 Online...

Страница 14: ... climate control 109 7 Radio 158 CD multimedia 166 8 Controller with buttons 16 9 Parking brake 60 Auto Hold 60 10 PDC Park Distance Control 101 Backup camera 103 Top View 106 HDC Hill Descent Control 95 11 Dynamic Driving Control 97 DSC Dynamic Stability Con trol 94 12 Automatic transmission 65 At a glance Cockpit 14 Online Edition for Part no 01 40 2 608 153 09 11 490 ...

Страница 15: ...adliner 1 Emergency Request 243 2 Panoramic glass sunroof 44 3 Indicator lamp front passenger airbag 87 4 Reading lamps 84 5 Interior lamps 84 Cockpit At a glance 15 Online Edition for Part no 01 40 2 608 153 09 11 490 ...

Страница 16: ...cle s occu pants and to other road users never attempt to use the controls or enter information unless traf fic and road conditions allow this Controls at a glance Controls 1 Control Display 2 Controller with buttons The buttons can be used to open the menus directly The controller can be used to select menu items and create the settings Control Display Notes To clean the Control Display follow th...

Страница 17: ...s displayed All iDrive functions can be called up via the main menu Selecting menu items Menu items shown in white can be selected 1 Turn the controller until the desired menu item is highlighted 2 Press the controller Menu items in the Owner s Manual In the Owner s Manual menu items that can be selected are set in quotation marks e g Settings Changing between panels After a menu item is selected ...

Страница 18: ...s the button The Options menu is displayed Additional options move the controller to the right repeatedly until the Options menu is dis played Options menu The Options menu consists of various areas Screen settings e g Split screen This area remains unchanged Control options for the selected main menu e g for Radio If applicable further operating options for the selected menu e g Store station Cha...

Страница 19: ... press the controller Status information Status field The followinginformationisdisplayedinthesta tus field at the top right Time Current entertainment source Sound output on off Wireless network reception strength Telephone status Traffic bulletin reception Status field symbols The symbols are grouped as follows Radio symbols Symbol Meaning Traffic bulletins are switched on HD Radio is switched o...

Страница 20: ...n remains visible even when you change to another menu Switching the split screen on and off 1 Press the button 2 Split screen Selecting the display 1 Press the button 2 Split screen 3 Move the controller until the split screen is selected 4 Press the controller or select Split screen content 5 Select the desired menu item Programmable memory buttons General information The iDrive functions can be...

Страница 21: ... for an extended period delete all letters or numbers Enter a blank space Switching between letters and numbers Depending on the menu you can switch be tween entering letters and numbers Symbol Function Enter the letters Enter the numbers Switching between upper and lower case letters Depending on the menu you can switch be tween entering upper and lower case letters Symbol Function Move the contr...

Страница 22: ...activation system 1 Press the button on the steering wheel 2 Wait for the signal 3 Say the command Thecommandisdisplayedintheinstrument cluster This symbol in the instrument cluster indi cates that the voice activation system is active If no other commands are available operate the function in this case via iDrive Terminating the voice activation system Briefly press the button on the steering whe...

Страница 23: ...oice dialog the an nouncements from the system are issued in an abbreviated form On the Control Display 1 Settings 2 Language Units 3 Speech mode 4 Select the setting Adjusting the volume Turn the volume button while giving an instruc tion until the desired volume is set The volume remains constant even if the volume of other audio sources is changed The volume is stored for the remote control cur...

Страница 24: ...ation Keep the doors windows and glass sun roof closed to prevent noise interference Avoid making other noise in the vehicle while speaking At a glance Voice activation system 24 Online Edition for Part no 01 40 2 608 153 09 11 490 ...

Страница 25: ...nt of a flat tire This information can also be displayed during driving Search by pictures Information and descriptions based on illustra tions can be searched via search by pictures This is helpful for example if the description of an outfitting package that cannot be named is needed Owner s Manual Information and descriptions can be searched by direct entry of a search term via the index Select ...

Страница 26: ...ns menu is displayed 2 Display Owner s Manual 3 Select the desired page in the Owner s Manual 4 Press the button again to return to the function displayed last 5 Press the button to return to the page of the Owner s Manual displayed last To switch back and forth repeatedly between the function displayed last and the page of the Owner s Manual displayed last repeat steps 4 and 5 This opens a new pa...

Страница 27: ...Integrated Owner s Manual in the vehicle At a glance 27 Online Edition for Part no 01 40 2 608 153 09 11 490 ...

Страница 28: ...Online Edition for Part no 01 40 2 608 153 09 11 490 ...

Страница 29: ...de you with information that will give you complete control of your vehicle All features and accessories that are useful for driving and your safety comfort and convenience are described here Online Edition for Part no 01 40 2 608 153 09 11 490 ...

Страница 30: ... up and implemented when the vehicle is unlocked depend on which remote control is used to unlock the vehicle Personal Profile refer to page 31 In addition information about service require ments is stored in the remote control Service data in the remote control refer to page 234 Integrated key Press the button on the back of the remote con trol arrow 1 and pull out the key arrow 2 The integrated ...

Страница 31: ...rsonal Profile The concept Personal Profile concept You can set several of your vehicle s functions to suit your personal needs and preferences The settings are automatically saved in the profile currently activated Whenthevehicleisunlocked theprofilethat was last detected and called up with the re mote control is used Your personal settings will be recognized and called up again even if the vehic...

Страница 32: ...Profiles 3 Import profile 4 USB interface USB device Exporting profiles Most settings of the active profile and the saved contacts can be exported This can be useful for storing and opening per sonal settings e g if settings are accidentally changed or deleted 1 Settings 2 Profiles 3 Export profile 4 USB interface USB device Using the guest profile The guest profile can be used to make individual ...

Страница 33: ...g the volume of the signal tone refer to page 101 Radio stored stations station listened to last special settings refer to page 158 Backup camera refer to page 103 selec tion of functions and type of display Language on the Control Display refer to page 78 Triple turn signal activation refer to page 62 Locking the vehicle refer to page 34 after a brief period or after starting to drive Central loc...

Страница 34: ...nd courtesy lamps are switched on You can set how the vehicle is to be unlocked The setting is stored for the remote control cur rently in use 1 Settings 2 Door locks 3 Unlock button 4 Select the desired function Driver s door only Only the driver s door and the fuel filler flap are unlocked Pressing again un locks the entire vehicle All doors The entire vehicle is unlocked Convenient opening The ...

Страница 35: ...tailgate is locked again as soon as it is pushed closed Provide edge protection Sharp or angular objects can hit the rear window while driving and damage the heating wires of the rear window Provide edge protec tion Confirmation signals from the vehicle 1 Settings 2 Door locks 3 Deactivate or activate the desired confirma tion signals Acoustic sig lock unlock Flash when lock unlock Retrieving the ...

Страница 36: ...erence re ceived including interference that may cause undesired operation Any unauthorized modifications or changes to these devices could void the user s authority to operate this equipment Using the door lock General information Locking from the outside Do not lock the vehicle from the outside if there are people in it as the vehicle cannot be unlocked from inside without special knowl edge Rem...

Страница 37: ...doors and the tailgate when the front doors are closed but they are not secured against theft The fuel filler flap remains unlocked Unlocking and opening Either unlock the doors together using the button for the central locking system and then pull the door handle above the armrest or Pull the door opener twice individually on each door the first time unlocks the door the second time opens it Auto...

Страница 38: ...esult Do not place the remote control in the cargo area Take the remote control with you and do not leave it in the cargo area otherwise the remote control is locked inside the vehicle when the tail gate is closed Locking the vehicle Press the button on the inside of the tailgate The vehicle is locked completely Automatic tailgate operation Adjusting the opening height You can set how far the tail...

Страница 39: ... Access Press the button arrow 1 on the inside of the tailgate The tailgate closes automatically Pressing again stops the motion Press the button arrow 2 Tailgate closes automatically and the vehi cle is locked Press the button on the exterior of the tail gate Pressing again stops the motion The closing operation is interrupted When starting the engine The vehicle starts off with jerks Danger of p...

Страница 40: ...cle is not possible until after approx 2 seconds The engine can only be started if the remote control is inside the vehicle Comparison with ordinary remote control The functions can be controlled by pressing the buttons of the remote control or Comfort Ac cess Unlocking Grasp the door handle on the driver s or front passenger door completely arrow 1 This cor responds to pressing the button Locking...

Страница 41: ...itching on the hazard warning system By flashing the high beams Arming and disarming the alarm system General information When you lock or unlock the vehicle either with the remote control Comfort Access or at the door lock the alarm system is armed or disarmed at the same time Door lock and armed alarm system Unlocking via the door lock will trigger the alarm on some country specific versions In ...

Страница 42: ...function properly Avoiding unintentional alarms The tilt alarm sensor and interior motion sensor can be switched off together such as in the fol lowing situations In automatic car washes In duplex garages During transport on car carrying trains at sea or on a trailer When animals are to remain in the vehicle Switching off the tilt alarm sensor and interior motion sensor Press the remote control bu...

Страница 43: ...ny accessories in the range of movement of the windows otherwise the pinch protection system will be impaired Closing without the pinch protection system Danger of pinching Monitor the closing process and make sure that the closing path of the window is clear otherwise injuries may result For example if there is an external danger or if ice on the windows prevents a window from closing normally pr...

Страница 44: ... Push switch upward briefly The closed roof is tilted and the sliding visor opens slightly The opened roof closes until it is in its tilted position The sliding visor stays completely open Opening closing the sliding visor Press the switch in the de sired direction to the resist ance point and hold it there The sliding visor moves while the switch is being held Press the switch in the desired dire...

Страница 45: ... pro ceed as follows 1 Press the switch forward beyond the resist ance point and hold Pinch protection is limited and the roof re opens slightly if the closing force exceeds a certain value 2 Press the switch forward again beyond the resistance point and hold until the roof closes without pinch protection Initializing after a power failure After a power failure during the opening or clos ing proce...

Страница 46: ...ng Do not adjust the driver s seat while driv ing or the seat could respond with unexpected movement and the ensuing loss of vehicle con trol could lead to an accident Do not incline the backrest too far to the rear Also on the front passenger side do not incline the backrest on the front passenger side too far to the rear during driving or there is a risk of slipping under the safety belt in the ...

Страница 47: ... gages properly Electrically adjustable seats At a glance 1 Backrest width 2 Lumbar support 3 Forward backward height seat tilt 4 Backrest tilt 5 Seat and mirror memory for driver s seat Note The seat setting for the driver s seat is stored for the remote control currently in use When the vehicle is unlocked via the remote control the position is automatically retrieved if the Func tion refer to p...

Страница 48: ...curvature is increased decreased Press the upper lower sec tion of the switch The curvature is shifted up down Backrest width Change the width of the backrest using the side wings to adjust the lateral support Front seat heating Switching on Press the button once for each temper ature level The maximum temperature is reached when three LEDs are lit If the drive is continued within approx 15 mi nut...

Страница 49: ...f every build if the seat is correctly adjusted The two outer safety belt buckles integrated into the rear seat are for passen gers sitting on the left and right The center rear seat belt buckle is solely in tended for the center passenger One person per safety belt Never allow more than one person to wear a single safety belt Never allow infants or small children to ride on a passenger s lap Putt...

Страница 50: ...d head restraint A correctly adjusted head restraint reduces the risk of injury to cervical vertebrae in the event of an accident Adjusting the head restraint Correctly adjust the head restraints of all occupied seats otherwise there is an increased risk of injury in an accident Height Adjust the head restraint so that its center is ap proximately at ear level Distance Adjust the distance so that ...

Страница 51: ...aint so that its center is ap proximately at ear level Adjusting the height outer head restraints To raise pull To lower press the button arrow 1 and push the head restraint down The center head restraint cannot be adjusted in elevation Removing Only remove the head restraint if no one will be sitting in the seat in question 1 Pull the head restraint upward as far as pos sible 2 Press the button a...

Страница 52: ...ff the ignition 3 Briefly press the desired button 1 or 2 The corresponding seat position is performed automatically The procedure stops when a switch for adjust ing the seat or one of the buttons is pressed Safety mode 1 Close the driver s door or switch on the ig nition 2 Press and hold the desired button 1 or 2 until the adjustment procedure is completed Calling up of a seat position deactivate...

Страница 53: ...as senger side This improves your view of the curb and other low lying obstacles when parking for example Activating 1 Slide the mirror changeover switch to the driver s side mirror position 2 Engage transmission position R Deactivating Slide the mirror changeover switch to the pas senger s side mirror position Fold in and out Press the button Possible up to approx 15 mph 20 km h For example this ...

Страница 54: ...ween the inside rearview mirror and the windshield Steering wheel General information Do not adjust while driving Do not adjust the steering wheel while driving otherwise an unexpected movement could result in an accident Adjusting 1 Fold the lever down 2 Move the steering wheel to the preferred height and angle to suit your seating posi tion 3 Fold the lever back Steering wheel heating Switching ...

Страница 55: ...t passenger seat make sure that the front knee and side airbags on the front passenger side are deactivated Au tomatic deactivation of front passenger airbags refer to page 87 Deactivating the front passenger airbags If a child restraint fixing system is used in the front passenger seat the front passenger airbags must be deactivated otherwise there is an increased risk of injury to the child when...

Страница 56: ...to be pulled in com pletely LATCH child restraint fixing system LATCH LowerAnchorsandTetherforChildren Note Manufacturer s information for LATCH child restraint fixing systems To mount and use the LATCH child restraint fix ing systems observe the operating and safety information from the system manufacturer oth erwise the level of protection may be reduced Mounts for the lower LATCH anchors Correc...

Страница 57: ...ook for upper retaining strap 4 Mounting point eye 5 Seat backrest 6 Upper retaining strap Attaching the upper retaining strap to the mounting point 1 Raise or remove head restraints as needed 2 Guide the upper retaining strap between the supports of the head restraint 3 Attach the hook of the retaining strap to the mounting eye 4 Tighten the retaining strap by pulling it down 5 Lower and lock hea...

Страница 58: ...stem automatically switches to the radio ready state when the door is opened if the lights are switched off or the daytime running lights are switched on Ignition off Automatic transmission press the Start Stop button again and do not press on the brake pedal at the same time All indicator lamps in the instrument cluster go out To save battery power when the engine is off switch off the ignition a...

Страница 59: ...the fuel is not burned or is inadequately burned and there is the danger of overheating and damaging the catalytic converter Do not wait for the engine to warm up while the vehicle remains stationary Start driving at mod erate engine speeds Automatic Transmission Starting the engine 1 Depress the brake pedal 2 Press the Start Stop button The ignition is activated automatically for a cer tain time ...

Страница 60: ...e is braked to a speed of approx 2 mph 3 km h the parking brake remains set Releasing With the ignition switched on Automatic transmission Press the switch while the brake is pressed or transmission position P is engaged The LED and indicator lamp go out The parking brake is released Automatic Release in cars with automatic transmission For automatic release operate the accelerator pedal The LED a...

Страница 61: ... letters AUTO H light up The indicator lamp lights up Automatic Hold is activated Deactivating Press the button again The LED and the letters AUTO H go out Automatic Hold is deactivated If the vehicle is being held by Automatic Hold press on the brake pedal to deactivate it When the parking brake refer to page 60 is set manually Automatic Hold is deactivated auto matically Driving Automatic Hold i...

Страница 62: ... rapid flashing of the indicator lamp in dicates that a turn signal bulb has failed Triple turn signal activation Press the lever to the resistance point The turn signal flashes three times The function can be activated or deactivated 1 Settings 2 Lighting 3 Triple turn signal Signaling briefly Press the lever to the resistance point and hold it there for as long as you want the turn signal to fla...

Страница 63: ...ss down once To switch off fast wipe press down twice Rain sensor The concept The time between wipes is controlled automat ically and depends on the intensity of the rainfall The sensor is located on the windshield directly in front of the interior rearview mirror Activating deactivating the rain sensor Press the button on the wiper lever When activated the wipers move over the wind shield once Th...

Страница 64: ...osition of the wipers Required when changing the wiper blades or under frosty conditions for example 1 Switch off the ignition 2 Under frosty conditions ensure that the wiper blades are not frozen onto the wind shield 3 Press the wiper lever up beyond the point of resistance and hold it for approx 3 seconds until the wiper remains in a nearly vertical position After the wipers are folded back down...

Страница 65: ... the engine is switched off if the car is in radio ready state refer to page 59 or if the ignition is switched off refer to page 58 and if position R or D is engaged With the ignition is off if position N is en gaged If the safety belt is unbuckled the driver s door is opened and the brake pedal is not pressed while the vehicle is stationary and transmission position R or D is engaged Before exiti...

Страница 66: ... the selector lever to the left out of trans mission position D Push the selector lever forward or backward Manual mode becomes active and the gear is changed The engaged gear is displayed in the instrument cluster e g M1 To shift down press the selector lever for ward To shift up pull the selector lever rearwards The vehicle only shifts up or down at appropriate engine and road speeds e g it does...

Страница 67: ...rated for a certain time the system switches back into automatic mode if the selec tor lever is in transmission position D Shift up pull right shift paddle Shift down pull left shift paddle The vehicle only shifts up or down at appropriate engine and road speeds e g it does not shift down if the engine speed is too high The selected gear is briefly displayed in the in strument cluster followed by ...

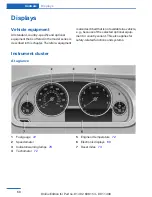
Страница 68: ...vailable in a vehicle e g because of the selected optional equip ment or country variant This also applies for safety related functions and systems Instrument cluster At a glance 1 Fuel gauge 72 2 Speedometer 3 Indicator warning lamps 70 4 Tachometer 72 5 Engine oil temperature 72 6 Electronic displays 69 7 Reset miles 73 Controls Displays 68 Online Edition for Part no 01 40 2 608 153 09 11 490 ...

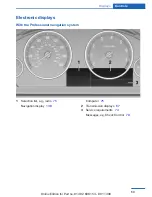
Страница 69: ...l navigation system 1 Selection list e g radio 75 Navigation display 138 Computer 75 2 Transmission displays 67 3 Service requirements 74 Messages e g Check Control 70 Displays Controls 69 Online Edition for Part no 01 40 2 608 153 09 11 490 ...

Страница 70: ...ystems A Check Control message is displayed as a combination of indicator or warning lamps and text messages in the instrument cluster and in the Head up Display Inaddition anacousticsignalmaybeoutputand a text message may appear on the Control Dis play Indicator warning lamps The indicator and warning lamps can light up in a variety of combinations and colors Several of the lamps are checked for ...

Страница 71: ... ABS in Cana dian models At least one Check Control message is displayed or is stored Text messages Text messages in combination with a symbol in the instrument cluster explain a Check Control message and the meaning of the indicator and warning lamps Supplementary text messages Addition information such as on the cause of a fault or the required action can be called up via Check Control The suppl...

Страница 72: ...l messages 1 Vehicle Info 2 Vehicle status 3 Check Control 4 Select the text message Messages after trip completion Special messages that are displayed during driving are displayed again after the ignition is switched off Fuel gauge The vehicle inclination may cause the display to vary Notes on refueling refer to page 218 Tachometer Always avoid engine speeds in the red warning field In this range...

Страница 73: ...splayed in the in strument cluster Set the date on the Control Dis play refer to page 78 Range After the reserve range is reached A Check Control message is displayed briefly The remaining range is shown on the computer When a dynamic driving style is used such as when corners are taken rapidly engine functions are not ensured The Check Control message appears continu ously below a range of approx...

Страница 74: ...le are auto matically transmitted to your service center be fore a service due date Automatic Service Re quest refer to page 210 Detailed information on service requirements More information on the scope of service re quired can be displayed on the Control Display 1 Vehicle Info 2 Vehicle status 3 Service required Required maintenance procedures and le gally mandated inspections are displayed 4 Se...

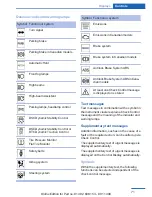
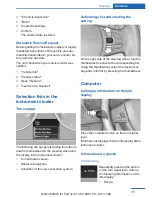
Страница 75: ... display in the instrument cluster Current audio source Redial on telephone Activation of the voice activation system Activating a list and creating the setting On the right side of the steering wheel turn the thumbwheel to activate the corresponding list Using the thumbwheel select the desired set ting and confirm it by pressing the thumbwheel Computer Calling up information on the info display P...

Страница 76: ...sumption is calculated on the basis of various distances Average speed Periods in which the vehicle is parked with the engine manually stopped do not enter into the calculation of the average speed Resetting average values Press and hold the computer button on the turn signal lever Distance to destination The distance remaining to the destination is dis played if a destination is entered in the na...

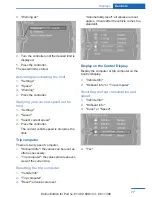
Страница 77: ...Onboard info the values can be reset as often as necessary Tripcomputer thevaluesprovideanover view of the current trip Resetting the trip computer 1 Vehicle Info 2 Trip computer 3 Reset all values are reset Automatically reset all values are reset approx 4 hours after the vehicle comes to a standstill Display on the Control Display Display the computer or trip computer on the Control Display 1 Ve...

Страница 78: ... the time format 1 Settings 2 Time Date 3 Format 4 Select the desired format The time format is stored Date Setting the date 1 Settings 2 Time Date 3 Date 4 Turn the controller until the desired day is displayed 5 Press the controller 6 Make the necessary settings for the month and year The date is stored Setting the date format 1 Settings 2 Time Date 3 Format 4 Select the desired format The date ...

Страница 79: ...elect the desired menu item 4 Select the desired unit The setting is stored for the remote control cur rently in use Brightness Setting the brightness To set the brightness of the Control Display 1 Settings 2 Control display 3 Brightness 4 Turn the controller until the desired bright ness is set 5 Press the controller The setting is stored for the remote control cur rently in use Depending on the ...

Страница 80: ...amps low beams headlamp control General information If the driver door is opened with the ignition switched off the exterior lighting is automati cally switched off at the following switch set tings 0 Parking lamps Switch position the vehicle lamps light up on all sides e g for parking Do not use the parking lamps for extended pe riods otherwise the battery may become dis charged and it would then...

Страница 81: ...n cause the lights to be switched on The low beams always stay on when the fog lamps are switched on Personal responsibility The automatic headlamp control cannot serve as a substitute for your personal judgment in determining when the lamps should be switched on in response to ambient lighting conditions For example the sensors are unable to detect fog or hazy weather To avoid safety risks you sh...

Страница 82: ...andstill When driving in reverse only the turning lamp is active Malfunction A Check Control message is displayed Adaptive light control is malfunctioning or has failed Havethesystemcheckedassoonaspos sible Headlamp range control Withhalogenheadlamps theheadlamprangeof the low beams can be manually adjusted for the vehicle load to avoid blinding oncoming traffic The values following the slash appl...

Страница 83: ...ntervention may be necessary In very unfavorable weather conditions such as fog or heavy precipitation In detecting poorly lit road users such as pedestrians cyclists horseback riders and wagons when driving close to train or ship traffic and at animal crossings In tight curves on hilltops or in depressions in cross traffic or half obscured oncoming traffic on freeways In poorly lit towns and citi...

Страница 84: ...f these lamps is influ enced by the thumbwheel for the instrument lighting 1 Interior lamps 2 Reading lamp Switching the interior lamps on and off Press the button To switch off permanently press the button for approx 3 seconds Switch back on press button Reading lamps Press the button Reading lamps are located at the front and rear next to the interior lamps With the interior lamps shut off the r...

Страница 85: ...bag driver 2 Front airbag front passenger 3 Head airbag 4 Side airbag 5 Knee airbags Front airbags Front airbags help protect the driver and front passenger by responding to frontal impacts in which safety belts alone cannot provide ade quate restraint Side airbags In a lateral impact the side airbag supports the side of the body in the chest and lap area Head airbags In a lateral impact the head ...

Страница 86: ...eering wheel Do not apply adhesive materials to the air bag cover panels cover them or modify them in any way Never modify either the individual compo nentsorthewiringintheairbagsystem This also applies to steering wheel covers the dashboard the seats the roof pillars and the sides of the headliner Even when all instructions are followed closely injury from contact with the airbags cannot be ruled...

Страница 87: ...oes out If it is not possible to activate the airbags have the person sit in the rear To make sure that the occupied seat cushion can be evaluated correctly Do not attach covers cushions ball mats or other items to the front passenger seat un less they are specifically recommended by the manufacturer of your vehicle Do not place any electronic devices on the passenger seat if a child restraint sys...

Страница 88: ...pt The tire inflation pressure is measured in the four mounted tires The system notifies you if there is a significant loss of pressure in one or more tires Functional requirements The system must have been reset when the in flation pressure was correct otherwise reliable signaling of a flat tire is not ensured Always use wheels with TPM electronics to ensure that the system will operate properly ...

Страница 89: ...isplayed tire temperature with the external temperature in the instrument clus ter Resetting the system Reset the system after each correction of the tire inflation pressure and after every tire or wheel change 1 Vehicle Info 2 Vehicle status 3 Reset 4 Start the engine do not drive away 5 Reset the tire pressure using Reset 6 Drive away The tires are shown in gray and Resetting TPM is displayed Af...

Страница 90: ...in all four tires is correct the Tire Pressure Monitor may not have been initialized In this case initialize the system Possible driving distance with complete loss of tire inflation pressure The possible driving distance after a loss of tire inflation pressure depends on the cargo load and the driving style and conditions For a vehicle containing an average load the possible driving distance is a...

Страница 91: ...on as possible and inflate them to the proper pressure Driving on a significantly under inflated tire causes the tire to overheat and can lead to tire failure Under inflation also reduces fuel efficiency and tire tread life and may affect the vehicle s handling and stopping ability Please note that the TPMS is not a sub stitute for proper tire maintenance and it is the driver s responsibility to m...

Страница 92: ...on Theinitializationprocessadoptsthesetinflation tire pressures as reference values for the detec tion of a flat tire Initialization is started by con firming the inflation pressures Do not initialize the system when driving with snow chains 1 Vehicle Info 2 Vehicle status 3 Reset 4 Start the engine do not drive away 5 Start the initialization with Reset 6 Drive away The initialization is complete...

Страница 93: ...km When the vehicle is driven with a damaged tire its handling characteristics change e g re duced lane stability during braking a longer braking distance and altered self steering properties Adjust your driving style accord ingly Avoid abrupt steering maneuvers or driv ing over obstacles e g curbs potholes etc Because the possible driving distance depends on how the vehicle is used during the tri...

Страница 94: ...en driving away and accelerating DSC also recognizes unstable vehicle condi tions such as fishtailing or nose diving Subject to physical limits DSC helps to keep the vehicle on a steady course by reducing engine speed and by applying brakes at individual wheels Adjust your driving style to the situation An appropriate driving style is always the responsibility of the driver The laws of physics can...

Страница 95: ...the button again TRACTIONandtheDSCindicatorlamp go out Performance Control Performance Control enhances the agility of your vehicle To enhance performance during sporty driving the rear wheel on the inside of the curve is braked while the resulting braking effect is largely compensated by engine intervention xDrive xDrive is the all wheel drive system of your ve hicle Concerted action by the xDriv...

Страница 96: ...ton lights up Deactivating HDC Press the button again and the LED goes out HDC is automatically deactivated above approx 37 mph 60 km h Display in the instrument cluster The selected speed is displayed in the speedometer Green the system is actively braking the vehicle Orange the system is on standby Malfunction A message is displayed in the instrument clus ter HDC is not available e g due to elev...

Страница 97: ...e the vehicle has max imum traction on loose road surfaces DTC Dy namic Traction Control refer to page 95 is ac tivated Driving stability is limited during acceleration and when driving in bends SPORT Sporty driving with optimized chassis and sus pension with limited driving stabilization Dynamic Traction Control is switched on The driver handles several of the stabilization tasks Activating SPORT...

Страница 98: ...ayed in the instrument cluster In certain situations the system automatically changes to the NORMAL program automatic program change refer to page 97 Displays Program selection Pressing the button displays a list of the selectable programs Selected program The selected program is dis played in the instrument cluster Display on the Control Display Program changes can be displayed on the Con trol Di...

Страница 99: ...ake it impossible to drive at a constant speed for instance On curvy roads In heavy traffic On slippery roads in fog snow or rain or on a loose road surface Otherwise you could lose control of the vehicle and cause an accident Controls At a glance 1 System on off interrupt 2 Resume speed 3 Store speed 4 Store maintain change speed Switching on Press the button on the steering wheel The marking in ...

Страница 100: ...ired speed to the road con ditions and be ready to brake at all times other wise there is the danger of an accident occur ring Press the rocker switch up or down repeatedly until the desired speed is set If active the displayed speed is stored and the vehicle reaches the stored speed if the road is clear Eachtimetherockerswitchispressedtothe point of resistance the desired speed in creases or decr...

Страница 101: ...ner sensors at approx 24 in 60 cm By the rear middle sensors at approx 5 ft 1 50 m System limits Check the traffic situation as well PDC cannot serve as a substitute for the driver s personal judgment of the traffic situa tion Check the traffic situation around the vehi cle with your own eyes Otherwise an accident could result from road users or objects located outside of the PDC detection range L...

Страница 102: ...cted to the left rear of the vehicle a signal tone sounds from the left rear speaker The shorter the distance to the object becomes the shorter the intervals If the distance to a detected object is less than approx 12 in 30 cm a continuous tone is sounded If objects are located both in front of and behind the vehicle an alternating continuous signal is sounded Theintermittenttoneisinterruptedafter...

Страница 103: ... not spray the sensors for long periods and main tain a distance of at least 12 in 30 cm Backup camera The concept Thebackupcameraprovidesassistanceinpark ing and maneuvering backwards The area be hind the vehicle is shown on the Control Display System limits Check the traffic situation as well Check the traffic situation around the ve hiclewithyourowneyes Otherwise anaccident could result from ro...

Страница 104: ...vel roads Are dependent on the current steering angle and are continuously adjusted to the steer ing wheel movements Show the parking aid lines refer to page 105 Turning circle lines Can be shown in the backup camera image Show the course of the smallest possible turning circle on a level road Only one turning circle line is displayed when the steering wheel is turned Show the parking aid lines re...

Страница 105: ...ly shaped markings are displayed Display on the Control Display Switching on the backup camera via iDrive With PDC activated Rear view camera Thebackupcameraimageisdisplayed Theset ting is stored for the remote control currently in use Brightness With the backup camera switched on 1 Select the symbol 2 Turn the controller until the desired setting is reached and press the controller Contrast With ...

Страница 106: ...ide the picture area of the cameras Switching on automatically Select transmission position R with the engine running The Top View and PDC images are displayed if the system is switched on via iDrive Automatic deactivation during forward travel The system switches off when a certain driving distance or speed is exceeded Switch the system back on if necessary Switching on off manually Press the but...

Страница 107: ...g the amount of space actually needed to the side of the vehicle The pathway line is dependent on the cur rent steering angle and is continuously ad justed with the steering wheel movement Parking aid lines Turning circle and pathway lines are displayed Cameras The objectives of the Top View cameras are lo cated at the bottom of the exterior mirror hous ings The image quality may be impaired by di...

Страница 108: ...ghtness 4 Turn the controller The brightness is adjusted When the low beams are switched on the brightness of the Head up Display can be addi tionally influenced using the instrument lighting refer to page 84 The setting is stored for the remote control cur rently in use Adjusting the height 1 Settings 2 Head up display 3 Height 4 Turn the controller The height is adjusted The setting is stored fo...

Страница 109: ...related functions and systems Automatic climate control 1 Vent settings 2 Air volume 3 AUTO program 4 Interior temperature sensor always keep clear 5 Recirculated air mode 6 Temperature 7 Defrosting windows and removing conden sation 8 Cooling function 9 Rear window defroster 10 Seat heating 48 Climate control functions in detail Manual air distribution Press the buttons repeatedly to select a pro...

Страница 110: ...ver switch off recirculated air mode and increase the air volume if neces sary Continuous recirculated air mode The recirculated air mode should not be used for an extended period of time as the air quality inside the vehicle deteriorates steadily Temperature Turn the wheel to set the desired temperature The automatic climate control achieves this temperature as quickly as possible if necessary wi...

Страница 111: ...0 The blower and automatic cli mate control are switched off entirely Switching on Set any air volume The AUTO program can also be switched on di rectly via the AUTO button Microfilter The microfilter removes dust and pollen from the incoming air This filter should be replaced during scheduled maintenance refer to page 234 of your vehicle Automatic climate control with enhanced features 1 Vent set...

Страница 112: ...ws out of the vents for the upper body re gion Open them for this purpose Air is cooled as quickly as possible At an external temperature of approx 32 0 When the engine is running The air volume can be adjusted when the pro gram is active AUTO program Press the button Air volume air distribution and tem perature are controlled automatically Depending on the selected temperature AUTO intensity and ...

Страница 113: ...us recirculated air mode The recirculated air mode should not be used for an extended period of time as the air quality inside the vehicle deteriorates steadily ALL program Press the button The current setting or later settings of the temperature on the driver s side are trans ferred to the front passenger side The program is switched off if the settings on the front passenger side are changed Def...

Страница 114: ... 2 Thumbwheel to vary the temperature ar row 3 Toward blue colder Toward red warmer Adjusting the ventilation Ventilation for cooling Adjust the vent to direct the air in your di rection e g if the vehicle interior is hot from the sun Draft free ventilation Adjust the vent to let the air flow past you Ventilation in the rear Thumbwheel for opening and closing the vents continuously arrow 1 Thumbwh...

Страница 115: ...t the desired time Activating the switch on time 1 Settings 2 Climate 3 Activate Timer 1 or Activate Timer 2 The symbol on the automatic climate control lights up when the switch on time is activated The symbol on the automatic climate control flashes when the system has been switched on The system will only be switched on within the next 24 hours After that it needs to reactivated Climate control...

Страница 116: ...e animals or objects in the range of movement of the remote controlled device otherwise there is a risk of injury or damage Also follow the safety instructions of the hand held transmitter Compatibility If this symbol is printed on the packaging or in the instructions of the hand held transmitter the remote controlled device is generally compatible with the integrated univer sal remote control If ...

Страница 117: ...the device be ing set up Programming will be easier with the aid of a sec ond person 1 Park the vehicle within range of the remote controlled device 2 Program the integrated universal remote control as described above under Fixed code hand held transmitters 3 Locate the button on the receiver of the de vice to be set e g on the drive 4 Press the button on the receiver of the de vice to be set You ...

Страница 118: ...elec trical devices with the engine running or with the ignition switched on The total load of all sockets must not exceed 140 watts at 12 volts Do not damage the socket by using unsuitable connectors Front center console Remove cover Center armrest Remove cover Rear center console Remove cover In the cargo area The socket is located on the right side in the cargo area Cargo area Cargo cover Pull ...

Страница 119: ... cover forward horizontally into the two side brackets until it audibly latches The red warning fields disappear in the case of a cover with partition net Tug on the cover to check if it is properly locked in place Enlarging the cargo area General information The cargo area can be enlarged by folding down the rear seat backrests The rear seat backrest is divided into two parts at a ratio of 60 to ...

Страница 120: ...safety belt will not have a restraining effect Folding down side The right side can be folded down separately The left side can be folded down in combination with the middle section Reach into the recess and fold forward Folding down the middle section Reach into the recess and pull forward Partition net Do not let the partition net snap back into place Do not allow the partition net to snap back ...

Страница 121: ...ld open the front covers on the headliner 6 Carefully pull out the partition net and insert it into the brackets as in the normal cargo area refer to page 120 This is best performed from the front seat If the partition net is no longer needed proceed in reverse order Finally slidethecaseforwardintothetwobrack ets on the sides until it engages The red warn ing fields disappear Tug on the case to ch...

Страница 122: ...eats Net in the front passenger footwell No loose objects in the passenger com partment Do not stow any objects in the passenger com partment without securing them otherwise they may present a danger to occupants for in stance during braking and avoidance maneu vers Glove compartment Front passenger side Opening Pull the handle The light in the glove compartment switches on Close the glove compart...

Страница 123: ... Do not store any breakable objects e g glass bottles in the compartments or there is an increased risk of injury in the event of an ac cident Center armrest Opening Press the button arrow 1 and fold the center arm rest up arrow 2 Connection for an external audio device This can be used to connect an external audio device such as an MP3 player AUX IN port refer to page 178 USB audio interface refe...

Страница 124: ...ckthecoversbeforefoldingupthe center armrest otherwise the cupholder could become damaged Clothes hooks The clothes hooks are located in the grab han dles in the rear Do not obstruct view When suspending clothing from the hooks ensure that it will not obstruct the driver s vision No heavy objects Donothangheavyobjectsfromthehooks otherwise they may present a danger to pas sengers during braking an...

Страница 125: ...2 there are lashing eyes in the cargo area Lashing eyes in the cargo area with rail To secure the cargo refer to page 132 there are lashing eyes in the cargo area Reversible floor panel The bottom of the cargo floor panel is coated with a water and dirt resistant finish Fold the cargo floor panel up remove it and flip it over Hook on the bottom of the cargo floor panel for easier loading the raise...

Страница 126: ...Online Edition for Part no 01 40 2 608 153 09 11 490 ...

Страница 127: ...Driving tips This chapter provides you with information useful in dealing with specific driving and operating modes Online Edition for Part no 01 40 2 608 153 09 11 490 ...

Страница 128: ...o not achieve their full trac tion potential until after an initial breaking in pe riod Drive conservatively for the first 200 miles 300 km Brake system Brakes require an initial break in period of ap prox 300 miles 500 km to achieve optimized contact and wear patterns between brake pads and discs Drive moderately during this break in period Following part replacement The same breaking in procedur...

Страница 129: ...er only if it is not deeper than 19 6 inches 50 cm and at this height no faster than walking speed up to 6 mph 10 km h Adhere to water depth and speed limita tions Do not exceed this water depth and walking speed otherwise the vehicle s engine the elec trical systems and the transmission may be damaged Braking safely Your vehicle is equipped with ABS as a standard feature Applying the brakes fully...

Страница 130: ...ions to clean the discs is not reached Should corrosion form on the brake discs the brakes will tend to respond with a pulsating ef fect that generally cannot be corrected Condensation under the parked vehicle When using the automatic climate control con densation water develops that exits underneath the vehicle Therefore traces of condensed water under the vehicle are normal Roof mounted luggage ...

Страница 131: ...ombined weight of occupants and cargo should never exceed XXX kg or YYY lbs Otherwise damage to the ve hicleandunstabledrivingsituationsmay result 2 Determine the combined weight of the driver and passengers that will be riding in your vehicle 3 Subtract the combined weight of the driver and passengers from XXX kilograms or YYY pounds 4 The resulting figure equals the available amount of cargo and...

Страница 132: ...protective material around any sharp edged or pointed objects that could bump against the rear window while the vehicle is in motion Securing cargo Lashing eyes in the cargo area To secure the cargo there are four lashing eyes in the cargo area Lashing eyes in the cargo area with rails To secure the cargo there are four movable lashing eyes in the cargo area To slide the lashing eyes press the but...

Страница 133: ...aps Larger and heavy objects secure with cargo straps Cargo straps cargo netting retaining straps or draw straps on the lashing eyes in the cargo area Securing cargo Always position and secure the cargo as described above otherwise it can endanger the car s occupants if sudden braking or swerving becomes necessary Heavy or hard objects should not be carried loose inside the car otherwise they coul...

Страница 134: ...consumption Close the windows and glass sunroof Driving with the glass sunroof and windows open results in increased air resistance and raises fuel consumption Check the tire inflation pressure regularly Check and if necessary correct the tire inflation pressure at least twice a month and before start ing on a long trip Low tire inflation pressure increases rolling re sistance and thus raises fuel...

Страница 135: ...at are not currently needed Functions such as seat heating and the rear win dow defroster require a lot of energy and con sume additional fuel especially in city and stop and go traffic Therefore switch off these functions if they are not actually needed Have maintenance carried out Have vehicles maintained regularly to achieve optimal vehicle economy and operating life Have the maintenance carrie...

Страница 136: ...Online Edition for Part no 01 40 2 608 153 09 11 490 ...

Страница 137: ...Navigation This chapter contains various examples of how the navigation system can guide you reliably to your destination Online Edition for Part no 01 40 2 608 153 09 11 490 ...

Страница 138: ...ic and road conditions and the instructions issued by the navigation system Failure to take to this precaution can place you in violation of the law and put vehicle occupants and other road users in danger Starting navigation system 1 Press the button on the controller 2 Navigation The navigation system can also be ac cesseddirectlywiththebuttononthecon troller Destination input Manual destination...

Страница 139: ...eral streets with the same name 1 Change to the list of street names 2 Highlight the street 3 Select the street Alternative enter the street address and house number 1 Select Street or the displayed street 2 Enter the street as you would the town city 3 House number 4 Select the numbers 5 Change to the list of house numbers 6 Select a house number or range of house numbers Street does not exist in...

Страница 140: ...he destination in the address book After entering the destination store the desti nation in the address book 1 Navigation 2 Map 3 Guidance 4 Options Open 5 Store as new contact or Add to existing contact 6 Select an existing contact if available 7 Business address or Home address 8 Enter Last name and if necessary First name 9 Store in vehicle Storing the position The current position can be store...

Страница 141: ...igation 2 Last destinations 3 Select the destination 4 Start guidance Editing the destination 1 Navigation 2 Last destinations 3 Highlight the destination 4 Open Options 5 Edit destination Deleting the last destinations 1 Navigation 2 Last destinations 3 Highlight the destination 4 Open Options 5 Delete entry or Delete all last destinations Special destinations Opening the search for special desti...

Страница 142: ...ntroller to the left to leave the category details 6 Start search A list of the special destinations is displayed 7 Select a special destination Details are displayed If multiple details are stored you can leaf through the pages If a phone number is available a connection can be established if necessary 8 Select the symbol Start guidance or Add as another destination Add a destination as a further...

Страница 143: ...estination Add a destination as a further destination refer to page 145 Exit interactive map return to the map view View in northern direction or View in driving direction Display destination the map section around the destination is displayed Display current location the map section around your current location is displayed Find points of interest the search for spe cial destinations is started D...

Страница 144: ... or say at least the first three letters Depending on the entry up to 20 towns cit ies may be suggested 5 Select the town city To select a recommended town city Yes To select a different town city New entry Select an entry Entry e g entry 2 To spell an entry Spell city 6 Continue making the entry as prompted by the system If there are several towns cities with the same name Towns cities of the sam...

Страница 145: ...skipped 2 Start guidance This symbol marks the active leg of the trip Store the trip Up to 30 trips can be stored in the trip list If necessary delete existing trips to be able to store new trips 1 Options Open 2 Store trip 3 Enter the name 4 OK Select the stored trip 1 Navigation 2 Stored trips 3 Select a stored trip 4 Start guidance Reversing the direction of travel Intermediate destinations are...

Страница 146: ...on The route calculated can be influenced by selecting certain criteria The route criteria can be changed when the destination is entered and during destina tion guidance Road types are part of the navigation data and are taken into consideration when plan ning a route e g avoid highways Therecommendedroutemaydifferfromthe route you would take based on personal ex perience The settings are stored ...

Страница 147: ...mation Traffic bulletins Distance to the next change in direction Street name at the next change in direction Lane information On multi lane roads the recommended lanes are marked in the arrow view by a triangle Solid triangle best lane Empty triangle possible lane However an other lane change may be needed shortly Displaying list of route sections When the destination guidance is started a list o...

Страница 148: ...ice instructions Repeating spoken instructions 1 Navigation 2 Map 3 Highlight the symbol 4 Press the controller twice Volume of spoken instructions Turn the volume button while giving an instruc tion until the desired volume is set Saving the spoken instructions on the programmable memory buttons The function for switching the spoken instruc tions on off can be stored on a programmable memory butt...

Страница 149: ...ial destination Display traffic bulletins Interactive map Set the map view Change the scale To change to the function bar move the con troller to the left Changing the map section Interactive map To shift the map move the controller in the required direction To shift the map diagonally move the con troller in the required direction and turn it Changing the scale 1 Select the symbol 2 To change the...

Страница 150: ...in A Total Traffic Network a division of Clear Channel Broadcasting Inc Total Traffic Network holds the rights to the traffic in cident data and RDS TMC network through which it is delivered You may not modify copy scan or use any other method to re produce duplicate republish transmit or distribute in any way any portion of traffic in cident data You agree to indemnify defend and hold harmless BM...

Страница 151: ...fic bulletins 1 Navigation 2 Map 3 Traffic Info First the traffic bulletins for the calculated route are displayed The traffic bulletins are sorted by their distance from the current po sition of the vehicle 4 Select a traffic bulletin More information display additional information 5 Scroll to the next or previous traffic bulletin if required Traffic bulletins on the map Traffic conditions gray m...

Страница 152: ...ulletins and the possible detour routes When there is a traffic obstruction if possible a detour is offered In addition distance and time differences between the original route and the detour are displayed To accept the detour Detour In the event of special hazards e g objects on the road a message is displayed without a de tour suggestion Detours can also be accepted if the traffic mes sages are ...

Страница 153: ...e vehicle is located in an unrecognized region is in a poor reception area or the system is currently determining the posi tion Reception is usually best when you have an unobstructed view of the sky Thedestinationwithoutstreetinformationis not used for route guidance When city has been input no downtown can be determined Input any street in the selected city and start destination guidance The des...

Страница 154: ...Online Edition for Part no 01 40 2 608 153 09 11 490 ...

Страница 155: ...rtainment The chapter helps assure your enjoyment when receiving radio and television stations and playing CDs DVDs and tracks from the music collection Online Edition for Part no 01 40 2 608 153 09 11 490 ...

Страница 156: ...Treble bass balance and fader Treble treble adjustment Bass depth adjustment Balance left right volume distribution Fader front rear volume distribution Setting treble bass balance and fader 1 CD Multimedia Radio or Settings 2 Tone 3 Select the desired tone settings 4 To adjust turn the controller 5 To store press the controller Equalizer Setting for individual audio frequency ranges Adjusting the...

Страница 157: ...signal e g thesafety belt reminder compared to the entertain ment sound output Microphone volume of the microphone during a phone call Loudspeak volume of the loudspeakers during a phone call The following volumes are only stored for the respective paired telephone Microphone Loudspeak Adjusting the volume 1 CD Multimedia Radio or Settings 2 Tone 3 Volume settings 4 Select the desired volume setti...

Страница 158: ...output Switching on off When the ignition is switched off press ON OFF button on the radio Muting When the ignition is switched on or the engine is running press the ON OFF button on the radio AM FM station Selecting a station 1 Radio 2 FM or AM 3 Select the desired station All saved stations are stored for the remote con trol currently in use Changing the station Press the button Storing a statio...

Страница 159: ...g deactivating digital radio reception 1 Radio 2 FM or AM 3 Open Options 4 HD Radio Reception The setting is stored for the remote control cur rently in use This symbol is displayed in the status line when the audio signal is digital In areas in which the station is not continuously received in digital mode the playback switches between analog and digital reception Due to time delayed broadcasting...

Страница 160: ...pack ages The packages must be enabled by tele phone Navigation bar overview Symbol Function Change the list view Select the category Direct channel entry Timeshift Symbol Function OpentheMyFavoritescategory open a favorite Manage the favorites Traffic Jump The functions of the navigation bar symbols can also be stored on the programmable memory buttons refer to page 20 Managing a subscription To ...

Страница 161: ...s The selected channel is stored for the remote control currently in use Via iDrive 1 Radio 2 Satellite radio 3 Select All channels or the desired cate gory 4 Select the desired channel Via the buttons on the center console Press the button The next channel is selected Via direct channel entry 1 Radio 2 Satellite radio 3 Set channel 4 Turn the controller until the desired channel is reached and pr...

Страница 162: ...lmust be available The stored audio track can be played with a de lay following the live broadcast When the buffer is full the older tracks are overwritten The buf fer is cleared when a new channel is selected Opening the timeshift function 1 Radio 2 Satellite radio 3 Replay Time shift The red arrow shows the current playback position The time difference to the live broadcast is displayed next to ...

Страница 163: ...r team Leagues or teams can be added to the favorites from a selection list 1 Radio 2 Satellite radio 3 Manage favorites 4 Add sports information 5 Select the league 6 Select Add all teams or the desired team Opening the favorites If an activated favorite is played back the fol lowing message appears for approx 20 sec onds Favorite alert Favorites Select the symbol while the message is shown The d...

Страница 164: ...ly being broad cast Select one of the symbols to deactivate Traffic Jump Automatic update About twice a year Sirius performs an update of the channel names and positions The update takes place automatically and may take several minutes Notes Reception may not be available in some sit uations such as under certain environmen tal or topographic conditions The satellite radio has no influence on this...

Страница 165: ...ntly in use The stations can also be stored on the program mable memory buttons refer to page 20 Deleting a station 1 Radio 2 Presets 3 Select the desired station 4 Options Open 5 Delete entry Radio Entertainment 165 Online Edition for Part no 01 40 2 608 153 09 11 490 ...

Страница 166: ...off press ON OFF button on the radio Muting When the ignition is switched on or the engine is running press the ON OFF button on the radio CD DVD Playback Loading the CD DVD player Insert the CD DVD with the printed side up Playback begins automatically Reading can take a few minutes with com pressed audio files Starting playback A CD DVD is located in the CD DVD player or DVD changer 1 CD Multime...

Страница 167: ... letters and num bers of the CD DVD may not be displayed cor rectly 1 Select the directory if necessary To go up a level in the directory move the controller to the left 2 Select the desired track to begin playback Displaying information on the track If information about a track has been stored it is displayed automatically Interpret Album track Number of tracks on the CD DVD File name of track Ra...

Страница 168: ...outheast Asia 4 Australia Central and South America New Zealand 5 Northwest Asia North Africa Code Region 6 China 0 All regions Playback The video image is displayed on the front Con trol Display up to a speed of approx 2 mph 3 km h in some countries it is only displayed if the parking brake is set or if the automatic trans mission is in position P DVD video 1 CD Multimedia 2 CD DVD 3 Select a DVD...

Страница 169: ... DVD VCD settings For some DVDs settings can only be made via the DVD menu refer also to the information on the DVD Selecting the language The languages that are available depend on the DVD 1 Turn the controller during playback 2 Open Options 3 Audio language 4 Select the desired language Selecting the subtitles The subtitles that are available depend on the DVD 1 Turn the controller during playba...

Страница 170: ...the desired track Selecting the camera angle The availability of a different camera angle de pends on the DVD and the current DVD track 1 Turn the controller during playback 2 Open Options 3 Additional options 4 Viewing angle 5 Select the desired camera angle Opening the main menu back These functions are not contained on every DVD Therefore they may not be available for use DVD changer In the car...

Страница 171: ...D DVD until the LEDs on the DVD slot are flashing otherwise the CD DVD or the DVD changer could be damaged Do not continue to push on the CD DVD this may cause it to jam and prevent it from being able to eject again After they are inserted it may take several mi nutes for the CDs DVDs to be read in Removing a single CD DVD 1 Press the button 2 Select the DVD compartment The CD DVD is partially eje...

Страница 172: ...Ds or the adapter may jam and no longer eject Do not use combined CDs DVDs e g DVD Plus as the CDs DVDs can jam and will no longer eject General malfunctions CD DVD changers and players have been optimized for performance in vehicles In some instances they may be more sensitive to faulty CDs DVDs than stationary devices would be If a CD DVD cannot be played first check whether it has been inserted...

Страница 173: ...s stored as well CD DVD or USB device with compressed audio files the entire content of the CD DVD or the USB device is stored in the vehicle as an album The WMA MP3 M4A and AAC formats are stored Individual tracks and di rectories can be deleted later Deleting a track and directory refer to page 177 Tracks with DRM copy protection can be stored but cannot be played back Backing up music data Regu...

Страница 174: ...artist is stored with the track if this informa tion is available in the vehicle database or on the CD To update the database contact your service center Storing from a USB device To store music a suitable device must be con nected to the USB interface in the glove com partment Suitable devices USB mass storage devi ces suchasUSBflashdrivesorMP3players with a USB interface Unsuitable devices USB h...

Страница 175: ...New search Music search using spoken instructions Instructions for the voice activation system re fer to page 22 1 Press the button on the steering wheel 2 Music search 3 Open the desired category e g Select artist 4 Say the desired entry in the list 5 Select other categories if you wish To select a track directly Title Say the voice command and the name of the desired track in a single command Cu...

Страница 176: ...directory move the controller to the left Random playback All tracks of the selection are played back in ran dom order 1 CD Multimedia 2 Music collection 3 Open Options 4 Random Managing music Albums Renaming an album The name of the album if available is automat ically entered when the album is stored If the name is not available it can be changed later if desired 1 CD Multimedia 2 Music collecti...

Страница 177: ...on Backing up the music collection The entire music collection can be stored on a USB device Make sure there is enough free memory capacity on the USB device Depending on the number of tracks backing up the music collection may take several hours Therefore it is best to perform the backup dur ing a long trip 1 Starting the engine 2 Connect the USB device to the USB inter face in the glove compartm...

Страница 178: ... the audio device switch it on and select a track on the audio device 2 CD Multimedia 3 If necessary External devices 4 AUX front The sound is played back on the vehicle loud speakers Volume The volume of the sound output is dependent on the audio device If this volume differs mark edly from the volume of the other audio sources it is advisable to adjust the volumes Adjusting the volume 1 CD Multi...

Страница 179: ...st To connect the device use the special cable adapter for the Apple iPod iPhone available from your service center or a flexible adapter cable Connect the Apple iPod iPhone with the AUX IN port and USB in terface using the special cable adapter or with the USB interface using the flexible adapter cable The Apple iPod iPhone menu structure is sup ported by the USB audio interface Connection of a U...

Страница 180: ...ed if they have been saved in the Latin alphabet Starting the track search 1 CD Multimedia 2 External devices 3 Select the or symbol 4 Search 5 Select the desired category e g Genre or Artist All entries are displayed in a list Open A Z search and input the de sired entry When a letter is entered the results are filtered using this letter as the first letter If multiple letters are entered all res...

Страница 181: ...in play back Video menu Symbol Function Next video file Previous video file Double click on an icon to play back previous video file Notes Do not expose the audio device to extreme en vironmental conditions such as very high tem peratures refer to the audio device operating instructions Depending on the configuration of the audio files e g bit rates greater than 256 kbit s the files may not play b...

Страница 182: ... It is only required once for pairing Pairing and connecting Pairing a device To avoid becoming distracted and posing an unnecessary hazard both to your own vehi cle s occupants and to other road users only pair the device while the vehicle is stationary 1 CD Multimedia 2 Bluetooth audio 3 If necessary Bluetooth audio 4 Add new phone The Bluetooth name of the vehicle is dis played 5 Perform additi...

Страница 183: ...he desired device from the list of paired devices 5 Options Open 6 Configure phone 7 Audio 8 OK Connecting the device 1 CD Multimedia 2 Bluetooth audio 3 If necessary Bluetooth audio 4 Select the desired device from the list of paired devices Whitesymbol thedeviceisactiveasanaudio source Playback General information The display of music track information de pends on the device Operation can takes ...

Страница 184: ...nected to the device or vehicle Delete connections with other devices if necessary Is the mobile phone in power save mode or does it have only a limited remaining battery life Charge the mobile phone in the snap in adapter or via the charging cable Depending on the mobile phone it is possi ble that only one device can be connected to the vehicle Unpair the connected device from the vehicle and pai...

Страница 185: ...ation Updating software via USB The software may only be updated when the ve hicle is stationary 1 Store the file for the software update in the main director of a USB flash drive 2 Insert the USB flash drive into the USB in terface of the USB audio interface in the center armrest An update via the USB in terface in the glove compartment is not pos sible 3 Settings 4 Software update 5 Update softw...

Страница 186: ...Online Edition for Part no 01 40 2 608 153 09 11 490 ...

Страница 187: ...ation All of the options available to you for mobile communication with family friends business partners and service providers are described in this chapter Online Edition for Part no 01 40 2 608 153 09 11 490 ...

Страница 188: ...llow Do not hold the mobile phone in your hand while you are driving use the hands free system instead If you do not ob serve this precaution you can endanger the ve hicle occupants and other road users Snap in adapter The snap in adapter is used to Hold the mobile phone Recharge the battery Connect the mobile phone to an outside an tenna of the vehicle This provides for better network reception a...

Страница 189: ... everywhere Comply with all safety guidelines and regulations 1 Telephone 2 Options Open 3 Bluetooth Additional functions Activating deactivating the additional functions Activate the functions before pairing to be able to use them in the vehicle Information on suit able mobile phones refer to page 188 that sup port these functions 1 Telephone 2 Bluetooth phone 3 Options Open 4 Configure Bluetooth...

Страница 190: ... The mobile phone is detected connected in the vehicle within a short period of time when the engine is running or the ignition is switched on The phone book entries of the telephone stored on the SIM card or mobile phone are transmitted to the vehicle after detection depending on the mobile phone Four mobile phones can be paired Specific settings may be necessary in some mobile phones e g authori...

Страница 191: ...her devices if necessary Is the audio connection activated Deacti vate the audio connection Is the mobile phone in power save mode or does it have only a limited remaining battery life Charge the mobile phone in the snap in adapter or via the charging cable Depending on the mobile phone it is possi ble that only one cell phone can be con nected to the vehicle Unpair the connected cellphonefromthev...

Страница 192: ...e ad justed The settings can only be created during a call and must be adjusted separately for each telephone The settings are deleted when the telephone is unpaired 1 Settings 2 Tone 3 Volume settings 4 Select the desired setting Microphone or Loudspeak 5 To adjust turn the controller 6 To store press the controller Incoming call Receiving calls If the number of the caller is stored in the phone ...

Страница 193: ... to letters as required Select the symbol Select the letters individually 5 Select the symbol Select symbol to convert to numbers Phone numbers can also be entered by voice Only numbers can be spoken Letter number assignment Letter Number ABC 2 DEF 3 GHI 4 JKL 5 MNO 6 PQRS 7 TUV 8 WXYZ 9 Calls with multiple participants General information You can switch between calls or connect two calls to a sin...

Страница 194: ...Conference call When terminating a conference call both calls are ended If one call is terminated by another party the other call can be continued Switching the microphone to mute When a call is active the microphone can be muted 1 Telephone 2 Active calls 3 Microphone mute A microphone that has been switched to mute is automatically reactivated When a new connection is established When switching ...

Страница 195: ...ialed numbers in the mobile phone is transmitted to the vehicle depending on the mobile phone The 20 phone numbers dialed last are displayed The sorting order of the phone numbers depends on the particular mo bile phone Dialing the number via the instrument cluster This is possible when there is no active call 1 Press the button on the steering wheel 2 Select the desired phone number The connectio...

Страница 196: ... of the vehicle can be continued on the hands free system with the ignition switched on Depending on the mobile phone the system au tomatically switches to the hands free system Ifthesystemdoesnotswitchoverautomatically follow the instructions on the mobile phone dis play refer also to the mobile phone operating instructions From the hands free system to the mobile phone Calls that are made on the...

Страница 197: ...obile phone remove the protective cap from the antenna con nector and from the USB connection of the mobile phone 2 Slide the mobile phone with the buttons fac ing up in the direction of the electrical con nections arrow 1 and push downward ar row 2 until it engages Removing the mobile phone Press the button and remove the mobile phone Professional mobile phone preparation package Communication 19...

Страница 198: ...ving To avoid becoming distracted and posing an unnecessary hazard to your vehicle s occu pants and to other road users never attempt to use the controls or enter information unless traf fic and road conditions allow this Requirements A suitable mobile phone is paired with the vehicle and connected In some mobile phones data access must be confirmed on the mobile phone The time time zone and date ...

Страница 199: ... of contacts an A Z search is offered refer to page 21 A symbol indicates the storage location of the contacts Symbol Storage location No symbol In the vehicle the address has not been checked as a destination In the vehicle the address has been checked as a destination Mobile phone Dialing phone numbers 1 Select the desired contact 2 Select the phone number The connection is established Editing a...

Страница 200: ...eld 7 Enter the text and assign the contact type 8 In the navigation system enter address Only addresses contained in the navigation data in the vehicle can be entered This en sures that destination guidance is possible for all addresses If necessary Accept address 9 Store contact in vehicle Contact types Various contact types can be assigned to phone numbers and addresses Symbol Meaning Home phon...

Страница 201: ...nformation Whether or not text messages and e mails from the mobile phone are displayed depends on whether transmission from the mobile phone to the vehicle is supported Text messages and e mails may not be supported by the service pro vider or the function may need to be enabled separately After the mobile phone is first paired transmission may take several minutes Mes sages are only displayed in...

Страница 202: ...aved or selected refer to page 205 Reading the text message out loud Read the text message out loud refer to page 206 My Info Starting destination guidance 1 Select the desired message 2 Start guidance or Add as another destination Dialing the number in the message Up to 4 phone numbers can be transmitted with a message 1 Select the desired message 2 Call If the message contains a number the con n...

Страница 203: ...mber select the desired num ber from the list The connection is established E mail Displaying e mails 1 Office 2 Messages 3 Select the desired e mail Displaying e mail contacts If the sender and recipient of an e mail are trans mitted by the mobile phone this information is displayed in the e mail Sender Recipient If the e mail addresses are stored in the con tacts the contact is displayed Select ...

Страница 204: ...intment 2 Scroll through the appointment if neces sary Turn the controller Select the symbol Using contact data Contact data from appointments tasks text messages e mails and notes can be saved or selected refer to page 205 Reading the appointment out loud Read the appointment out loud refer to page 206 Tasks Displaying the task list Display tasks that are due within the next 90 days 1 Office 2 Ta...

Страница 205: ...nders of pending appointments and tasks are displayed After an appointment or after a task is due the reminder is no longer displayed 1 Office 2 Reminders 3 Select the desired reminder The corresponding appointment or the task are displayed Using contact data At a glance Contact data from appointments tasks text messages emails and notes can be stored or selected Displaying contact or selecting ph...

Страница 206: ...s have been marked as completed or have a due date that lies more than 90 days in the future Depending on the number of stored ap pointments task notes and messages in the mobile phone not all are displayed in the vehicle Not all appointments and tasks from the mobile phone are displayed at the right time The time zone time or date is incorrectly set on the Control Display and mobile phone The e m...

Страница 207: ... New contact 1 Contacts 2 New contact 3 The entry fields are still filled with the previ ous entries Delete input fields 4 Fill in the entry fields select the symbol next to the entry field 5 Enter the text refer to page 21 6 In the navigation system enter address Only addresses contained in the navigation data in the vehicle can be entered This en sures that destination guidance is possible for a...

Страница 208: ...r destination Checking the address as a destination An address that is to be used for destination guidance must match the navigation data con tained in the vehicle The address can be checked for this purpose 1 Select the desired contact and highlight the address 2 Options Open 3 Check as destination 4 Correct and store the address if necessary Selecting the sorting order of the names Names can be ...

Страница 209: ...n you press the SOS button a connection to the BMW As sist Response Center is established The BMW Assist Response Center then speaks with you and takes further steps to help you Automatic Collision Notification under cer tain conditions a connection is established to the BMW Assist Response Center after a serious accident If possible the BMW As sist Response Center then speaks with you and takes f...

Страница 210: ...lease contact your service partner or the BMW customer hotline Concierge service General information The BMW Assist Concierge service offers infor mation on events gas stations or hotels and provides phone numbers and addresses Hotels can be booked directly by the BMW Assist Con cierge service The Concierge service is part of the optional BMW Convenience Plan Starting the Concierge service 1 BMW A...

Страница 211: ...ess search can be opened via BMW Search License conditions This product contains NetFront Browser soft ware of ACCESS Co Ltd Copyright 2007 ACCESS Co Ltd All rights reserved NetFront is a trademark or registered trademark of ACCESS CO LTD in Japan and other coun tries This software is based in part on the work of the Independent JPEG Group Requirements Subscription to the optional Convenience Plan...

Страница 212: ...c tion is established to Customer Relations Vehicles equipped with BMW Assist or TeleService 1 BMW Assist or ConnectedDrive 2 Customer Relations 3 Start service Service Request At a glance Sends information to your service partner to re quest the arrangement of a service appoint ment The TeleService data is transmitted dur ing a Service Request If possible your service partner will establish conta...

Страница 213: ...osition data is trans mitted Indicate when the last Teleservice Report was transmitted 1 Vehicle Info 2 Vehicle status 3 Options Open 4 Last Teleservice Info Teleservice Battery Guard Teleservice Battery Guard continually checks the battery charge level of the vehicle If the bat tery charge level falls below a certain value a notification is automatically sent to your service partner If necessary ...

Страница 214: ...ay be put in danger because of the distraction from driving For reasons of safety some software applica tions are usable only while the vehicle is station ary Use apps 1 Connect the cell phone via the snap in adapter or via the USB audio interface 2 ConnectedDrive 3 Select the desired software application Displaying status Information about the currently available soft ware applications can be dis...

Страница 215: ...ell phone Some cell phones cannot simultaneously use Apps and the Bluetooth hands free sys tem If necessary restart the software application on the cell phone after a phone conversa tion ConnectedDrive Communication 215 Online Edition for Part no 01 40 2 608 153 09 11 490 ...

Страница 216: ...Online Edition for Part no 01 40 2 608 153 09 11 490 ...

Страница 217: ...emain mobile at all times this chapter supplies you with important information on the topics of fuels and lubricants wheels and tires service maintenance and Roadside Assistance Online Edition for Part no 01 40 2 608 153 09 11 490 ...

Страница 218: ... may occur Fuel cap Opening 1 Briefly press the rear edge of the fuel filler flap 2 Turn the fuel cap counterclockwise 3 Place the fuel cap in the bracket attached to the fuel filler flap Closing 1 Fit the cap and turn it clockwise until you clearly hear a click 2 Close the fuel filler flap Do not pinch the retaining strap Do not pinch the retaining strap attached to the cap otherwise the cap cann...

Страница 219: ...bol This releases the fuel filler flap Observe the following when refueling The fuel tank is full when the filler nozzle clicks off the first time Handling fuels Obey safety regulations posted at the gas station Refueling Mobility 219 Online Edition for Part no 01 40 2 608 153 09 11 490 ...

Страница 220: ... high outside temperatures This has no effect on the engine life Minimum fuel grade Do not use any gasoline below the mini mum specified fuel grade otherwise engine damage may occur Use high quality brands Field experience has indicated significant differ ences in fuel quality volatility composition ad ditives etc among gasolines offered for sale in the United States and Canada Fuels containing up...

Страница 221: ...rect tire pressures a condition that may not only compromise your vehicle s driving stability but also lead to tire damage and the risk of an accident After correcting the tire inflation pressure Reinitialize the Flat Tire Monitor Reinitialize the Tire Pressure Monitor Pressure specifications The tire inflation pressure table refer to page 222 contains all pressure specifications for the specified...

Страница 222: ...specifications in bar PSI Specifications in psi kilopascal with cold tires 245 50 R 18 100 V M S A S RSC 245 50 R 18 100 V M S RSC 2 2 32 2 4 35 245 45 R 19 102 V M S XL A S RSC 245 45 R 19 102 V M S RSC 2 2 32 2 6 38 V 245 45 R 19 98 W RSC H 275 40 R 19 101 W RSC 2 2 32 2 2 32 V 245 40 R 20 99 Y XL RSC H 275 35 R 20 102 Y XL RSC 2 2 32 2 4 35 Compact wheel T 135 80 R 18 104 M Speed up to a max of...

Страница 223: ...eed up to a max of 50 mph 80 km h 4 2 60 X3 35iA Tire size Pressure specifications in bar PSI Specifications in bar PSI with cold tires 245 50 R 18 100 V M S A S RSC 245 50 R 18 100 V M S RSC 2 6 38 3 0 44 245 45 R 19 102 V M S XL A S RSC 245 45 R 19 102 V M S RSC 2 8 41 3 2 46 V 245 45 R 19 98 W RSC H 275 40 R 19 101 W RSC 2 4 35 2 8 41 V 245 40 R 20 99 Y XL RSC H 275 35 R 20 102 Y XL RSC 2 4 35 ...

Страница 224: ...ing habits service practices and differences in road characteristics and cli mate Traction The traction grades from highest to lowest are AA A B and C Those grades represent the tire s ability to stop on wet pavement as measured under controlled conditions on specified government test surfa cesofasphaltandconcrete AtiremarkedCmay have poor traction performance The traction grade assigned to this t...

Страница 225: ... as well as debris curbs and other obstacles can cause serious damage to wheels tires and sus pension parts This is more likely to occur with low profile tires which provide less cushioning between the wheel and the road Be careful to avoid road hazards and reduce your speed es pecially if your vehicle is equipped with low pro file tires Indications of tire damage or other vehicle de fects Unusual...

Страница 226: ...of your vehicle cannot evalu ate non approved wheels and tires to determine if they are suited for use and therefore cannot ensure the operating safety of the vehicle if they are mounted Recommended tire brands For each tire size the manufacturer of your ve hicle recommends certain tire brands These can be identified by a star on the tire sidewall With proper use these tires meet the highest stand...

Страница 227: ... against all contact with oil grease and fuels Do not exceed the maximum tire inflation pres sure indicated on the side wall of the tire Run flat tires Label RSC label on the tire sidewall The wheels are composed of special rims and tires that are self supporting to a limited de gree The support of the sidewall allows the tire to re main drivable to a restricted degree in the event of a pressure l...

Страница 228: ...cturer s instructions Do not initialize the Flat Tire Monitor after mounting snow chains as doing so may result in incorrect readings Do not initialize the Tire Pressure Monitor after mounting snow chains as doing so may result in incorrect readings When driving with snow chains briefly activate Dynamic Traction Control if necessary Maximum speed with snow chains Do not exceed a speed of 30 mph 50...

Страница 229: ...ehicle identification number 3 Jump starting negative terminal 4 Jump starting positive terminal 5 Coolant reservoir 6 Oil filler neck Hood Opening the hood Working in the engine compartment Never attempt to perform any service or repair operations on your vehicle without the necessary professional technical training If you are unfamiliar with the statutory guide lines have any work on the vehicle...

Страница 230: ... of injury from protruding parts when the hood is open Closing the hood Let the hood drop from a height of approx 16 in 40 cm and push down on it to lock it fully Make sure you hear the engine compartment lid engage Hood open when driving If you see any signs that the hood is not completely closed while driving pull over imme diately and close it securely Danger of pinching Make sure that the clos...

Страница 231: ...east 6 miles 10 km The vehicle is stopped or being driven on a level roadway Displaying the oil level 1 Vehicle Info 2 Vehicle status 3 Engine oil level Possible messages Engine oil level OK Measurement not possible at this time Measuring engine oil level Duration with the engine running ap prox 3 minutes Duration while driving approx 5 minutes Engine oil level below minimum Add 1 quart Add oil wi...

Страница 232: ...mation about the approved types of oils can be requested from the service center Alternative oil types If the approved engine oils are not available up to 1 US quart liter of an oil with the following specification can be added Specification API SM or superior grade specification Oil change An oil change should be carried out by your service center only Coolant General information Danger of burns ...

Страница 233: ...nd maximum marks in the filler neck 4 If the coolant is low slowly add coolant up to the specified level do not overfill 5 Turn the cap until there is an audible click 6 Have the cause of the coolant loss elimi nated as soon as possible Disposal Comply with the relevant environmental protection regulations when disposing of coolant and coolant additives Engine oil Mobility 233 Online Edition for P...

Страница 234: ...y stored in the remote control Your servicecenterwillreadoutthisdataandsuggest the right array of service procedures for your ve hicle Therefore hand your service specialist the re mote control that you used most recently Storage periods Storage periods during which the vehicle bat tery was disconnected are not taken into ac count If this occurs have a service center update the time dependent main...

Страница 235: ...tic converter Fuel cap The indicator lamp lights up If the fuel cap is not properly tightened the OBD system may conclude that fuel vapor is escaping If the cap is then tightened the display should go out in a short time Data memory Your vehicle records data relating to vehicle op eration faults and user settings These data are stored in the remote control and can be read out with suitable devices...

Страница 236: ...olding cover in the cargo area Wiper blade replacement General information Do not fold down the wipers without wiper blades Do not fold down the wipers if wiper blades have not been installed this may damage the wind shield Replacing the front wiper blades 1 To change the wiper blades fold up refer to page 64 the wiper arms 2 Fold up the wipers 3 Position the wiper blade in a horizontal po sition ...

Страница 237: ...our bare hands as even minute amounts of contamination will burn into the bulb s surface and reduce its service life Use a clean tissue cloth or something similar or hold the bulb by its base Light emitting diodes LEDs Light emitting diodes installed behind a cover serve as the light source for controls display el ements and other equipment These light emitting diodes which are related to conventi...

Страница 238: ...lb holder The lower bulb is the high beam and head lamp flasher and the upper bulb is the park ing lamp 4 Pull off the bulb 5 Insert the new bulb and attach the cover in the reverse order Xenon headlamps Because of the long life of these bulbs the like lihood of failure is very low Switching the lamps on and off frequently shortens their life Ifaxenonbulbfails switchonthefrontfoglamps and continue...

Страница 239: ...he clip arrow 1 2 Turn the screwdriver by 90 arrow 2 3 Press the removal hook upward arrow and remove the front fog lamp from the front us ing the hook 4 Detach the connector 5 Turn the bulb bracket and remove it 6 Remove the bulb and replace it 7 Proceed in reverse order to insert the front fog lamp Note the guide rails in doing so Turn signal Follow the General instructions on lamps and bulbs re...

Страница 240: ...al tail lamp and brake lamp Follow the General instructions on lamps and bulbs refer to page 237 21 watt bulb P21W With an Adaptive Light Control or xenon head lamp tail lamp is designed with LED technol ogy Contact your service center in the event of a malfunction 1 Open the tailgate 2 Insert the screwdriver from the onboard ve hicle tool kit between the cover and body push it up arrow and remove...

Страница 241: ...refully To replace the brake lamp push the bulb down and turn it to the left 6 Proceed in the reverse order to insert the new bulb and attach the bulb holder Ensure that the bulb holder is firmly at tached Changing wheels Notes The vehicle equipment does not include a spare tire When using run flat tires or tire sealants a tire does not need to be changed immediately in the event of pressure loss ...

Страница 242: ...Disposing of old batteries Have old batteries disposed of by your service center or bring them to a recy cling center Maintain the battery in an upright position for transport and storage Secure the battery so that it does not tip over during transport Fuses Notes Replacing fuses Never attempt to repair a blown fuse and do not replace a defective fuse with a substitute of another color or amperage...

Страница 243: ...on in an emergency Emergency Request not guaranteed For technical reasons the Emergency Re quest cannot be guaranteed under unfavorable conditions Service contract After your contract with BMW Assist has ex pired the BMW Assist system can be deac tivated by the service center without you having to visit a workshop After deactivation an Emergency Request is no longer possible Under certain circumst...

Страница 244: ... The warning triangle is located behind the left hand cover in the cargo area To remove loosen the bracket First aid kit The first aid kit is located behind the left hand cover in the cargo area Some of the articles have a limited service life Check the expiration dates of the contents reg ularly and replace any expired items promptly Roadside Assistance Service availability RoadsideAssistancecanb...

Страница 245: ...p of the BMW starting aid ter minal 2 Attach one terminal clamp of the positive jumper cable to the positive terminal of the battery or to the corresponding starting aid terminal of the vehicle providing assistance 3 Attach the other end of the cable to the pos itive terminal of the battery or to the corre sponding starting aid terminal of the vehicle to be started 4 Attach one terminal clamp of t...

Страница 246: ...ttaching the tow bar tow rope correctly Attach the tow bar or tow rope to the tow fitting connecting it to other vehicle parts may cause damage Switch on the hazard warning system de pending on local regulations If the electrical system has failed clearly identify the vehicle being towed by placing a sign or a warning triangle in the rear win dow Tow bar The tow fittings used should be on the same...

Страница 247: ...w fitting for towing on paved roads only Avoid lateral loading of the tow fitting e g do not lift the vehicle by the tow fitting Otherwise damage to the tow fitting and the ve hicle can occur Screw thread Push out the cover by pressing on the top edge Front Rear Tow starting Automatic transmission Do not tow start the vehicle Due to the automatic transmission the engine cannot be started by tow st...

Страница 248: ...oad salt can damage the ve hicle Washing in automatic car washes Give preference to cloth car washes or those that use soft brushes in order to avoid paint damage Notes Note the following Make sure that the wheels and tires are not damaged by the transport mechanisms Fold in the exterior mirrors otherwise they may be damaged depending on the width of the vehicle Deactivate the rain sensor refer to...

Страница 249: ...rs or windows Only use products intended for cleaning vehi cles Cleansers can contain substances that are dan gerous and harmful to your health Vehicle paint Regular care contributes to driving safety and value retention Environmental influences can act on the vehicle paint Tailor the frequency and extent of your car care to these influences Leather care Remove dust from the leather often using a ...

Страница 250: ...ot soak the headliner Do not use cleansers that contain alcohol or solvents Do not use cleansers that contain alcohol or sol vents such as lacquer thinners heavy duty grease removers fuel or such this could lead to surface damage Safety belts Dirty belt straps impede the reeling action and thus have a negative impact on safety Chemical cleaning Do not clean chemically this can destroy the webbing ...

Страница 251: ...ep all fluids and moisture away from the unit Otherwise they could affect or damage surfa ces or electrical components Avoid pressing too hard when cleaning and do not use abrasive materials otherwise damage can result Long term vehicle storage Your service center can advise you on what to consider when storing the vehicle for longer than three months Care Mobility 251 Online Edition for Part no 0...

Страница 252: ...Online Edition for Part no 01 40 2 608 153 09 11 490 ...

Страница 253: ...nce This chapter contains technical data short commands for the voice activation system and an index that will quickly take you to the information you need Online Edition for Part no 01 40 2 608 153 09 11 490 ...

Страница 254: ... not available in a vehicle e g because of the selected optional equip ment or country variant This also applies for safety related functions and systems Dimensions Width height 1 Vehicle height 66 inches 1 675 mm 2 Vehicle width without mirrors 74 inches 1 881 mm 3 Vehicle width with mirrors 82 6 in ches 2 098 mm Reference Technical data 254 Online Edition for Part no 01 40 2 608 153 09 11 490 ...

Страница 255: ...ifications The rated power outputs are established on the basis of fuel grade AKI 91 X3 xDrive 28i Displacement cu in cm 182 8 2 996 No of cylinders 6 Maximum output at engine speed hp rpm 241 6 600 Maximum torque at engine speed lb ft Nm rpm 221 300 2 750 4 000 Technical data Reference 255 Online Edition for Part no 01 40 2 608 153 09 11 490 ...

Страница 256: ...ad lbs kg 2 403 1 090 Approved rear axle load lbs kg 2 833 1 285 Approved roof load capacity lbs kg 220 100 Trunk capacity cu ft l 19 4 56 5 550 1 600 X3 xDrive 35i Approved gross vehicle weight lbs kg 5 214 2 365 Load lbs kg 903 410 Approved front axle load lbs kg 2 447 1 110 Approved rear axle load lbs kg 2 844 1 290 Approved roof load capacity lbs kg 220 100 Cargo area capacity cu ft l 19 4 56 ...

Страница 257: ...uel tank US gal liters approx 17 7 67 Fuel quality refer to page 220 Windshield and headlamp washer system US quarts liters approx 5 3 5 0 Technical data Reference 257 Online Edition for Part no 01 40 2 608 153 09 11 490 ...

Страница 258: ...activation system refer to page 22 To have the available spoken instructions read out loud Voice commands Adjusting Vehicle Function Command Open the main menu Main menu Open the options Options Open the settings Settings Info display of the instrument cluster Info Display Settings on the Control Display Control display Open the time and date Time and date Open the language and units Language and ...

Страница 259: ...ck Reference Guide Quick reference Open the index Owner s Manual Open the search by pictures Search by pictures Computer Function Command Open the computer Onboard info Open the trip computer Trip computer Vehicle Function Command Open the vehicle information Vehicle info Open the vehicle status Vehicle status Short commands of the voice activation system Reference 259 Online Edition for Part no 0...

Страница 260: ...ference Open the route Route information Turn on spoken instructions Switch on voice instructions Repeat the spoken instruction Repeat voice instructions Turn off spoken instructions Switch off voice instructions Display the address book Address book Display the most recent destinations Last destinations Open the traffic bulletins Traffic Info Special destinations Points of interest Map Function C...

Страница 261: ...position Split screen facing the direction of travel Split screen map in direction of travel Split screen perspective Split screen perspective Split screen expanded intersection zoom Splitscreen Exit ramp view Split screen scale feet Split screen scale feet e g split screen scale 100 feet Split screen scale meters Split screen scale meters e g split screen scale 100 meters Split screen scale kilom...

Страница 262: ...mand Open a frequency Frequency megahertz e g 93 5 megahertz or frequency 93 5 Open the radio Radio Open the FM stations F M Open the manual search Manual Select a frequency range Select frequency Open a station Select station AM Function Command Open a frequency Frequency Kilohertz e g frequency 753 or 753 kilohertz Open the AM stations A M Open the manual search Manual Reference Short commands o...

Страница 263: ... satellite radio channel 2 Stored stations Function Command Open the stored stations Presets Choose a stored station Select preset Select a stored station Preset e g stored station 2 CD Multimedia CD DVD drive Function Command Select a track Track e g track 5 or C D track e g CD track 5 Play back a CD C D on Select a CD Select C D Select a CD and track C D track e g CD 3 track 5 Open the CD and Mu...

Страница 264: ...Play back the music collection Music collection on Play back the most frequently played tracks Top fifty External devices Function Command Open the external devices External devices Open the Bluetooth devices Bluetooth AUX at front AUX front Tone Function Command Open the tone settings Tone Telephone Function Command Dial a phone number Dial number Opens the Telephone menu Telephone Reference Shor...

Страница 265: ...Display Office Today Current office Display the contacts Contacts Display the messages Messages Display the calendar Calendar Display the tasks Tasks Display the reminders Reminders Contacts Function Command Select a name Choose name My contacts My contacts Open the contacts Contacts New contact New contact Short commands of the voice activation system Reference 265 Online Edition for Part no 01 4...

Страница 266: ...ive Function Command Open BMW Assist Open ConnectedDrive B M W Assist Connected Drive Open BMW Search B M W Online Reference Short commands of the voice activation system 266 Online Edition for Part no 01 40 2 608 153 09 11 490 ...

Страница 267: ...Short commands of the voice activation system Reference 267 Online Edition for Part no 01 40 2 608 153 09 11 490 ...

Страница 268: ...81 Armrest refer to Center arm rest 123 Arrival time 76 Assist 209 Assistance Roadside Assis tance 244 Audio playback 167 Audio playback Blue tooth 181 AUTO H button refer to Auto matic Hold 60 AUTO intensity 112 Automatic car wash 248 Automatic climate con trol 109 Automatic climate control with enhanced features 111 Automatic Curb Monitor 53 Automatic deactivation front passenger airbags 87 Auto...

Страница 269: ...41 Changing wheels tires 226 Check Control 70 Children seating position 55 Children transporting safely 55 Child restraint fixing sys tem 55 Child restraint fixing system LATCH 56 Child restraint fixing systems mounting 55 Child safety locks 57 Child seat mounting 55 Child seats 55 Chrome parts care 250 Cleaning displays 251 Climate control 109 111 Clock 73 Closing opening from in side 37 Closing ...

Страница 270: ...ion remote control 31 Emergency release door lock 37 Emergency release fuel filler flap 218 Emergency Request 243 Emergency service refer to Roadside Assistance 244 Emergency start function en gine start 31 Energy Control 73 Energy recovery 74 Engine compartment 229 Engine compartment working in 229 Engine coolant 232 Engine oil 231 Engine oil adding 231 Engine oil additives 232 Engine oil change ...

Страница 271: ...p courtesy delay fea ture via remote control 35 Headlamp flasher 62 Headlamp flasher bulb re placement 238 Headlamp glass 237 Headlamps 237 Headlamps care 249 Headlamp washer system 62 Headliner 15 Head restraints 46 Head restraints front 50 Head restraints rear 51 Head up Display 107 Head up Display care 251 Heavy cargo stowing 132 Height vehicle 254 High beam Assistant 82 High beams 62 High beam...

Страница 272: ...Loading 131 Lock door 36 Locking unlocking from in side 37 Locking unlocking via door lock 36 Locking unlocking with re mote control 34 Locking automatic 37 Locking central 33 Locking via tailgate 38 Lock power window 43 Locks doors and win dows 57 Low beams 80 Lowbeams automatic referto High beam Assistant 82 Lower back support 48 Luggage compartment roller cover 118 Luggage rack refer to Roof mo...

Страница 273: ...isplay 16 Onboard vehicle tool kit 236 Opening closing from in side 37 Opening closing via door lock 36 Opening closing with remote control 34 Operating concept iDrive 16 Optional equipment standard equipment 6 Outside air refer to Automatic recirculated air control 113 P Paint vehicle 249 Pairing mobile phone 189 Panic mode 35 Panoramic glass sunroof 44 Park Distance Control PDC 101 Parked car ve...

Страница 274: ...y switch windows 43 Safety systems airbags 85 Satellite radio 160 Saving fuel 134 Scale changing during navi gation 149 Screen refer to Control Dis play 16 Screwdriver 236 Screw thread for tow fit ting 247 Search refer to BMW Search 211 Seat and mirror memory 52 Seat belts refer to Safety belts 49 Seat heating front 48 Seat heating rear 49 Seating position for chil dren 55 Seats 46 Selection list ...

Страница 275: ...tarting aid 245 Text messages 201 Text messages supplemen tary 71 Theft alarm system refer to Alarm system 41 Theft protection refer to Cen tral locking system 33 Thigh support 48 Tilt alarm sensor 42 Time of arrival 76 Tire damage 225 Tire identification marks 223 Tire inflation pressure 221 Tireinflationpressuremonitor refer to FTM 91 Tire Pressure Monitor TPM 88 Tires changing 226 Tires everyth...

Страница 276: ...uid reservoir ca pacity 257 Washer nozzles wind shield 64 Washer system 62 Washing vehicle 248 Water on roads 129 Weather Band 160 Weights 256 Welcome lamps 80 Wheel base vehicle 255 Wheels changing 226 Wheels everything on wheels and tires 221 Wheels Flat Tire Monitor FTM 91 Wheels Tire Pressure Monitor TPM 88 Width vehicle 254 Window defroster rear 111 113 Windows powered 42 Windshield washer fl...

Страница 277: ......

Страница 278: ...More about BMW bmwusa com The Ultimate Driving Machine 01 40 2 608 153 ue BL260815300J Online Edition for Part no 01 40 2 608 153 09 11 490 ...

Отзывы: