
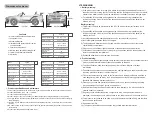
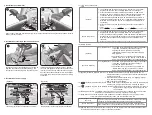

3. Install the rear-view mirror
Open the door, install the inverted mirror (part 4) in the specified position, and tighten the inverted mirror with
screws (part 18) as shown.
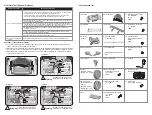
4. Installation of steering wheel and hand shank
Plug the wire plug of the steering wheel into the wire
plug from the car body hole correspondingly, and
then put the connected plugs into the car body hole.
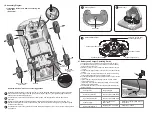
5. Installation of power supply
(Option A)
(Option B)
1
1
2
2
4
18
18
4
18
18
5
3
15
15
20
20
USB
MP3
Plug-in
Car body
hole
Install the steering wheel (part 3) on the J-shaped
iron hook, and tighten with the steering wheel screw
(part 15) and the steering wheel anti-loose nut (part
20); then insert the handle (part 5) into the designat-
ed position and press down firmly to make it reliably
connected.
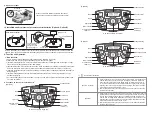
11) Mode switch button:
(Option A)
①
It is by default the built-in music play mode, and there is "music player"
English prompt sound, and the display "MUSIC" will be always on;
②
Press this button and switch to USB mode, and there is "USB mode"
English prompt, and "USB" on display will flash (Flash when USB is not
connected, and it will be always on when it is connected to USB);
③
Press this button again and switch to BT Bluetooth mode, and there is
"bluetooth mode" English prompt, "BT" on display will flash (Flash when
Bluetooth is not connected, and it will be always on when Bluetooth is
connected);
④
Press this button again and switch back to the built-in music playback
mode.
(Option B, Option C)
①
It is by default the built-in music play mode, and there is "music player"
English prompt sound, and the display "MUSIC" will be always on;
②
Press this button and change to MP3 mode, and there will be “MP3 mode”
English prompt voice, and “MP3” will flash on the display(It will flash when
MP3 line is not inserted and it will always be on when the MP3 line is
inserted);
③
Press this button again to change back to the built-in music playing mode.
(It will be
as such
Press
USB mode
Press
Press
BT mode
Music mode Loop)
12) Display function:
(Option A)
(Option B, Option C)
Four digits display:
①
The middle four digits display the voltage of the battery
in real time; it will display the volume change in
adjusting the volume (U00-U30); which song
(0001-9999) in USB music will be displayed during
USB playback.
②
The function icons on both sides of the display are
“MUSIC, USB, BT, V, ►,
〓
”, and the mode or state in
which it lies will be displayed by its corresponding icon.
Four digits display:
①
The middle four digits display the voltage of the battery
in real time; it will display the volume change in
adjusting the volume (U00-U30)
②
The function icons on both sides of the display are
“MUSIC, MP3, V,
►,
〓
”, and the mode or state in
which it lies will be displayed by its corresponding icon.
13) (Option A) Bluetooth playback function:
①
In Bluetooth mode, after connecting Bluetooth, the “BT” on
display will be always on, and then the audio file in the Bluetooth
device can be played.
②
When Bluetooth is disconnected, there is a “dingding” prompt
tone, and “BT” on display will flash.
③
Name of Bluetooth: CHILOKBO
14) (Option A) USB playback function: In USB mode, after connecting USB, the “USB” on the display will
be always on, and then the audio file in USB can be played.
15) (Option B, Option C) MP3 playback function: In MP3 mode, after plugging the MP3 line, the "MP3" in
display will be always on, then the external sound file
can be played.
16) Steering wheel button: The middle is the horn sound button, which will be sounded in any audio playback
mode; press and hold this button, the horn will sound continuously.
17) Sleep function: The system will enter sleep mode when it is without driving for 30 min, and the central
control board will automatically shut down, and all functions will turn off!
18) Low voltage protection function:
(Option A)
(Option B, Option C)
When the voltage is as low as 8V, the central control board will automatically power
off and the car will stop automatically. Please charge as soon as possible!
When the voltage is as low as 4.5V, the central control board will automatically
power off and the car will stop automatically. Please charge as soon as possible!
19) Charging and power-off function: When charging the car, the central control board will automatically power
off. All functions will be turned off, and the car cannot be started!
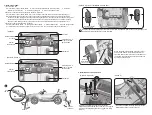
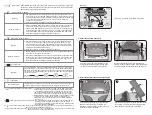
A
A
A
A
Black
cable
Circuit board
placing box
Battery
black-plug
(-)
Battery
red-plug (+)
Red cable
Over-current
protection
Insert plug (A) into the circuit board to its bottom.
Insert plug (A) into the circuit board to its bottom.
Battery
black-plug
(-)
Black
cable
Battery
red-plug (+)
Red cable
Over-current
protection
Circuit board
placing box