BMW i Wallbox Connect Скачать руководство пользователя страница 11

EN

11

Firmware update

Prepare USB stick

1. Format a USB stick with the FAT32 file system.
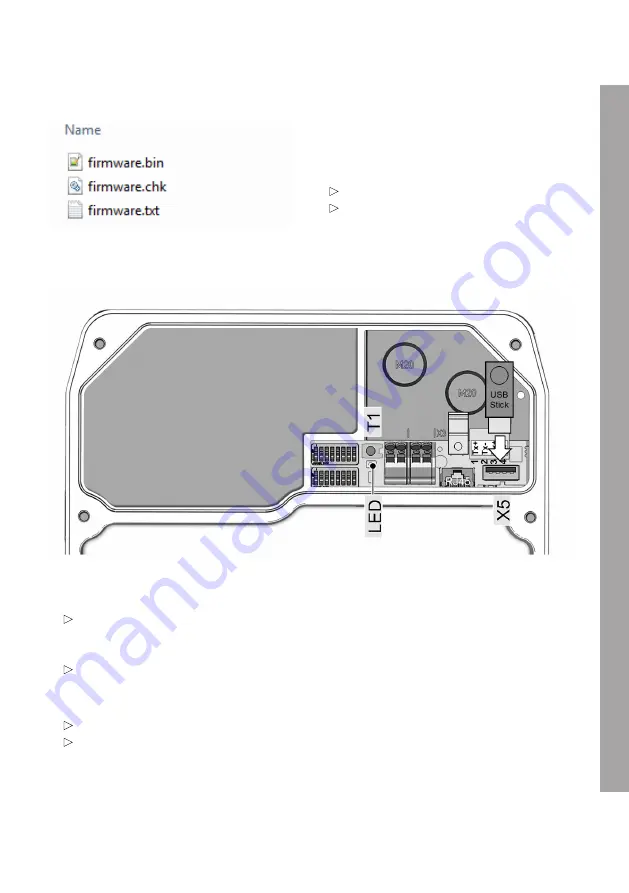
2. Copy the following files into the root directory

of the empty USB stick. Do not use any

folders.

firmware.bin

firmware.chk

Complete firmware update

1. Insert the USB stick into USB port 

X5

 on the charging station.

2. Press the service button


T1

 until the 

1st signal tone

 sounds to reset the charging station.

The firmware update will now be completed. The internal status 

LED

 next to the service

button will now flash in various colours and at various intervals. The update process can take

up to 1 minute.

After the installation has completed, the internal status LED will be lit 

permanently in green

.

3. Remove the USB stick to trigger a restart of the charging station.
4. Check the firmware version.

Binary version display with a colour code on the status LED during power up.

The firmware version is also displayed in the web interface of the charging station.

Содержание i Wallbox Connect

Страница 1: ...BMW i Wallbox USB update instrunctions Freude am Fahren BMW i...

Страница 2: ......

Страница 3: ...BMW i Wallbox USB update instrunctions 5 EN...

Страница 4: ......

Страница 5: ...information 8 Prepare the charging station 9 Removing the housing cover 9 Remove the terminal panel cover 10 Firmware update 11 Prepare USB stick 11 Complete firmware update 11 Concluding work 13 Inst...

Страница 6: ...n protected by copyright All rights reserved especially the rights of reproduction and distribution No part of this documentation may be reproduced photocopying scanning or any other procedures or pro...

Страница 7: ...tions to install the Wallbox and to store and transport it Symbols used You will find information and warnings about possible dangers at various points in the manual The symbols used in the manual hav...

Страница 8: ...USB stick These instructions apply to devices of the following types BMW i Wallbox BMW i Wallbox Plus Note Refer to the instructions and safety information in the installation manual for the Wallbox A...

Страница 9: ...n the underside of the Wallbox upwards The housing cover should then jump out slightly at the bottom 2 Swing the housing cover forwards a little on the underside 2 3 Then release the housing cover by...

Страница 10: ...c components may be destroyed if touched Before handling modules perform an electrical discharge process by touching a metallic earthed object 2 Remove the terminal panel cover The terminal panel 2 is...

Страница 11: ...et the charging station The firmware update will now be completed The internal status LED next to the service button will now flash in various colours and at various intervals The update process can t...

Страница 12: ...re In the binary display this colour stands for 0 The sub version is displayed by the binary display of the LED segments Example Version 3 07 LED1 LED2 LED3 LED4 Colour code orange blue blue blue Bina...

Страница 13: ...ening screws 1 Insert the terminal panel cover 1 again 2 Install the terminal panel cover again using the four screws Housing marking 1 Tighten the four screws until the housing markings on the right...

Страница 14: ...rrectly attached 1 2 Press the cover downwards and then swing the housing cover 2 backwards The housing cover must slide into the bottom guides without any major resistance IMPORTANT Ensure that the h...

Страница 15: ...Mehr ber BMW www bmw de www bmw com Freude am Fahren 1 0...

Отзывы: