background image

58

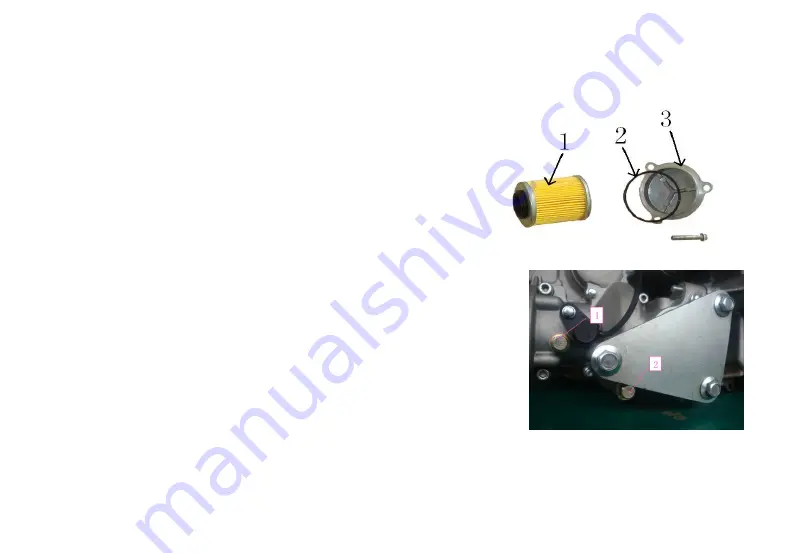
Note that the rubber sealing ring on the oil filter element is oriented towards the gear box when assembling
(Fig. 5).
1. Oil filter
2. O-ring
3. Oil filter cover
Check whether the oil drain bolt is tight, add about 2000ml new oil from the oil scale, start the engine to
run for about 5 minutes, confirm that there is no oil leakage at the oil drain bolt and the oil filter element.
Then stop the machine and wait for about 5 minutes to check the height of the oil level. When insufficient,
add to the upper limit position of the oil gauge.
4, transmission gear oil
Use 85/90 GL-4 or GL-5 grade gear oil or # 18 hyperbolic gear oil
5 gear oil inspection and replacement
Check the gearbox oil regularly to ensure that the oil level can
overflow from the bolt hole on the oil level
(Fig. 5).
Fig. 5 Gearbox oil level
1 -- Oil level bolt

Fig. 5

Содержание Sniper T-1500 2S

Страница 1: ...Owner s Manual 06 61 3 5 7 6 READ THIS MANUAL CAREFULLY IT CONTAINS IMPORTANT SAFETY INFORMATION ...

Страница 2: ...RATOR AGE FOR OFF ROAD USE ONLY This vehicle is designed and manufactured for off road use only USA only It does not confirm to federal motor vehicle safety standards and operation on Public streets roads or highways is illegal ...

Страница 3: ...manship under the following terms and conditions This warranty covers the engine and engine related components for a period of 90 days This warranty does not apply to any part which in opinion of seller was defective because of improper maintenance improper assembly alterations abuse negligence or accident Should warranty service be required on your BMS Sniper T 1000 during the 90 days warranty pe...

Страница 4: ...ng or repairing of the vehicle in any way so as to adversely affect its safety or reliability d Competition or racing The warranty does not cover loss of use of the seller vehicle loss of time inconvenience or other consequential damage which includes but is not limited to loss or damage to persons or property or any expense of returning any damaged units to the seller distributor or its authorize...

Страница 5: ...FEW WORDS ABOUT SAFETY 6 3 IMPORTANT SAFETY INFORMATION 7 4 SAFETY LABELS 14 5 ARE YOU READY TO DRIVE 17 6 IS YOUR VEHICLE READY TO DRIVE 22 7 SAFE DRIVING PRECAUTIONS 25 8 SPECIFICATIONS 29 9 CONTROL FUNCTIONS 32 10 MAINTENANCE 47 11 ENGINE 53 ...

Страница 6: ... it contains important safety and maintenance information Failure to follow the warnings contained in this manual can result in serious injuries Besure to follow the recommended maintenance schedule and service your kart accordingly Preventive maintenance is extremely important to the longevity of your BMS Sniper T 1000 We hope you will have a pleasant experience with our products and thanks again...

Страница 7: ...cal or possible to warn you about all hazards associated with operating or maintaining a Go kart You must use your own good judgment You will find important safety information in a variety of forms including Safety Labels C On the Go Kart Safety Messages C Preceded by a safety alert symbol and one of two signals WARNING or CAUTION These signal words mean Physical harm may result from failure to ad...

Страница 8: ...u can do to protect your self when you drive You ll find many helpful recommendations throughout this manual The following are a few that we consider most important Follow the Age Recommendation It is strongly recommended that no one under the age of 16 be permitted to drive this Go Kart without adult supervision Always Wear a Helmet It s a proven fact helmets significantly reduce the number and s...

Страница 9: ...ize and weight Because many accidents involve inexperienced or untrained drives we urge all drives to take a training course approved by the Go Kart Safety Institute Check with your dealer for more information on training courses Be Alert for Off Road Hazards The terrain can present a variety of challenges when you drive off road Continually read The terrain for unexpected turns drop offs rocks ru...

Страница 10: ...contains a tasteless odorless and poisonous gas called carbon monoxide Keep away from moving parts of the Go Kart The operator of the Go Kart should never place their hands or other parts of their body near any moving part of the Go Kart Failure to adhere to this warning will cause physical harm to your body Skidding or Sliding The terrain surface can be a major factor affecting turns Skidding a t...

Страница 11: ...perate this vehicle on any public street road or highway even a dirt or gravel one Never operate this vehicle without wearing an approved motorcycle helmet that fits properly You should also wear eye protection goggles or a face shied gloves over the ankle boots long sleeved shirt or jacket and long pants Never consume alcohol or drugs before or while operating this vehicle Never operate at speeds...

Страница 12: ...d the steering wheel This is particularly important when driving in rough terrain The front wheels will move right and left as they respond to the terrain and this movement will be felt in the steering wheel A sudden jolt could wrench the steering wheel around and your thumbs or fingers could be injured if they are in the way of the steering wheel spokes Always go slowly and be extra careful when ...

Страница 13: ...ill If you lose momentum and cannot continue up a hill back down the hill with the engine in reverse gear Use engine braking to help you go slowly If necessary use the brakes gradually to help you go slowly Always check terrain carefully before going down hills Go as slowly as possible Never go down a hill at high speed Always check for obstacles before operating in a new area Never operate the ve...

Страница 14: ...tain proper tire pressure as described in this manual Never exceed the stated load capacity Cargo should be as far forward in the bed as possible and distributed evenly from side to side Be sure cargo is secured so that it cannot move around during operation Reduce speed and follow instructions in this manual for carrying cargo or pulling a trailer Allow greater distance for braking ...

Страница 15: ... permanent parts of the Go Kart If a label comes off or becomes hard to read contact your dealer for warning labels replacements Read and understand all of the labels on you vehicle They contain important information for safe and proper operation of your vehicle Never remove any labels from your vehicle If a label becomes difficult to read or comes off a replacement label is available from your de...

Страница 16: ...15 ...

Страница 17: ...16 ...

Страница 18: ... you to Read this owner s manual and the labels on your Go Kart carefully Make sure you understand all the safety messages Know how to operate all the controls Have adult present if under 16 years old Before each drive be sure You feel well and are in good physical and mental condition You are wearing an approved motorcycle helmet with chin strap tightened secure eye protection and other protectiv...

Страница 19: ... Your helmet is your most important piece of driving gear because it offers the best protection against head injuries A helmet should fit your head comfortably and securely An open face helmet offers some protection but a full face helmet offers more Regardless of the style look for a DOT Department of Transportation sticker in any helmet you buy Always wear a face shield or goggles to protect you...

Страница 20: ... elbows and a chest shoulder protector Drive Training Developing your driving skills is an on going process Even if you have derived other Go Karts take time to become familiar with how this Go Kart works and handles To build skills Practice driving the Go Kart in a safe area do not drive in rough terrain until you get accustomed to the Go Kart s controls and feel comfortable with its size and wei...

Страница 21: ...ithout adult supervision No Alcohol or Drugs Alcohol drugs and Go Karts don t mix Even small amount of alcohol can impair your ability to operate a Go Kart safely Likewise drugs even if prescribed by a physician can be dangerous while operating a Go Kart Consult your doctor to be sure it is safe to operate a ...

Страница 22: ...21 vehicle after taking medication ...

Страница 23: ...be a major inconvenience If your Go Kart has overturned or has been involved in a collision do not drive it until your dealer has inspected your Go Kart There may be damages or other problems your cannot see Pre drive inspection Check the following items before you get on the Go Kart Engine Oil Check the oil level and add oil if needed Check for leaks Fuel Check the fuel level and add fuel if need...

Страница 24: ...olts and fasteners are tight Under body Exhaust System Check for and remove any dirt vegetation or other debris that could be fire hazard or interfere with the proper operation of the Go Kart Air Cleaner Housing Drain Tube Check for deposits in the drain tube If necessary clean the tube and check the air cleaner housing Leaks Loose Parts Walk around you Go Kart and look for anything that appears u...

Страница 25: ... it is released Brakes Press the brake pedal several times check for proper brake pedal free piay Make sure there is no brake fluid leakage Steering Wheel Check that the wheels turn properly as you turn the steering wheel Cable Check the cable housing for wear Check the fitting for looseness Replace or tighten as needed Tie rod Check the tie rod housing for wear Check the fittings for looseness Re...

Страница 26: ...ing off road also remember to always obey local off road driving laws regulations Obtain permission to drive on private property Avoid posted areas and obey no trespassing signs You should never drive your Go Kart on public streets roads or highways even if they are not paved Drivers of street vehicles may have difficulty seeing and avoiding you which could lead to a collision In many states it is...

Страница 27: ...ep Hands and Feet on Controls Always keep both hands on the steering wheel and both feet on the foot controls When driving your Go Kart It is important to maintain your balance and to control of the Go Kart Control Speed ...

Страница 28: ...rrain visibility and other operating conditions plus your own skills and experience Use Care on Unfamiliar or Rough Terrain Before driving in a new area always check the terrain thoroughly Don t drive fast on unfamiliar terrain or when visibility is limited It s sometimes difficult to see obstructions like hidden rocks bumps or holes in time to react ...

Страница 29: ...28 ...

Страница 30: ...erall Width 69 3in 1760mm Overall Height 68 1in 1730mm Wheelbase 125 2in 3180mm Front Track 61 6 in 1565mm Rear Track 56 3 in 1430mm Ground Clearance 12 8 in 325mm CAPACITIES Maximum load 280kg Fuel tank 25L Engine oil 2200ml Gear oil 2000ml Coolant 5500ml Starting 5s Climbing 20 25 Battery 12V45Ah Head Light 10 48V 45W Both Tail Light 12V10W 5W 21W Both Top light 10 80V 27W Four Main Fuse 50A ...

Страница 31: ...t Dual A Arm Rear Suspension Longitudinal Control Arm Final Drive shaft driven TIRE PRESSURE Front 70kpa 0 7kg cm3 10psi Rear 70kpa 0 7kg c m3 10psi WEIGHT Net Weight 540kg Warranty factory limited scope 90 Days Never drive past the limit of visibility Maintain a safe distance between your Go Kart and other off road vehicles Always exercise caution and use extra care on rough slippery and loose te...

Страница 32: ...31 Do Not Perform Stunts You should always operate your Go Kart in a safe and reasonable manner When driving always keep all four wheels on the ground ...

Страница 33: ...the respective switch positions are as follows D All electrical circuits are supplied with power and the headlights and taillights come on when the light switch is on S All electrical circuits are switched off The key can be removed in this position 1 ...

Страница 34: ...33 Q The electric starter is engaged by turning and holding the key in this position Release the key when the engine starts ...

Страница 35: ...peration of the electric starter to let it cool Do not turn the key to the D position with the engine running or damage to the electric starter can result See starting instructions prior to starting the engine Switches Light switch Set the switch to to turn on the low beam and the taillights Set the switch to to turn on the high beam and the taillights ...

Страница 36: ...mmand four wheel drive switch 2WD 4WD 2 On Command differential gear lock switch 4WD LOCK This vehicle is equipped with an On Command four wheel drive switch 2WD 4WD and a differential gear lock switch 4WD LOCK Select the appropriate drive according to terrain and conditions ...

Страница 37: ...36 Indicators Display ...

Страница 38: ...lay is shown in Table 1 Table 1 Multi function display area displays information table No Display content Display condition 1 xxxxrpm Shows the speed 2 xxxxkm h Shows the speed in metric mode 3 xxxxmph Shows the speed in inch mode 4 FUEL NC Fuel sensor is not connected 5 FUEL SHORTAGE Fuel shortage 6 TEMPRATURE NC The water temperature sensor is not connected ...

Страница 39: ... OVER TACH Engine speed is higher than 8000rpm 10 GEAR FAULT Gear signal failure 11 DIFFERETIAL LOCK Front axle or rear axle differential locked 12 EPS FAULT ECU fault 13 OIL SHORTAGE Insufficient oil surplus Two four wheel drive display Two wheel drive Four wheel drive The front wheel drive is locked ...

Страница 40: ...icates low high oil pressure when illuminated see authorized dealer if necessary Check engine indicator lamp After turning the ignition switch on the lamp shall be on and the lamp shall be off after starting the engine If the lamp is on while the engine working it indicates that the system failed When some electric jet parts are found fault check engine indicator lamp will also be ON the vehicle s...

Страница 41: ...ulti function display area showed that the engine speed digital display area when the engine speed multi function display area shows the speed Secondary digital display area setting short press S button secondary digital display area display in 0DO0 TRIP A TRIP B HR A HR B 24 hour clock 12 hour clock display mode switch Clock setting Under the 24 hour clock display mode long press M button to ente...

Страница 42: ...e After the setting is completed long press the S button to confirm the setting is completed Auxiliary DC jack The auxiliary DC jack is located at the right side of the front panel The auxiliary DC jack can be used for suitable work lights radios etc The auxiliary DC jack should only be used when the engine is running ...

Страница 43: ...p CAUTION Do not use accessories requiring move than the above maximum capacity This may overload the circuit and cause the fuse to blow If accessories are used without the engine running or with the headlights turned on the battery will lose its charge and engine starting may become difficult Do not use an automotive cigarette lighter or other accessories with a plug that gets hot because the jac...

Страница 44: ... pedal to the rest position when released Ways check that the accelerator pedal returns normally before starting the engine Before starting the engine check the accelerator pedal to be sure it is operating smoothly Make sure the accelerator pedal fully returns to the idle position as soon as it is released ...

Страница 45: ... unit can engage park brake To release the unit press button in the front end of parking lever then push the parking lever to the bottom CAUTION Never use parking brake lever then the vehicle don t stop fully Adjust the parking cable if necessary Be sure to fully release the parking brake lever before starting the vehicle ...

Страница 46: ...when shifting to reverse Passengers The vehicle 2seats allows for two riders only 4seats model allows for four riders only Combine maximum weight of driver and the passenger should not exceed 200kg 320lbs Make sure you brief your passenger on proper safety procedures like keeping hands arms feet and other bodily appendages inside the vehicle Passengers should only be transported in ...

Страница 47: ...ts must always be securely fastened in the position which best affords the operator control of the foot pedals steering wheel and the remote stop button a Pull seat adjustment handle upward to disengage seat slide b Move seat to desired position c Be sure seat adjustment handle snaps back Into place and that seat is locked into position ...

Страница 48: ...by Joyner It is important for your safety and the safety of others that the tires have correct air pressure Check air pressure in four tires before each use Visually inspect tires for loss of air throughout each day of operation See Tire inflation Chart below for correct tire pressuse ...

Страница 49: ...ing Adjustment Parking level Release button Not on parking On parking Pull the park brake lever up so that the unit can engage park brake To release the unit press button on front end of parking lever then push the parking lever to the bottom Adjust the parking cable if necessary ...

Страница 50: ...your vehicle Proper operation during this break in period will help assure maximum life and performance from your new vehicle The following guidelines explain proper break in procedures 1 After the engine starts the engine is not allowed in high speed in the neutral gearshift 2 Drive vehicle from stop to low speed slowly 3 Avoid braking strongly 4 Do not exceed the vehicle speed on the below sched...

Страница 51: ... more controllable speed when turning to prevent the Gokart1000 from rolling over To prevent vehicle from rolling over be sure to only turn the vehicle at a slow more controllable speed 3 Shock Absorber Adjustment After a long time of use it is necessary to adjust the spring as following 1 Loosen the lock nut with a shock absorber wrench 2 Screw the stop nut clockwise and the tension of shock spri...

Страница 52: ...e the center castle nuts when you replace the front wheels Tighten the nuts after replacing the wheels 5 Rear Wheel Replacement Do not disassemble the center castle nuts when you replace the front wheels tighten the nuts after replacing the wheels ...

Страница 53: ...nuts on both sides of Front Tie Rods To make Dimension B smaller turn the rod to the left Turn the rod to the right to make Dimension B larger After adjusted to desired length tighten the lock nut against the rod end Recheck the dimensions for proper alignment 7 Cleaning Instructions Keep your kart clean With a clean rag wipe off any dirt and oil from around controls Wipe off any spilled fuel and ...

Страница 54: ...s 1 Drain fuel tank by allowing engine to run out of fuel or use a fuel stabilizer 2 Lubricate engine cylinder by removing the spark plug and pour one ounce of clean lubricating oil through the spark plug hole into the cylinder Crank the engine slowly to spread oil and replace spark plug 3 Do not save or store gasoline over winter Using old gasoline which has deteriorated from storage will cause h...

Страница 55: ...ng in unusually dusty areas require more frequent servicing 11 ENGINE Maintenance of Lubricating System 1 gasoline engine oil 10W 50 SL or SM grade and above gasoline oil Note Due to the high compression ratio of the engine do not use oil lower than SL class otherwise it is easy to damage the engine ...

Страница 56: ...lowing figure 2 Measurement of oil plane The amount of oil in the crankcase is measured by the oil gauge Fig 1 mounted on the right side of the engine Measure approximately 5 minutes after engine stop Take out the oil scale wipe the oil with a cleaning cloth and then insert it into the box to measure the oil level Before each trip the height of the oil surface should ...

Страница 57: ...se to or below the lower limit oil should be added to the upper limit But you can t exceed the upper limit Fig 1 Fig 2 3 replace the engine oil and oil filter element The engine oil and the oil filter should be replaced simultaneously The engine oil change should be carried out when the engine is hot but not hot ...

Страница 58: ...e oil bolt while it is hot Fig 3 so that the oil will flow into the oil box Tighten the oil drain bolt after the oil is drained Fig 3 Oil drain bolt Fig 4 Oil filter Loosen the three fixing bolts of the oil filter chamber cover Fig 4 remove the oil filter chamber cover and the oil filter element replace a new oil filter element check whether the O ring of the oil filter chamber cover is damaged an...

Страница 59: ...is no oil leakage at the oil drain bolt and the oil filter element Then stop the machine and wait for about 5 minutes to check the height of the oil level When insufficient add to the upper limit position of the oil gauge 4 transmission gear oil Use 85 90 GL 4 or GL 5 grade gear oil or 18 hyperbolic gear oil 5 gear oil inspection and replacement Check the gearbox oil regularly to ensure that the o...

Страница 60: ... the amount is about 400ml so as to overflow from the oil level bolt hole Maintenance of Cooling System Cooling system is one of the necessary conditions to ensure the normal operation of the engine so it is necessary to ensure that there is enough coolant in the engine which must be checked before each departure and should be supplemented in time if insufficient 1 Coolant Since the engine cylinde...

Страница 61: ...add coolant fill the radiator with coolant tighten the air release bolt on the radiator 2 loosen the vent bolt on the thermostat cover of the engine cylinder head continue to add coolant so that continuous water flows out of the vent bolt hole and tighten the vent bolt Fill the radiator with coolant and make the water level of the auxiliary kettle reach FULL marking Be careful not to exceed the FU...

Страница 62: ...ust be discharged otherwise due to the gas in the waterway the engine cooling is not good the computer will enter the protection program to run so that the engine can not play its performance When the engine is in a hot state it is not allowed to open the radiator cover to avoid scald 3 Add coolant After a long time of use when it is found that the coolant level in the water storage bucket is lowe...

Страница 63: ...ide of the engine and release the coolant 2 remove the deputy kettle and pour out the coolant 3 Install the water discharge bolt and auxiliary kettle as original and fill the coolant according to the steps of coolant filling 5 Do not remove the thermostat assembly without installing it Note without the thermostat assembly the engine will be warmed up longer after starting Working at low temperatur...

Страница 64: ...ance Angle is controlled by an electronic controller without adjustment Maintenance of spark plug The car should be replaced every 10000 km after the spark plug usually check if found damaged can be replaced at any time the replacement should pay attention to the model CPR8EA 9 the thread is M12X1 25 The surface between the insulator of the center electrode and the outer electrode of the spark plu...

Страница 65: ...important and must not be overlooked I inspection 25 hours or 750 kilometres L lubrication 50 hours or 1500 kilometers R replacement 100 hours or 3000 km or 1 year Items and contents 200 hours or 6000 km or 2 years Engine oil height I each ride Oil and oil filters R R Valve clearance I A I A Engine fixing bolts I I Air filter C R Exhaust system I I Reliability of various sensor I I ...

Страница 66: ... hours or 750 kilometres L lubrication 50 hours or 1500 kilometers R replacement 100 hours or 3000 km or 1 year Items and contents 200 hours or 6000 km or 2 years spark plug I R Coolant I I R Coolant Pressure Test I I Cooling hose aging cracking or not I I Reliable sensor plug I I Throttle body I I L Does the fuel pipe leak I I Fuel pump pressure test I ...

Страница 67: ...ortant and must not be overlooked I inspection 25 hours or 750 kilometres L lubrication 50 hours or 1500 kilometers R replacement 100 hours or 3000 km or 1 year Items and contents 200 hours or 6000 km or 2 years High voltage line I I CVT belt I CVT master follower wheel I C CVT unidirectional devices I L CVT inlet I I C Gear oil R I R Speed sensor C ...

Страница 68: ...onnection bolts Twenty N m and 60 N m 2 Air intake manifold fixing bolts 12 5 4 Valve adjusting nut 12 5 Flywheel bolts 150 6 Main wheel fixing bolts 100 7 Fixed bolts for follower wheels 60 8 Connecting rod bolts Ten N m 20 N m last 45 N m 9 Oil release bolts 10 Cylinder head bolts 7 11 Pressure relief valve spring seat 20 ...

Страница 69: ...erature sensor 16 14 Hydraulic sensor 12 15 Start motor fixing bolts 25 16 Start unidirectional bolt fixing 30 17 spark plug 20 18 Front output shaft flange bolts 42 19 Back output shaft flange bolts 45 20 Boxes and M8 bolts 25 21 Boxes and M6 bolts 12 5 ...

Отзывы: