4
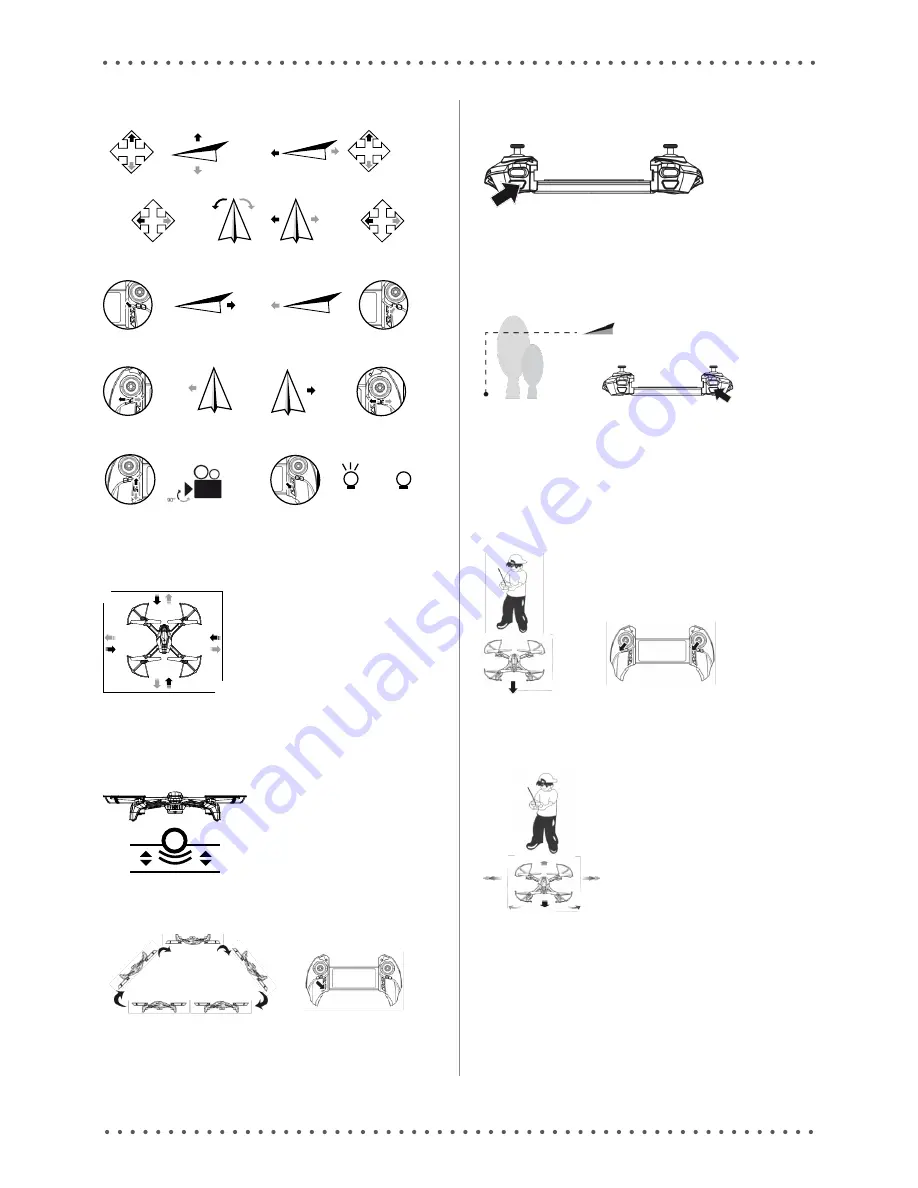
Left joystick
Right joystick
Climb
Descend
Backward
Forward
Turn
left
Turn
right
Move
left
Move
right
Step back
Step forward
Step rotate left/right
Step left/right
Camera direction
LED switch
On
Off
SPecIal featureS
Obstacle senzor
When the sensor detects an obstacle at a distance of 2 metres (depending on the envi-
ronment), the drone stops moving. The sensor is activated automatically 1 metre above the
ground. The sensor cannot prevent all crashes, so never fly too close to people and animals.
2m
2m
2m
2m
CAUTION: Obstacle detection only works at low speeds and in good visibility. The sensor
cannot detect glass surfaces. Best results are achieved when detecting white walls. When
sensor is working, it is not possible to use headless mode or the return to starting point
button.
Maintaining height
When releasing the height control joystick, the drone remains hovering at the same height.
Flip
Climb to a height of at least 2 metres and press the Flip button. Then move the right joystick
in any direction and the drone will flip up and over in that direction and back.
CAUTION: Flip does not work if the obstacle sensor and the camera module are attached.
Once removed, the remote must be restarted. Flip also does not function when the battery
is low.
Speed switch
By pressing the speed switch, you can choose between slow (one beep), medium (two
beeps) and high (three beeps) speed.
Return to start point
Press the button and the drone will fly back to its starting position. With the right joys-
tick, you can control the flight back to the left or right. Move the right joystick up to abort.
Only use the return function in the open air and when the air is calm. It cannot be guaran-
teed that this feature will return the drone to the exact same position as it depends on the
surrounding conditions. Therefore, when flying, keep the drone under control and under
supervision so you can safely land it. Using the return function does not exclude you from
damage or injury liability.
Headless mode
Turning on
After pairing the drone with the controller, press the headless mode button. The controller
beeps and the LEDs on the drone blink.
Turning off
When the drone is in headless mode, press the headless mode button. The controller then
beeps and the LEDs light up.
Setting forward direction
Before turning on headless mode, you need to set the direction forward. Point the drone so
that it is facing the same direction as you (1). Then move both joysticks to the left and hold
them in this position for 2 seconds (2). The LEDs on the drone will flash.
(1)
(2)
Controls in headless mode
In headless mode, the forward direction is always the direction that has been pre-set. Al-
ways stand facing this direction during operation. In headless mode, it does not matter
which direction you turn the drone – when moving the right joystick forward, it always flies
away from you, even if it is facing sideways.
TiPS:
1. The simplest way to fly in headless mode is to carefully set the forward direction and
after take-off to make sure you stand facing this direction and not to move.
2. If the drone moves differently than it should, abort the flight and set it up again.


