background image

13

contact

 [email protected] / [email protected]

MX44VW

  USER MANUAL

NOTE: 

THE BUTTON PRESS SEQUENCE SHOULD BE FINISHED IN 5 SECONDS, 

OTHERWISE THE OPERATION IS DISCARDED

Remote Control Description

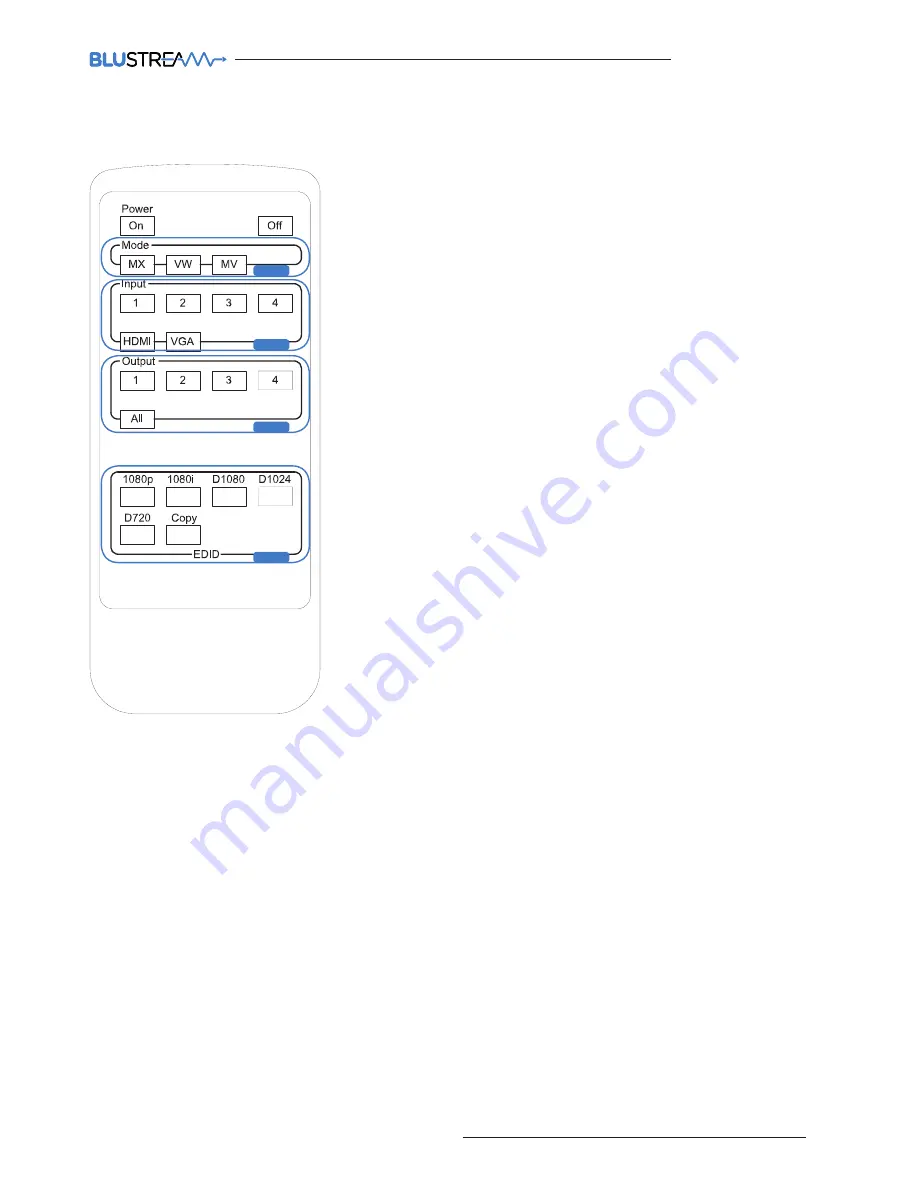
MODE SELECTION

A


Switches between Matrix modes:


MX - Matrix mode


VW - Video Wall mode


MV - Multi-View mode

HDMI/VGA INPUT TYPE SELECTION

B


Inputs 1-4 can be assigned as EITHER 
HDMI or VGA video. This selection 
can be acheived for each input.


HDMI selection - Press an input    


button followed by the HDMI button.


VGA selection - Press an input    


button followed by the VGA button.

OUTPUT AND INPUT SELECTION

C


Selects the zone OUTPUT you wish to 
change the source on (Numbers 1 - 4 
correspond to the zone outputs 1 - 4)

B


Selects the source INPUT you wish 
to change on the selected zone 
(Numbers 1 - 4 correspond to the 
source inputs 1 - 4) 

EXAMPLE

To switch source 2 to zone 4 you 
would press 4 in the output section 
(C) followed by pressing 2 in the Input 
section (B). 

ALL button:

 The all button selects 

all the inputs or outputs in its 
corresponding box. Example: (The “All” 
button in the Output box selects all the 
zones so all zones will change to what 
source input is selected next).

EDID SET UP

The MX44VW provides a comprehensive 
range of EDID settings. Below are three 
examples of how to deploy the desired 
EDID setting when using the supplied 
remote.

1.


 Fix EDID to an Input or ALL inputs:


Press the desired video resolution 
button (1080i / 1080p etc), then 
select the source input you want 
this EDID information allocated to 
by pressing the INPUT 1 – 4 or the 
ALL button 

2.


 Copy EDID of Output-X to an Input 

or ALL: 

Press the COPY but-ton then 

select the OUTPUT you wish to copy 
the EDID information from, then 
select the source input you want to 
copy this EDID to by selecting the 
INPUT 1-4 or the ALL button.

3.


User defined EDID to an Input or 

ALL inputs: 

Press USER1 / USER2 

button then select the source you 
wish to assign this EDID to by select-
ing INPUT 1-4 or the ALL button

EDID

B

A

A

B

C

D

Содержание MX44VW

Страница 1: ...MX44VW User Manual...

Страница 2: ...Thank you for purchasing this product For optimum performance and safety please read these instructions care fully before connecting operating or adjusting this product Please keep this manual for fu...

Страница 3: ...res 3 operational modes 4x4 Matrix selected HDMI or VGA inputs Video wall 2x2 4x1 or 1x4 configuration Multi viewer mode Features 4x video inputs that can be configured as HDMI video or VGA video with...

Страница 4: ...from 1 to 4 o Selection button Press to select current setting p Down selection button Press to change segment s value a Enter button Press to confirm mode selection or set EDID to specified INPUT or...

Страница 5: ...For the full list of protocols please see MX44VW Control Protocols located at the rear of this manual The MX44VW Matrix features a built in web browser user interface allowing con trol and configurati...

Страница 6: ...gleselectionandSELECTbuttontoconfirm OptionsarestandardEDIDsettings DF00 DF04 or COPY EDIDfromoutputs1 4 e PresstheESCbuttontoexit Matrix Front Panel Control TurningOn OffHDMIoutputs Itispossibletotur...

Страница 7: ...VideoInputTypeSelection TheMX44VWallowsyoutoswitchbetweenHDMIandVGA audiopersourceinput ItisonlypossibletoselecteitherHDMIorVGApersource anditisnotpossibletoviewbothvideotypesonthesameinput I E Youca...

Страница 8: ...entscreenlayoutconfigurationwillbegintoflash Youmustselecttherequiredscreen configurationusingthe UP or DOWN buttons Thescreenlayoutsare CHANGE MODE TO A 3 Pressthe ENTER buttontofinalisetheVideoWallc...

Страница 9: ...ypeselection VW 2x2 EN A 1 2 B C D ChangingthescreenconfigurationwheninVideoWallmode 1 Tochangescreenconfigurationfirstpress VideoWall button 2 Thedisplaywillchangeandthecurrentscreenlayoutconfigurati...

Страница 10: ...ew screenconfiguration 0 9 usingthe UP or DOWN buttons Thescreenlayoutsare CHANGE MODE TO A 3 Pressthe ENTER buttontofinalisetheMulti Viewconfiguration 1 3 2 Understandingthedisplay A MV showsthatthep...

Страница 11: ...rVGA V videotype Note ThemasterWindow outputisalwaysWindow1 ThesourceallocatedforWindow1cannotbereplicatedonanyotheroutputWindow ThesecondaryWindows 2 4 candisplaythesamesourceinputaseachothershouldth...

Страница 12: ...plied with all necessary IR hardware required and includes IREmitter IR1 IR2 IR2soldseparately Blustream 5V IR Emitter designed for discrete IR control of hardware IRReceiver IRR Blustream 5V IR recei...

Страница 13: ...output section C followed by pressing 2 in the Input section B ALL button The all button selects all the inputs or outputs in its corresponding box Example The All button in the Output box selects al...

Страница 14: ...troducedbecauseoftheincreasednumberof variables Bypre determiningthevideoresolutionandaudioformatofthesourceanddisplaydeviceyoucanreducethetime needforEDIDhandshakingthusmakingswitchingquickerandmorer...

Страница 15: ...vice Laptop 1 Laptop 2 Display 2 Display 1 Display 4 Display 3 HDMI Output TCPIP HDMI Input DC 12V IR Ext 1 2 3 4 1 2 3 4 Off On L R 4 L R 3 L R 2 L R 1 VGA 1 VGA 2 VGA 3 VGA 4 SOURCE 01 SOURCE 02 SOU...

Страница 16: ...tput Ports 4x 3 5mm mono jack Rack Mountable 1U rack height rack ears included Dimensions WxDxH 438 x 245 x 44mm without feet Shipping Weight 2 4kg Operating Temperature 32 F to 104 F 0 C to 40 C Stor...

Страница 17: ...FR04 This would switch output 1 to source input 4 Common Mistakes Carriage return Some programs do not require the carriage return where as other will not work unless sent directly after the string In...

Страница 18: ...DTS DOLBY HD zz 06 HDMI 1080p 60Hz 3D Audio 2CH PCM zz 07 HDMI 1080p 60Hz 3D Audio 5 1CH PCM DTS DOLBY zz 08 HDMI 1080p 60Hz 3D Audio 7 1CH PCM DTS DOLBY HD zz 09 HDMI 4K2K Audio 2CH PCM zz 10 HDMI 4...

Страница 19: ...15 0015 003f 0015 003f 0015 0015 0015 003f 0015 003f 0015 0015 0015 0015 0015 0015 0015 0015 0015 0015 0015 003f 0015 0015 0015 0015 0015 003f 0015 003f 0015 003f 0015 05d3 INPUT 3 11 0000 0069 0000 0...

Страница 20: ...0016 0016 0016 0016 0016 0016 003F 0016 0016 0016 003F 0016 003F 0016 0016 0016 003F 0016 003F 0016 003F 0016 0016 0016 003F 0016 0689 D1080 0f 0000 006D 0000 0022 0157 00AC 0016 0016 0016 0016 0016...

Страница 21: ...etworksettingsoftheMatrixusingeithertheWebBrowserInterface BlustreamMatrixproductsareshippedwiththenetworksettoDHCP orusingtheBlustreamPCConfiguration Software downloadablefromtheBlustreamDrivers Prot...

Страница 22: ...www blustream co uk www blustream com au...

Отзывы: