background image

BT-211 User Guide

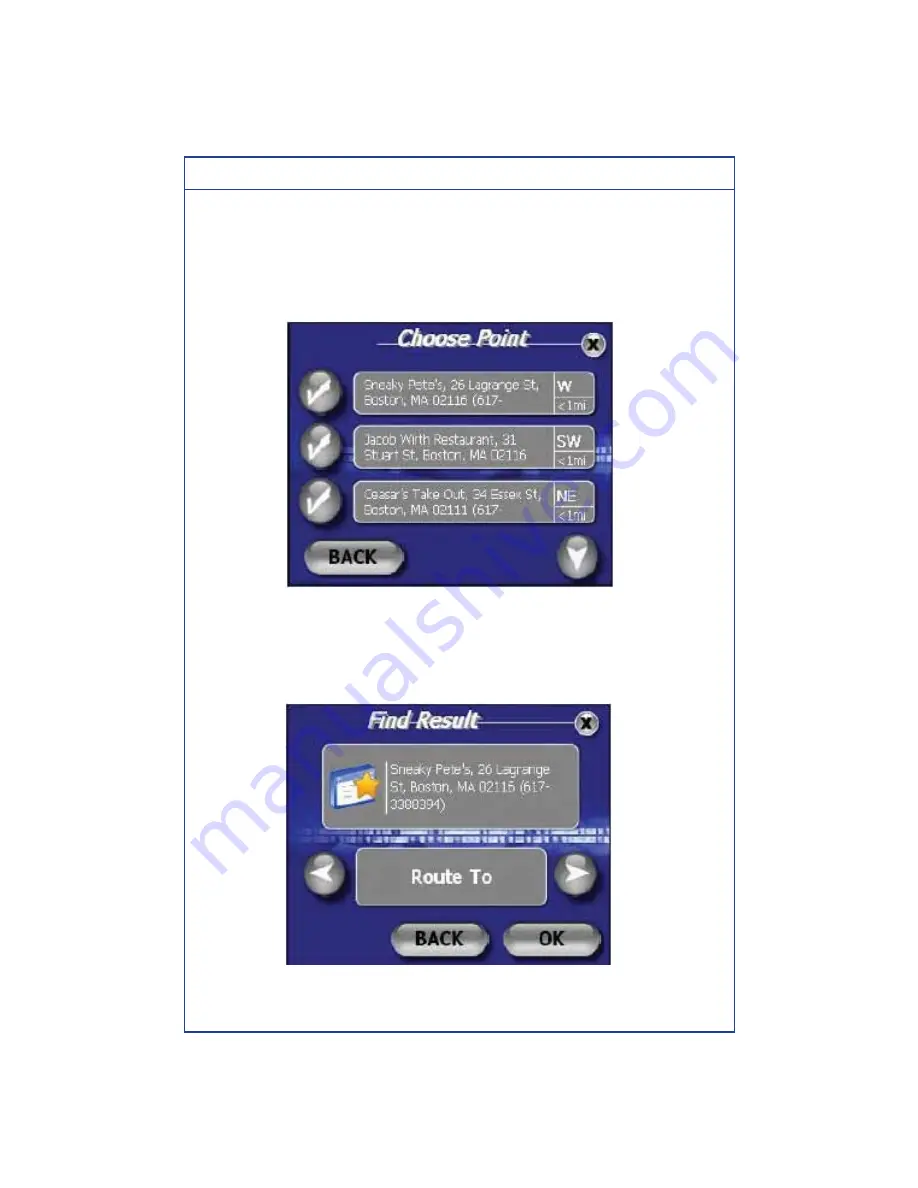
9. The generated results will be listed according to the distance they are from 
your current location.

Distance and direction of each POI is displayed. Select a POI from an 
existing result by touching the corresponding check mark.

Select POI

10. After selecting a POI you will be brought to the Find Result Screen where 
you can select an action to take. Using the right and left arrow icons you will 
choose <Show>, <Mark> or <Route To>

POI Options

40

Содержание BT-211

Страница 1: ... IPod Navigation User Guide Please read before using this equipment BlueTraks Inc 2125 Delaware Avenue Suite A Santa Cruz CA 95060 Phone 1 831 466 0302 www bluetraks com 2008 Copyright BlueTraks Inc All rights reserved ...

Страница 2: ...om the USB port to change the image Your Dealer Installer can assist you in doing this Splash Screen Touch Screen Operation Press the graphic button icons directly on the touch screen display to activate the function Press exactly in the button area to insure a desired result Most button graphics will change color when pressed to show contact Clean touch screen with dry lint free cloth when dirty ...

Страница 3: ... real time B Hands free speaker VOLUME UP button press to increase volume of hands free speaker C PLACE RECEIVE CALL button press to place outgoing or to answer incoming calls D Hands free speaker VOLUME DOWN button press to lower volume of hands free speaker E MENU button press to go to MAIN MENU screen Main Screen A B C D E 2 ...

Страница 4: ... iPOD button press to go to iPod control menu screen G NAVIGATION button press to go to Navigation menu screen BT 211N ONLY OR IF EQUIPPED WITH OPTIONAL GPS 211 H TOOLS button press to go to SYSTEM TOOLS menu screen Main Menu Screen F G H 3 ...

Страница 5: ...PAIRING button press to connect your Bluetooth telephone to the BT 211 J SETTINGS button press to access BT 211 user settings K SYSTEM INFO button press to review BT 211 software version model number and serial number System Tools Screen I K J 4 ...

Страница 6: ...evices Pairing your telephone with the BT 211 1 Press the PAIRING button on the BT 211 2 The BT 211 is now ready for pairing Pairing Screen 3 From your Bluetooth telephone activate the search for Bluetooth hands free devices consult your telephone s user guide 4 Select BlueTraks in the list 5 Enter 1111 on your telephone when prompted for PIN 5 ...

Страница 7: ...BT 211 User Guide Searching for Hands Free Devices 6 The BT 211 says Bluetooth Pairing Successful when both devices are paired successfully Pairing Successful Screen 6 ...

Страница 8: ...acing Calls 1 Press the PLACE RECEIVE CALL button to start to place outgoing call 2 If you have selected voice activated dialing from the SYSTEM TOOLS SYSTEM DIALING MODE check box you will see the following screen after your telephone prompts you to speak the contact you are calling 3 When selecting a contact you must say the contacts name as it is recorded in your phone book ie Call David Smith ...

Страница 9: ... TOOLS SYSTEM DIALING MODE check box the following keypad entry screen will be displayed Keypad Entry Screen 5 Enter the telephone number you wish to dial using the touch screen keypad and then press SEND to place the call 6 The call is connected Call Established Screen 8 ...

Страница 10: ...g buttons to manage your incoming and outgoing calls L PLACE RECEIVE CALL press this button to answer and place calls Use this button to switch between a current call and a call waiting call M REJECT press this button to reject an incoming call while you are already on a current call If not the incoming call will be routed to voice mail N TERMINATE press this button to end the current call O PRIVA...

Страница 11: ... STEREO slide selection to set stereo line out level to vehicle radio input S NITE BRIGHT slide selection to set backlighting when vehicle headlights are turned on Under night time driving conditions you may want to adjust the backlighting to match the vehicle panel illumination and to reduce glare T DIALING MODE press the check box to select either voice activated or keypad dialing Voice activate...

Страница 12: ...TOOLS SYSTEM INFO Menu MODEL NUMBER the exact model of the BT 211 is displayed SERIAL NUMBER the serial number of the BT 211 is displayed S W VERSION the current software version of the BT 211 is displayed System Info Screen 11 ...

Страница 13: ... while maintaining the clean look of your vehicles interior with one simple cable that connects controls and powers your iPod The BT 211 is the ultimate in iPod to vehicle performance and integration When the BT 211 is connected to an iPod using the cable the controls on the iPod are not functional Photo of iPod Connected to Cable About iPods usable with the BT 211 The BT 211 can be used with the ...

Страница 14: ...laylists Artists Albums Songs Genres Shuffle Play search mode s individual hierarchy you can narrow down your search as shown in the table below IHierarchy 1 IHierarchy 2 IHierarchy 3 IHierarchy 4 IHierarchy 5 IPlaylists IPlaylist Name ISongs I I IArtists IArtist Name IAlbums ISongs I IAlbums IAlbum Name ISongs I I ISongs ISong Name I I I IGenres IGenres Types IArtists IAlbums ISongs IShuffle Play...

Страница 15: ...articular Artist Another search mode can be used for the same operation although the hierarchy differs 1 IF A SONG IS CURRENTLY PLAYING PRESS THE PAUSE BUTTON TO STOP THE CURRENT SONG Now Playing Screen with PLAY PAUSE Button Circled 2 Press the RETURN button Now Playing Screen with RETURN Button Circled 14 ...

Страница 16: ...11 User Guide 3 Press the ARTIST button iPod Main Menu Screen with Artist Button Circled 4 Press the PAGE DOWN or PAGE UP buttons to locate desired artist name Artist Screen with PAGE DOWN Button Circled 15 ...

Страница 17: ...uide 5 Press artist name button Artist Screen with Artist Name Circled 6 Press the NEXT SONG or the PREVIOUS SONG buttons to move through the songs by that artist Now playing Screen with NEXT SONG Button Circled 16 ...

Страница 18: ...USE button PREVIOUS SONG button NEXT SONG button RETURN to iPod menu screen button Name of current song playing Name of Artist Name of Album Current song number of available songs from this Artist Elapsed playing time Song playing time remaining iPod Now Playing Screen 17 ...

Страница 19: ...ers on and the NAVIGATION button is pressed a safety disclaimer screen will show with the following warning ANY MANIPULATION OF THIS GPS DEVICE WHILE DRIVING MAY LEAD TO SERIOUS INJURY OR DEATH USE CAUTION WHEN USING THIS DEVICE Please input any navigation destination settings while the vehicle is not in motion Press the I AGREE button to go to the navigation main menu Navigation Disclaimer Screen...

Страница 20: ... injury in the event of an accident Do not mount the BlueTraks BT 211 Navigation device in a place where the driver or passengers are likely to impact it in an accident or collision The mounting hardware supplied by BlueTraks Inc is not warranted against collision damage or the consequences thereof When used in vehicles it is the sole responsibility of the driver of the vehicle to operate the vehi...

Страница 21: ...pread out over 3 screens NAVIGATION MAIN MENU Screen One FIND lets you into the Find Wizard situated on two separate screens in which you can locate an Address Point of Interest POI Home Intersection listed My Point or view your Find History INFO provides information on your current location MY POINTS allows you to mark or manage your My Points favorites and set your Home address ROUTE MENU lets y...

Страница 22: ...d three dimensional views Note You will not see the names of most roadways on the 3D view but the map will look more realistic UNITS lets you choose to navigate in either English or Metric units POI s puts you into the POI Display Menu screen to adjust the Restaurant display Transport display and Other POI display DAY NIGHT switches from a night screen to a day screen and vice versa 21 ...

Страница 23: ...ws user to change the voice and language of the BT 211 Navigation NAV PANEL lets you set three identifying panels on your navigation screen including distance to go speed odometer heading satellite info and arrival time GPS STATUS provides GPS information such as latitude longitude elevation speed heading date time and strength of signal 22 ...

Страница 24: ... can also create routes by entering start and end addresses for later use When you are driving the screen will display your location in route and you will be given voice instructions for when and where to turn Your destination will be indicated on the map with a checkered flag Once you have reached your destination the route will be cleared and will be ready to navigate to your next destination Se...

Страница 25: ...rd Menu when you press Find in the main menu Find Wizard Menu 2 You will now be asked to enter the address of your destination The BT 211 Navigation is equipped with Smart Search Technology that will automatically generate possible States Cities and Street names based on the first few letters of your entry The following illustrates the address search for 151 Tremont St Boston MA Note To select a r...

Страница 26: ...BT 211 User Guide Start to Enter State Select from Possible States 25 ...

Страница 27: ...BT 211 User Guide Start to Enter City Select from Possible Cities 26 ...

Страница 28: ...BT 211 User Guide Start to Enter Street Name Select from Possible Streets 27 ...

Страница 29: ...BT 211 User Guide House Number 3 The BT 211 Navigation software will generate search results based on your entry Select your destination by touching the appropriate check mark 28 ...

Страница 30: ...rent location If you would like to modify your Route at this point you can touch the magnifying lens icon located to the left of the End Address This will take you back to the Find Wizard where you can enter a new destination Once your desired End Address is displayed press Create Route 29 ...

Страница 31: ...BT 211 User Guide Route Start and End Addresses Creating Route 30 ...

Страница 32: ...ill prompt you at turns and you can follow the distance remaining or whatever other parameters you chose in the Navigation Panel You can also see the turn by turn maneuver list by pressing Route and then View Route View Route Results 31 ...

Страница 33: ...The intersection feature cannot be used for highways or freeway intersections exits 1 Press the Menu button and then the Find button Main Menu and Find 2 This will put you into the Find Wizard where you can use the right arrow icon to scroll to the second screen and then press the icon labeled Intersection Note In this illustration the WorldNav will locate the intersection of Beacon and Park Stree...

Страница 34: ...rst street beginning with the state the city and finally the street name Press Next between adding the various components of the address until you get to street name You make your selection by touching the check mark next to the street name in the list of possible streets 33 ...

Страница 35: ...BT 211 User Guide Selecting First Intersection Street 4 You will now be asked to type the name of the Second Street you are looking for Entering Second Intersection Street 34 ...

Страница 36: ... of possible selections Pick one and press the check mark icon to see the intersection on a map Select Correct Intersection 6 You can now display the route to this intersection from your current location simply by pressing Create Route 35 ...

Страница 37: ...ide Create Route Details 7 You will automatically be taken into driving mode and guided to your destination If you would like to view the route you can select View Route from the Route Menu at any time View Route 36 ...

Страница 38: ...Select Menu and then Find Find Wizard 2 In the Find Wizard select POI or point of interest 3 You can now touch the right and left arrow icons in order to select your POI search option You may choose from Anywhere By Phone Number or By Nearest When your preferred Route option is displaying in the text field press OK 37 ...

Страница 39: ... nearest for the purposes of this tutorial Use this when you don t know the address or need to find something close by 5 Select a category such as Automotive Food Drink Business Education etc If you are unsure select the category All Select POI Category 38 ...

Страница 40: ...all Food Drink subcategories to search from by touching the down arrow icon located in the bottom right hand corner of the screen You may also select All to search all types Select POI Subcategory 8 You will be prompted to enter a POI name to search You may skip the entry of a name to view all results from this category Press Next Search POI by Name 39 ...

Страница 41: ... and direction of each POI is displayed Select a POI from an existing result by touching the corresponding check mark Select POI 10 After selecting a POI you will be brought to the Find Result Screen where you can select an action to take Using the right and left arrow icons you will choose Show Mark or Route To POI Options 40 ...

Страница 42: ...have created a My Point see working with my point section you can find it in the Find Wizard Menu 1 Press Menu then My Points Find Wizard Menu 2 You are brought to the My Points Menu screen Press the manage button and proceed Manage My Points 41 ...

Страница 43: ...BT 211 User Guide 3 Press the right and left arrow icons to choose to either Show or Route To your My Point Press OK Finding a My Point 42 ...

Страница 44: ...ur selection 1 Press the Address button You will be prompted to enter an address in the usual fashion beginning with the State Province The Smart Search feature will generate results for each component of your address entry based on the first few letters you type 2 For street names that include direction N S SE NW etc and or numbers 5th Ave 32nd St etc you will need to switch between the alpha and...

Страница 45: ...BT 211 User Guide Enter Direction then Press 123 Enter Numerical Portion then Press abc 44 ...

Страница 46: ...BT 211 User Guide Continue Street Entry Select Street Name 3 Continue entering the street address by entering the House Number and then press Next and select the address from the results 45 ...

Страница 47: ...BT 211 User Guide Enter House Number Select Address from Results 46 ...

Страница 48: ...r Route The Reroute function is intended for manual use in case you prefer to create a new route without waiting for the GPS to reroute you to a new path If you are on a route and have strayed more than 300 feet from it press Menu Route Menu right arrow icon and finally press Reroute Your position must be locked motionless when you activate this function It will create a new route based on your cu...

Страница 49: ...levation speed heading direction of travel date time the total number and strength of satellite signals The green dot on the bottom right of the panel indicates the GPS is locked in The dot will change colors based on the following status Red not locked in Yellow Acquiring satellites Blinking Green position fixed The same dot colors will also appear on the bottom right hand side of the map screen ...

Страница 50: ...f you are centered on a position that you would like to create a My Point for press Menu My Points and then Mark Position The Mark Position Screen will come up allowing you to enter a name and then you may assign an icon to your new My Point from the icon gallery The position will now be saved as a My Point Mark My Point at Current Position Press Menu and then My Points My Points Menu 1 Press Mark...

Страница 51: ...BT 211 User Guide Naming a My Point Selecting a My Point Icon 3 Your current position will now be recorded as a My Point and will appear on the screen as the icon you selected 50 ...

Страница 52: ...o a screen entitled Manage My Points Select the i icon next to the My Point you wish to edit Editing your My Points 2 Change the name of the My Point by pressing the Name field and type the new name when prompted You can also press the Icon field which will bring you to the icon gallery where you can assign a new Icon to illustrate your My Point My Point Details 51 ...

Страница 53: ...Back 4 To view your edited My Point press the check mark icon next to it This will bring you to the Find Result Screen With the Show option displayed in the text field press OK This will take you to the map with your My Point centered on the screen Find Result Show My Point My Point on Map 52 ...

Страница 54: ... Menu My Points Manage My Points and then press the i icon next to the My Point you wish to delete Manage My Points Menu 2 In the My Points Details press Recycle Bin The selection will now be removed from the list of My Points My Point Details 53 ...

Страница 55: ...whether the BT 211 Navigation should display measurements in Metric or English units Main Menu Units 1 Press Menu right arrow icon and then select Units 2 You can switch between Metric and English units by pressing the arrow icons Select one and then press OK System of Units 54 ...

Страница 56: ...hways 1 Press Menu Route Menu right arrow and then Settings Route Menu 2 You will be brought to the Route Settings Screen where you can select your route preferences Allow Ferry Usage and Allowing Toll Roads are indicated by a blue check mark You can deselect these options by pressing the icon once A grey x icon will display when the feature is not activated 55 ...

Страница 57: ...t and left arrow icons to choose from Quickest Path fastest route regardless of distance Shortest Path shortest distance regardless of speed Avoid Highways no highways included in route Walking Path 3 When the Route Setting screen displays your desired routing preferences press OK to apply 56 ...

Страница 58: ...he same section when you reach your destination The two other information areas in the bottom right of the Navigation Panel can be customized 1 Press Menu scroll to the third Menu screen by using the right arrow icons and then press Nav Panel You can choose to display Big Panels Big Map or to Hide or See Through the Upper and Lower Panels You can also choose two values to be displayed in the Navig...

Страница 59: ...ing focused on degrees such as 270º Heading Text Directional heading focused on text such as West Odometer Odometer Satellite Info GPS signal strength Speed Ground speed Time GPS UTC time Nav Panel Choose from Big Map Big Panel or Hide Panel Big Map devotes more space to the map area with a narrower Nav Panel Big Panel displays a wider Nav Panel with a reduced map size Hide Panel displays no Navig...

Страница 60: ...ces Choose the types of POIs that you would like to appear on the map For the purposes of this tutorial let s decide the restaurant types you like 1 Press Menu right arrow icon and then POI s Select POI s 2 Select Restaurant POI Display Menu 59 ...

Страница 61: ...icular item is now selected You may unselect the same item by tapping the blue check mark icon which will then return to the unselected grey state Once all of your selections are highlighted press OK Restaurant POI Display Preferences 4 You can do the same for Transport display and General POI display Only the items you select will be displayed on the map For example if you unselect all preference...

Страница 62: ...here you select the voice you would like to hear while navigating Use the right and left arrow icons to make your selection When your preferred voice is displaying in the text field press OK Voice Selection Screen Changing the Time The GPS has preset time to U S East Coast To change the time your GPS position must be locked in 1 Press Menu use the right arrow icons to get to the third Menu screen ...

Страница 63: ... 211 User Guide Select GPS Status 2 The GPS Information screen will appear Tap on the Date Time field to adjust the time GPS Information Screen 3 Click on the and buttons to change the hour accordingly 62 ...

Страница 64: ...an be shown in two dimensions where the streets are clearly marked This looks like a regular map For 3D mode only the main streets are labeled but the map more clearly displays what your route looks like while driving Routing in 3D Mode Routing in 2D Mode 63 ...

Страница 65: ...om either Routing Mode press Menu right arrow icon and select 2D 3D From the 2D 3D View Screen you are able to use the right and left arrow icons to display your desired setting Press OK to apply your preference Select View Mode 64 ...

Страница 66: ...n and zoom out when you speed up 1 Press Menu Right arrow icon and then press 2D 3D View then Auto Zoom choice Route Menu 2 Press the corresponding icon next to Enable Auto Zoom to turn on off the Auto Zoom feature A blue highlighted check mark icon indicates a feature is turned on A grey x icon indicates a feature is turned off Auto Zoom 65 ...

Страница 67: ...th gray streets for day vision Select Menu right arrow icon and then select Day Night You can also select Auto Mode which automatically switches from day to night and vice versa based on your current GPS position lat long When your preferred mode is displayed in the text field press OK to apply the setting Select Night Vision Night Mode Map 66 ...

Страница 68: ...ter and trip timer simultaneously Press Menu then use the right arrow icon to get to the third Menu screen and then press Trip Stats to see the Trip Statistics screen Trip Statistics Screen Map Information If you press Menu and then Info the GPS will display the best estimate of your current location Map Information Screen 67 ...

Страница 69: ...r Guide Simulating a Route You can simulate a previously created route to preview what it will look like while you are driving 1 Press Menu Route Menu right arrow icon and then press Simulator Select Simulator 68 ...

Страница 70: ... simulation will automatically begin Simulation Mode 3 To end the simulation simply tap the screen once You may resume the simulation mode by touching GO located on the left side of the screen Press GO to Resume Simulation 69 ...

Страница 71: ...es to lock in on the satellite signal after which your true location will be shown 5 Sometimes the GPS indicates an address to be in a different part of the block why House numbers are estimated positions within the block Typically the GPS will put you within a few feet of the actual position 6 How do I transfer maps onto my device The BT 211 Navigation does not require maps to be transferred All ...

Страница 72: ...BT 211 REV 001 ...

Отзывы: