background image

NEDERLANDS

GEBRUIKERSHANDLEIDING

3,5’’ HDD-BEHUIZING

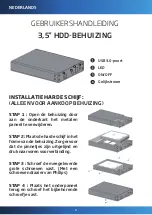
USB 3.0-poort

LED

ON/OFF

Gelijkstroom

INSTALLATIE HARDE SCHIJF:

(ALLEEN VOOR AANKOOP BEHUIZING)

STAP 1 :

 Open de behuizing door 

aan de onderkant het metalen 

paneel te verwijderen.

STAP 2 :

 Plaats de harde schijf in het 

frame van de behuizing. Zorg ervoor 

dat de pinnetjes zijn uitgelijnd en 

druk naar voren voor verbinding.

STAP 3 :

 Schroef de meegeleverde 

grote schroeven vast. (Met een 

schroevendraaier van Philips)

STAP 4 :

 Plaats het onderpaneel 

terug en schroef het bijbehorende 

schroefj e vast.

8

Содержание 3760162060188

Страница 1: ...rnal Hard Drive Enclosure Users manual p 2 Manuel utilisateur p 4 Manual del usuario p 6 Manuale dell utente s 7 Gebruikershandleiding p 8 Bedienungsanleitung p 9 Manual do utilizador p 10 p 11 Gebrui...

Страница 2: ...Y STEP 1 Open the enclosure by draw out the bottom metal panel STEP 2 Place the hard drive into the enclosure frame Make sure the pins are aligned and push forward to connect STEP 3 Screw in the large...

Страница 3: ...ntial requirements and other relevant provisions of the following directives Directive 2004 108 EC Theproductiscompatiblewiththefollowingnorms standards EN55022 2010 EN61000 3 2 2006 A1 2009 A2 2009 E...

Страница 4: ...ERNE QUE LE BO TIER ACHET TAPE 1 Ouvrir le bo tier en retirant le panneau m tallique sup rieur TAPE 2 Placer le disque dur dans le bo tier V rifier le bon alignement des broches et pousser vers l avan...

Страница 5: ...spositions des directives CE suivantes Directive 2004 108 EC Et que les normes et ou sp cifications techniques mention n es ont t appliqu es sur un mod le type EN55022 2010 EN61000 3 2 2006 A1 2009 A2...

Страница 6: ...la caja extrayendo el panel met lico inferior PASO 2 Coloque el disco duro dentro de la estructura de la caja Aseg rese de que los contactos est n alineados y empuje hacia delante para conectarlos PA...

Страница 7: ...platte herausziehen SCHRITT2 LegenSiedieFestplatte in den Geh userahmen Stellen Sie sicher dass die Pins korrekt ausgerichtet sind und schieben Sie die Festplatte nach bis zum Kontakt nach vorne SCHRI...

Страница 8: ...g door aan de onderkant het metalen paneel te verwijderen STAP 2 Plaats de harde schijf in het frame van de behuizing Zorg ervoor dat de pinnetjes zijn uitgelijnd en druk naar voren voor verbinding ST...

Страница 9: ...UCRO PUNTO 1 Aprite l involucro togliendo il pannello di metallo inferiore PUNTO 2 Sistemate il disco rigido nella struttura dell involucro Assicuratevi che i perni siano allineati e spingete per coll...

Страница 10: ...PARA COMPRA DA CAIXA PASSO 1 Abra a caixa removendo o painel met lico inferior PASSO 2 Coloque o disco r gido na estrutura da caixa Certifique se de que os pinos est o alinhados e empurre para conecta...

Страница 11: ...3 5 USB 3 0 LED On Off DC 1 2 3 Philips 4 11...

Страница 12: ......

Отзывы: