

2/10/2017
BlueROV2 Operating Manual
2/5
To set up your topside control follow the instructions on the Software Setup (/brov2/software-setup/) page.
Vacuum Test
To perform a vacuum test on the
BlueROV2, you need a vacuum pump. If you do not own one, we recommend this pump. (https://www.amazon.com/HFS-Brake-Bleeder-Vacuum-
Tuner/dp/B00NP60URE/ref=sr_1_10?ie=UTF8&qid=1470775016&sr=8-10&keywords=pump) It is important to do a vacuum test prior to putting the
BlueROV2 in the water for the
ᵠrst time. It is also important to perform a vacuum test after changing anything that could compromise a seal, such as changing out a penetrator or an O-ring.
The vacuum test can be performed using the following procedure:
1. Remove the vent plugs from both the electronics and the battery enclosure.
2. Install one of the vacuum plugs on the included tee in the electronics enclosure and the other in the battery enclosure.
3. Pump until the gauge reads 10 in. Hg [34 kPa] vacuum.
4. Let the
BlueROV2
and pump sit for 15 minutes.
5. If the gauge reads above 9 in. Hg [31 kPa] vacuum after 15 minutes, your seals are acceptable.
If the gauge reads below 9 in. Hg [31 kPa] vacuum after 15 minutes, you should check the following:
1. Make sure that the M3 screws on the front and back end caps of the battery and electronics encloure using the M2.5 hex driver. If you are able to tighten one or more, attempt the vacuum test again.
2. Make sure the the penetrators on the battery and electronics enclosure are fully tightened. Check by attempting to loosen by hand. If you are able to tighten one or more, attempt the vacuum test
again.
3. Make sure that all of the O-rings are installed in the penetrators. If any are missing, install then attempt the vacuum test again.
4. Check that the Face seal O-rings and radial O-rings are installed in the battery and electronics enclosures and in good condition. If you ᵠnd a damaged or missing O-ring, install and attempt the
vacuum test again.
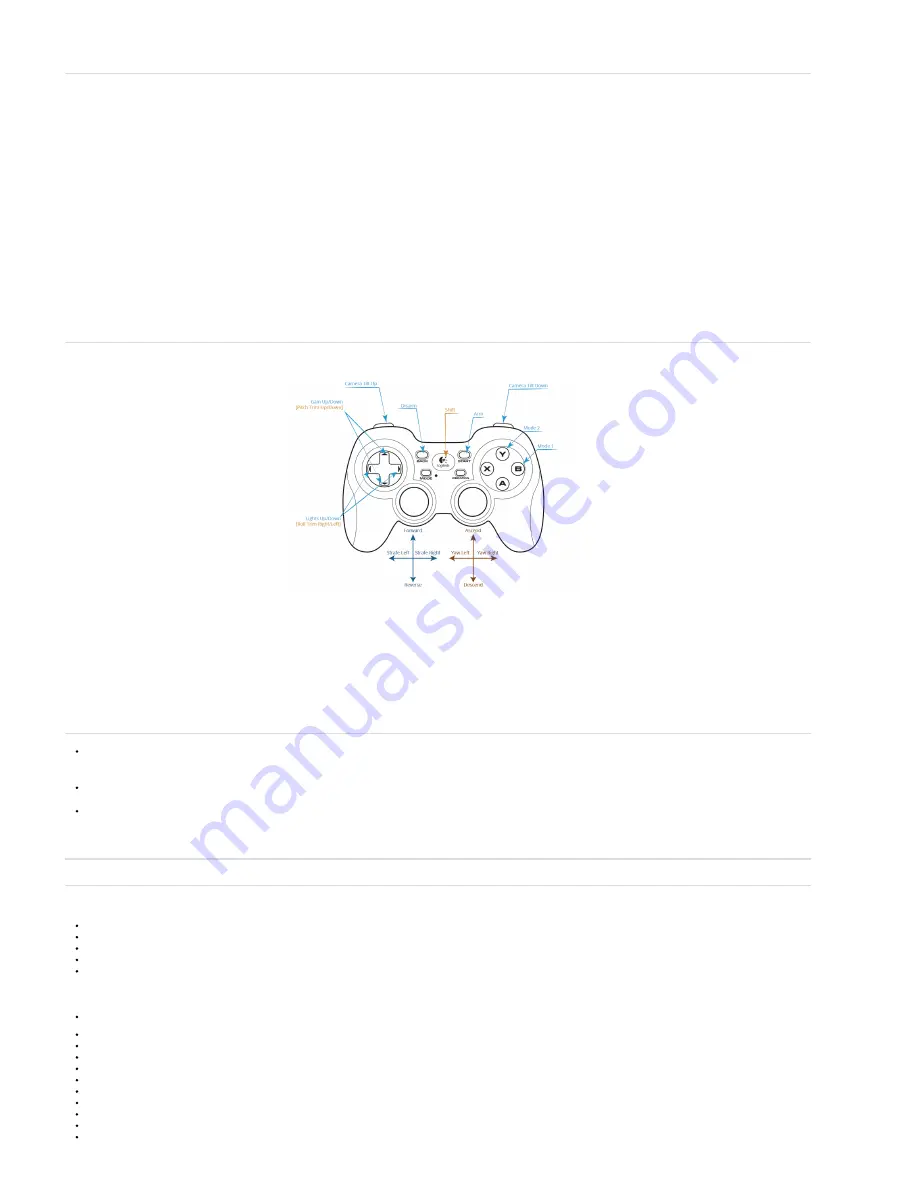
Controller Functions
The BlueROV2 comes with the button setup shown below as a default:
If you do not like the button settings, you can change the button setup in QGroundControl.
1.
Go to
Settings then select “Joystick”
2.
Under “Button actions:” QGroundControl shows what all buttons are currently set to control.
3.
Press the button that you are interested in changing. The button number will light up.
4.
Select what you would like the button to do from the dropdown to the right of the button number.
Dive Modes
In Manual Mode (Flight Mode 1) the BlueROV2 will only output motor controls based on the pilot input from the joysticks. There is no feedback stabilization, heading holding, or
depth holding.
In Stabilize Mode (Flight Mode 2) the BlueROV2 will stabilize roll to level and it will maintain heading when not commanded to turn. The vertical control is left entirely to the pilot.
In DepthHold Mode (Flight Mode 3) the BlueROV2 will hold depth unless you command it to dive/ascend. It will also stabilize roll to level and maintain heading when not commanded
to turn.
Pre-Dive Checklists
Comprehensive Checklist
This checklist is more thorough than the Pre-Dive Checklist and should be done in a couple of circumstances:
After travel by airplane
After extended travel by car or boat (>1 hour)
After taking oᶰ the electronics enclosure
After replacing or exchanging penetrators
After replacing any sealing O-ring
Comprehensive Checklist
Check that the ROV has connected to QGroundControl
Tighten the M5x16 screws that hold the frame to the center and bottom panels using the short part of the M3 hex key as the handle or an M3 hex driver.
Tighten the M3x12 screws that hold the back end caps to the ᵸange seals using the M2.5 hex driver.
Tighten the M3x16 screws that hold the clips to the electronics enclosure.
Tighten the M3x12 screws that hold the dome and the front battery end cap to the ᵸange seals using the M2.5 hex driver.
Gently attempt to twist the ballast weights clockwise.
Pull on the side panels and attempt to twist the frame.
Pull on the cable bundles going into the 14 hole end cap.
Pull on and twist the tether thimble.
Attempt to loosen all of the penetrators by hand.
Check that the vent plugs are installed.
Push and twist the battery enclosure.
BlueLink, LLC / 619-204-1060
(Authorized Distributor)


