
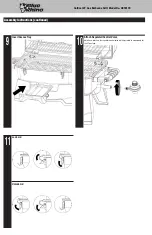
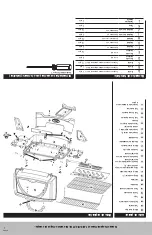


Outdoor LP Gas Barbecue Grill Model No. GBT611B
Contact 1.800.762.1142 for assistance. Do not return to place of purchase.
1. This grill is for outdoor use only, and shall not be used in a building,
garage, or any other enclosed area.
2. This grill is NOT for commercial use.
3. This is not a tabletop grill. Therefore, do not operate this grill on any
type of tabletop surface
4. This grill is for use with liquid propane (LP) gas only. The conversion
to or attempted use of natural gas in this LP gas grill is dangerous and
will void your warranty.
5. LP gas Characteristics:
a. LP gas is flammable and hazardous if handled improperly. Become
aware of the characteristics before using any LP gas product.
b. LP gas is explosive under pressure, heavier than air, and settles and
pools in low areas.
c. LP gas in its natural state has no odor. For your safety, an odorant is
added that smells like rotten cabbage.
d. Contact with LP gas can cause freeze burns to skin.
6. LP gas tank needed to operate. Only tanks marked “propane” may be
used.
7. The LP gas supply tank must be constructed and marked in accordance
with the Specifications for LP gas Cylinders of the U.S. Department of
Transportation (DOT) or the National Standard of Canada, CAN/CSA-
B339, Cylinders, Spheres and Tubes for the Transportation of Dangerous
Goods; and Commission.
8. LP gas tank must be arranged for vapor withdrawal.
9. Dented or rusted LP gas tanks may be hazardous and should be
checked by your LP gas supplier prior to use.
10. The LP gas tank should not be dropped or handled roughly.
11. LP gas tanks must be stored outdoors out of the reach of children and
must not be stored in a building, garage, or any other enclosed area.
Your tank must never be stored where temperatures can reach over
125°F.
12. Never attempt to attach this grill to the self-contained LP gas system
of a camper trailer, motor home, or house.
13. The use of alcohol, or prescription or non-prescription drugs may
impair the consumer’s ability to properly assemble or safely operate
the appliance.
14. Never use charcoal, lighter fluid, lava rocks, gasoline, kerosene, or
alcohol with this product.
15. Your grill has been checked at all factory connections for leaks.
Recheck all connections, as movement in shipping can loosen
connections.
16. Check for leaks even if your unit was assembled for you by
someone else.
17. Do not operate if gas leak is present. Gas leaks may cause a fire or
explosion.
18. You must follow all leak-checking procedures before operating. To
prevent fire or explosion hazard when testing for a leak:
a. Always perform leak test before lighting the grill and each time the
tank is connected for use.
b. No smoking. Do not use or permit sources of ignition in the area
while conducting a leak test.
c. Conduct the leak test outdoors in a well-ventilated area.
d. Do not use matches, lighters, or a flame to check for leaks.
e. Do not use grill until any and all leaks are corrected.
If you are unable to stop a leak, disconnect the LP gas supply. Call
a gas appliance serviceman or your local LP gas supplier.
19. Do not use in an explosive atmosphere. Keep grill area clear and free
from combustible materials, gasoline and other flammable vapors and
liquids.
20. Keep all combustible items and surfaces at least 21 inches (53 cm)
away from the grill at all times. DO NOT use this grill or any gas
product under any overhead or near any unprotected combustible
constructions.
21. It is essential to keep the grill’s valve compartment, burners, and
circulating air passages clean. Inspect grill before each use.
22. Do not alter grill in any manner.
23. Do not use the grill unless it is COMPLETELY assembled and all parts
are securely fastened and tightened.
24. This grill should be thoroughly cleaned and inspected on a regular
basis.
25. Use only the regulator provided. The replacement regulator shall be
that specified by the manufacturer.
26. Use only Blue Rhino Global Sourcing, LLC. factory authorized parts.
The use of any part that is not factory authorized can be dangerous.
This will also void your warranty.
27. Do not use this appliance without reading “Operating Instructions” in
this manual.
28. Do not touch metal parts of grill until it has completely cooled (about
45 min.) to avoid burns, unless you are wearing protective gear (pot
holders, gloves, BBQ mittens, etc.).
29. Do not install or use in or on boats or recreational vehicles.
30. When cooking, fire extinguishing materials shall be readily accessible.
In the event of an oil grease fire, do not attempt to extinguish with
water. Use type BC dry chemical fire extinguisher or smother with
dirt, sand or baking soda.
31. Do not use grill in high winds.
32. Never lean over the grill when lighting.
33. Do not leave a lit grill unattended, especially keep children and pets
away from grill at all times.
34. Do not attempt to move grill when in use. Allow the grill to cool
before moving or storing.
35. Storage of grill indoors is permissible only if the tank is disconnected,
removed from the grill and properly stored outdoors.
36. While wearing a protective glove or mit, open grill lid carefully and
slowly as heat and steam trapped within grill can severely burn you.
37. Do not attempt to disconnect the gas regulator from the tank or any
gas fitting while the grill is in use.
38. Disconnect cylinder when not in use.
39. Always use your grill on a hard, non-combustable level surface. An
asphalt or blacktop surface may not be acceptable for this purpose.
40. Do not use directly on wooden decks.
41. Keep all electrical cords away from a hot grill.
42. Do not use grill for indoor cooking or heating. TOXIC fumes can
accumulate and cause asphyxiation.
43. After a period of storage and/or nonuse, check for leaks, and burner
obstructions.
44. Failure to open lid while igniting the grill’s burner, or not waiting 5
minutes to allow the gas to clear if the grill does not light, may result
in an explosive flame-up.
45. If grill is not in use, the gas must be turned off at the supply tank.
46. Never operate grill without heat plate installed.
47. Always use a meat thermometer to ensure food is cooked to a safe
temperature.
48. Never cover entire cooking area with aluminum foil.
49. Do not store a spare LP gas tank under or near this appliance.
50. Please use protective gloves when assembling this product.
51. Do not force parts together as this can result in personal injury or
damage to the product.
52. Deaths, serious injury or damage to property may occur if the above is
not followed exactly.
Safety First
DANGERS and
Cautions
WARNING
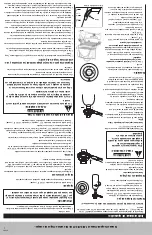
FOR YOUR SAFETY
If you smell gas -
1. Shut off gas to appliance.
2. Extinguish any open flame.
3. Open lid.
4. If odor continues, immediately call your gas supplier or your fire
department.
1. Do not store spare LP cylinder within 10 feet (3.05 m) of this
appliance.
2. Do not store or use gasoline or other liquids with flammable vapors
within 25 feet (7.62 m) of this or any other appliance.
3. An LP cylinder not connected for use shall not be stored in the vicinity
of this or any other appliance.


