13 | 8 4 4 . 4 2 5 . 8 3 6 8
C H I C A G O 8 B O X
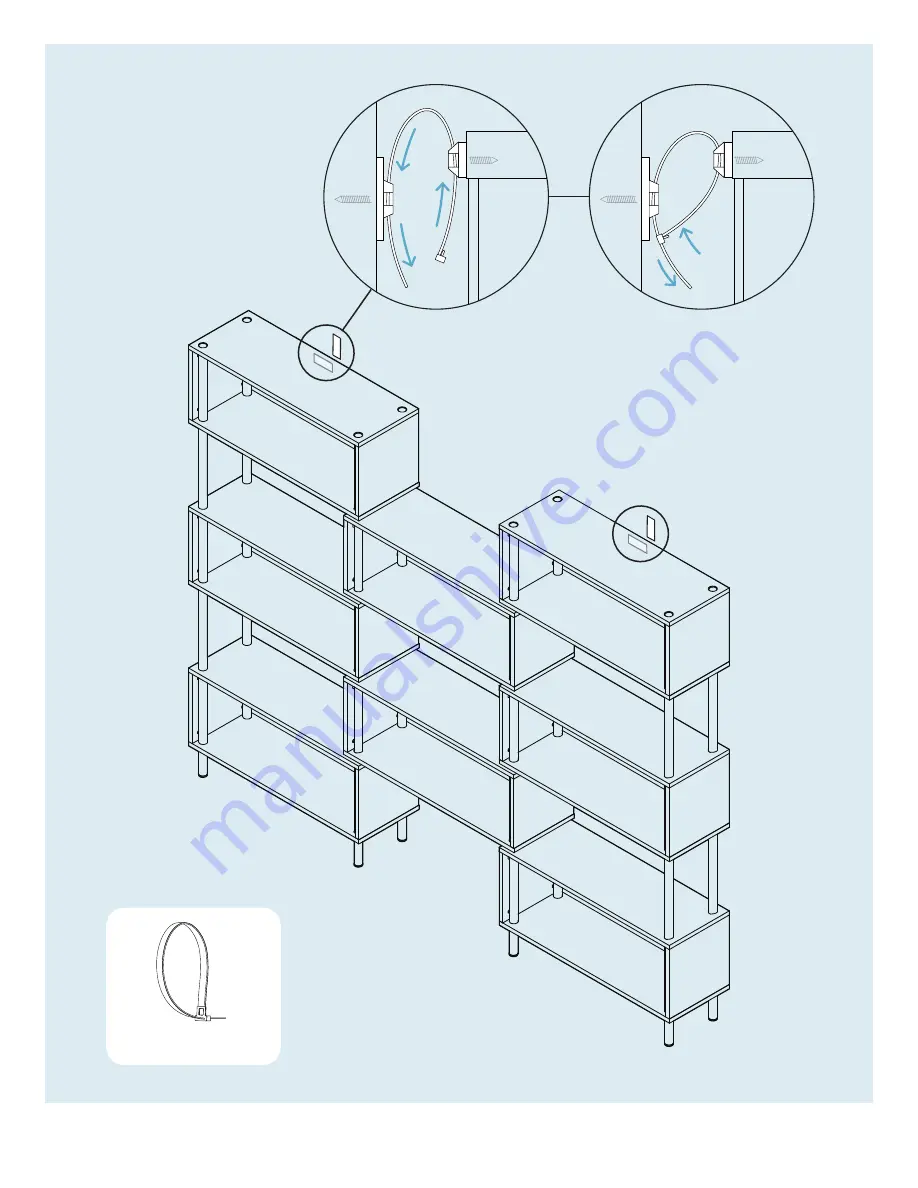
PT. 8042 X 2
8042
Anti-tip Strap
Step 13
S E C U R E T H E CA S E .
Install and tighten the strap prior to using the product.
Страница 1: ...1997 ASSEMBLY NOTES REV 04 BLUDOT We design all our pieces in our Minneapolis studio Follow along on Instagram for some sneak peeks into the process NEED A HAND Contact us at service bludot com or 84...
Страница 2: ...1001 QTY Pt 8036 4 QTY 64 Back Panel 8 QTY Horizontal Panel 16 QTY Side Panel 16 QTY Pt 1218 4 QTY Pt 8042 2 QTY 3 Hole Post QTY 5 Hole Post 4 QTY 4 Pt 5005 64 QTY Pt 5002 64 QTY Pt 1217 QTY Pt 8041...
Страница 3: ...S E R V I C E B L U D O T C O M 2 A S S E M B L Y N O T E S 3 5 4 1 2 How to use the cam lock system Note direction of cam arrow Turncamclockwise 1 2 turnoruntil tight Note direction of cam arrow...
Страница 4: ...4 PT 5002 X 4 SidePanel HorizontalPanel SidePanel Step 01 BEGIN ASSEMBLING CASE Attach side panels to horizontal panel as shown using the provided hardware Be sure to align grooves on horizontal panel...
Страница 5: ...1 X 4 PT 5005 X 4 PT 5002 X 4 HorizontalPanel Step 03 FINISH ASSEMBLING CASE Finish assembling the case as shown Repeat steps 01 03 for remaining cases Refer to page 2 on how to use the cam lock syste...
Страница 6: ...5 8 4 4 4 2 5 8 3 6 8 C H I C A G O 8 B O X PT 1001 X 16 5HolePost 3HolePost Step 04 ASSEMBLING THE POSTS Assemble the posts as shown using the provided hardware Repeat step 04 for remaining posts...
Страница 7: ...N O T E S 5HolePosts 3HolePosts 3HolePosts Turntolevel Step 06 LEVEL THE CASES Level the cases as shown Step 05 INSTALLING THE POSTS Insert post as shown After the posts have been installed have a se...
Страница 8: ...7 8 4 4 4 2 5 8 3 6 8 C H I C A G O 8 B O X PT 1001 X 8 Step 07 AT TACHING THE CASES Attach the cases to the posts as shown using the provided hardware...
Страница 9: ...S E R V I C E B L U D O T C O M 8 A S S E M B L Y N O T E S PT 1001 X 16 Step 08 AT TACHING THE CASES Attach the cases to the posts as shown using the provided hardware...
Страница 10: ...9 8 4 4 4 2 5 8 3 6 8 C H I C A G O 8 B O X PT 1001 X 8 Step 09 AT TACHING THE CASES Attach the cases to the posts as shown using the provided hardware...
Страница 11: ...S E R V I C E B L U D O T C O M 10 A S S E M B L Y N O T E S PT 1001 X 16 Step 10 AT TACHING THE CASES Attach the cases to the posts as shown using the provided hardware...
Страница 12: ...ack Panel Top 8041 An p Bracket PT 8041 x 2 PT 1217 x 4 Step 11 INSTALL ANTI TIP BRACKETS TO CASE Brackets must be installed to top panel of case In order to prevent damage it is recommended that 7 64...
Страница 13: ...rmine the hardware best suited for your wall type Position the anti tip brackets onto the wall 1 below case top panel height as shown and mark hole locations with a pencil If the mounting locations ar...
Страница 14: ...13 8 4 4 4 2 5 8 3 6 8 C H I C A G O 8 B O X PT 8042 X 2 8042 Anti tip Strap Step 13 SECURE THE CASE Install and tighten the strap prior to using the product...
Страница 15: ...IN MINNEAPOLIS MN Additional Information CLEAN Clean with a slightly damp soft cloth To remove dirt and fingerprints use a quality cleaner formulated for wood furniture Wipe completely dry with a soft...
Страница 16: ...BLU DOT DESIGN MANUFACTURING INC DESIGNED IN MINNEAPOLIS MN...