Blomberg LRI1854310 Скачать руководство пользователя страница 36

36 / EN

Washer-Dryer / User Manual

C

INFORMATION

•  If you cannot complete the setup 

successfully in 5 minutes, the washing 

machine will switch off automatically. In this 

case, you will have to start over the setup 

procedure. If the problem persists, please 

contact the Authorised Service Agent.

•  You can use your washing machine with 

more than one smart device. To do this, 

download the HomeWhiz app on the other 

smart device as well. After launching the 

app, you will need to sign in to your account 

you have previously created and paired with 

your washing machine. Otherwise, please 

read “Setting up a washing machine that is 

connected to someone else’s account”.

A

 WARNING!

•  For HomeWhiz setup, your smart device must 

be connected to internet. Otherwise, the 

HomeWhiz App will not let you complete the 

setup process successfully. If you are having 

problems with your internet connection, 

please contact your internet service provider.

C

INFORMATION

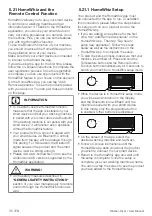
•  The HomeWhiz application may ask you 

to enter the product number stated on 

the label of the product. Product label is 

found on the inner side of the product door. 

Product number is written on this label.


5.21.2 Setting up a washing 

machine that is connected to 

someone else’s account

If the washing machine you want to use has 

previously been registered in the system with 

someone else’s account, you need to establish 

a new connection between the HomeWhiz App 

and the product.

•  Download the HomeWhiz App on the 

new smart device you want to use.

•  Create a new account and log in to this 

account on the HomeWhiz app.

•  Follow the steps in the HomeWhiz 

Setup (5.21.1 HomeWhiz Setup) 

to complete the setup.

A

 WARNING!

•  Since the HomeWhiz and Remote Control 

functions of your product work through 

pairing via Bluetooth, the product can be 

run by only one HomeWhiz app at a time.

5.21.3 Using the Remote 

Control function

After HomeWhiz setup, Bluetooth will turn on 

automatically. To enable or disable the Bluetooth 

connection, please see 5.11.2 Bluetooth 3”.

If you switch your machine off and on 

while Bluetooth is enabled, it will reconnect 

automatically. If the paired device goes out of 

the range, the Bluetooth connection will turn off 

automatically. For this reason, you will need to 

turn on Bluetooth again if you want to use the 

Remote Control function.

You can check the Bluetooth symbol on the 

display to follow the connection status. If the 

symbol is on, this means that the Bluetooth 

connection is established. If the symbol is 

established, the product is trying to connect. If 

the symbol is off, this means that you have no 

connection.

A

 WARNING!

•  If the Bluetooth connection is enabled on your 

product, you can select the Remote Control 

function. If the Remote Control function 

cannot be selected, check the connection 

status. If the connection fails, repeat the initial 

set-up settings on the appliance.

•  For safety reasons, the product’s door will 

remain locked while the Remote Control 

function is enabled, independently of the 

operating mode. If you want to open the 

door of the product, you will need to turn 

the programme selection knob or press the 

Remote Control key to disable the Remote 

Control function.

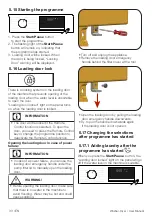
If you want to control your washing machine 

remotely, enable the Remote Control function 

by pressing the Remote Control button while 

the programme knob is in the Programme 

Download/Remote Control position on the 

control panel. Once the product is accessed, 

you will see a screen similar to the one below.

Содержание LRI1854310

Страница 1: ...Washer Dryer User Manual LRI1854310 2820529474_EN 28 04 21 9 21 Document Number...

Страница 2: ...other models Differences between models will be listed If you have any questions or concerns please call our contact centre or find help and information online at www beko co uk Explanation of symbol...

Страница 3: ...r Otherwise lack of airflow beneath the product will cause electrical parts to overheat This will cause problems with your product C INFORMATION Always have the installation procedures carried out by...

Страница 4: ...securely fastened and remain undamaged Otherwise there is the risk of water leakage A WARNING The product should be used without removing the upper plate C INFORMATION Do not force open the locked lo...

Страница 5: ...with vegetable oil alcohol petrol gas oil stain remover turpentine wax or wax remover must be washed with hot water and a great amount of detergent before drying Otherwise there will be the risk of fi...

Страница 6: ...using the machine only for drying purposes run a washing programme with the machine unloaded after every 15 drying cycles A WARNING Before loading the machine check each laundry item and make sure th...

Страница 7: ...by clients in hotels motels and other residential type environments bed and breakfast type environments areas for communal use in blocks of flats or in launderettes 1 3 Children s safety A CAUTION Chi...

Страница 8: ...t Help protect the environment and natural resources by recycling used products For children s safety cut the power cable and break the lock mechanism of the loading door to make the product non funct...

Страница 9: ...r User Manual 2 2 Package contents Power cable Water discharge hose Transit bolts Mains water inlet hose User manual Plastic plug group NOTE Figures in this manual are schematic and may not match the...

Страница 10: ...00 Washing capacity cotton kg 8 Drying capacity cotton kg 5 Built in Yes Height cm 82 Width cm 60 Depth cm 55 Single Water inlet Double Water inlet Available Electrical input V Hz 230 V 50Hz Total cur...

Страница 11: ...while pushing the product into its place after installation or cleaning procedures 3 1 Appropriate installation location Place the product on a solid and level floor Do not place it onto a carpet wit...

Страница 12: ...ction mode and will not operate Do not use old or used water inlet hoses on the new product It may cause stains on your laundry 1 2 3 1 Connect the special hose supplied with the product to the water...

Страница 13: ...se the product may move from its place and cause crushing noise and vibration problems Do not use any tools to loosen the lock nuts Otherwise the lock nuts may get damaged a Loosen the lock nuts on th...

Страница 14: ...tifying the terminals on your plug proceed as follows 1 Connect the green yellow or green earth wire to the terminal in the plug marked E or with the symbol f or coloured green and yellow or green 2 C...

Страница 15: ...ys follow the instructions on the package C INFORMATION Laundry that is subjected to heavy deposits of materials such as flour lime dust milk powder etc Must be shaken off before placing into the mach...

Страница 16: ...l drying performance do not dry more laundry than stated Laundry type Weight g Laundry type Weight g Bathrobe 1200 Hand towel 100 Fabric napkin 100 Women s night gown 200 Bed sheet 700 Underclothing 1...

Страница 17: ...he washing Programme Liquid stain remover must be put into this compartment Put the suggested amount of liquid detergent into the left compartment with II symbol and dilute it to the maximum filling l...

Страница 18: ...ounts or lightly soiled clothes 4 7 7 Using gel and tablet detergent If the gel detergent thickness is fluidal and your machine does not contain a special liquid detergent cup put the gel detergent in...

Страница 19: ...s Powder and liquid detergents recommended for coloured laundry can be used at dosages recommended for heavily soiled clothes It is recommended to use powder detergents to clean clay and soil stains a...

Страница 20: ...thes A very small amount of laundry should be loaded Delicate Silk Woollens Cashmere Angora wool etc content Clothes Not recommended Not recommended Not recommended Not recommended Not recommended Bul...

Страница 21: ...nt and fabric softener 5 4 Selecting a washing programme 1 In accordance with the Programme and consumption table select a suitable programme for the amount and soiling level of the laundry 2 Select t...

Страница 22: ...he programme you have selected press and hold the Drying auxiliary function button until the Drying light turns off Hand Wash Use this programme to wash your woollen clothes Select the appropriate tem...

Страница 23: ...to the drying selections you will add to the washing programmes you can see when the programme will end on the display of the machine If you don t want drying to take place after the programme you ha...

Страница 24: ...don t want drying to take place after the programme you have selected press and hold the Drying auxiliary function button until the Drying light turns off Lingerie You can use this programme to wash...

Страница 25: ...s the Spin Speed adjustment button in programmes where the spin speed is not allowed the spin speed setting will not change and you will hear a warning You can also change the spin speed after the was...

Страница 26: ...amme the machine automatically removes the lints coming from the clothes The machine uses water in the drying step For this reason water tap of the machine should be open also in the drying programmes...

Страница 27: ...nutes With the Fast auxiliary function you may select different program periods such as 48 minutes or 38 minutes 5 10 Programme and consumption table for washing EN 1 Auxiliary functions Programme C M...

Страница 28: ...erence of 1 to 1 5 hours between the duration shown on the display and the actual duration of the washing programme The duration will be corrected automatically right after the washing programme has s...

Страница 29: ...53 Cottons 60 1400 8 03 40 1 800 90 60 53 Synthetics 40 1200 3 02 25 0 850 58 40 40 Fast Full Load Mini 14 30 1400 8 00 28 0 200 68 23 62 Eco 40 60 Cupboard Dry 40 1400 5 07 55 3 215 61 25 53 40 1400...

Страница 30: ...amme time Remote Control You can use this auxiliary function button to connect your product to smart devices For detailed information see HomeWhiz and the Remote Control Function Custom Programme This...

Страница 31: ...mes consecutively To enable Child Lock Press and hold the Drying Level Adjustment button for 3 seconds When the countdown 3 2 1 on the display ends child lock icon will be displayed Once you see this...

Страница 32: ...tage 5 14 End Time With the End Time function start of the programme can be delayed up to 24 hours After pressing the End Time button the programme s estimated end time will be displayed If an End Tim...

Страница 33: ...the programme position to deactivate the Remote Control function Opening the loading door in case of power failure C INFORMATION In case of a power failure you can use the loading door emergency handl...

Страница 34: ...will not be cancelled if you turn the programme selection knob while child lock is enabled You should cancel the Child Lock first If you want to open the loading door after you have cancelled the prog...

Страница 35: ...nal between the product and the smart device must be strong enough Please visit www homewhiz com to see the Android and iOS versions supported by the HomeWhiz application A WARNING All the safety meas...

Страница 36: ...te the setup A WARNING Since the HomeWhiz and Remote Control functions of your product work through pairing via Bluetooth the product can be run by only one HomeWhiz app at a time 5 21 3 Using the Rem...

Страница 37: ...d off 5 21 4 Troubleshooting Follow the steps below if you are having problem with controlling or connection Observe whether the problem persists or not after the action you have performed Do the foll...

Страница 38: ...the body of the machine with soapy water or non corrosive mild gel detergents as necessary and dry with a soft cloth Use only a soft and damp cloth to clean the control panel 6 4 Cleaning the water in...

Страница 39: ...risk of the product freezing After each use turn off the water tap to which the mains hose is connected In order to clean the dirty filter and discharge the water 1 Unplug the machine to cut off the s...

Страница 40: ...rmal level Machine directly discharges the water it takes in The drain hose might be at an inappropriate height Connect the water drain hose as described in the user manual No water can be seen in the...

Страница 41: ...cur in the machine Colour of the clothes faded Machine might have been overloaded Do not overload the machine Detergent used might be damp Keep detergents closed in an environment free of humidity and...

Страница 42: ...er the drying step The programme selected might not be suitable for the type of laundry Check the care labels on garments and select a programme accordingly or select timed programmes additionally Mac...

Страница 43: ...43 EN Washer Dryer User Manual T20 4 x 16mm M 5 x 10mm x8 x2 x6 a b c d e x2 x2 580 mm 560 mm 595 mm 600 mm 818 mm 820 mm 1 165 mm 15 mm 54 mm 8 BUILT IN INSTALLATION...

Страница 44: ...44 EN Washer Dryer User Manual 2 3...

Страница 45: ...45 EN Washer Dryer User Manual 172 338 36 190 338 52 536 21 26 590 595 4 35 12 mm L 26...

Страница 46: ...46 EN Washer Dryer User Manual 4 190 338 36 172 338 52 536 21 26 590 595 35 12 R 26 mm...

Страница 47: ...47 EN Washer Dryer User Manual 5 35 12 16 22 2 mm 12 2 36 mm...

Страница 48: ...48 EN Washer Dryer User Manual 6...

Страница 49: ...49 EN Washer Dryer User Manual 7 2mm 2mm...

Страница 50: ...o ensure product safety and to prevent risk of serious injury the mentioned self repair shall be done following the instructions in the user manual for self repair or which are available in support bl...

Страница 51: ...ial or non residential household premises unless we have previously agreed to the installation environment This guarantee is limited to the cost of repairing the product To the extent permitted by law...

Страница 52: ...pointment cannot be arranged Will there be any charge for the repairs It is your responsibility to provide evidence to the Engineer that your product is covered by this guarantee with a proof of purch...

Страница 53: ...n addition it is only valid for one replacement of the Optima motor during the extra 9 year for free standing appliances or 8 year for built in appliances guarantee period 3 To activate your guarantee...

Страница 54: ...ing service the area around the product must be easily accessible to the Engineer without the need for cabinets or furniture to be removed or moved It is your responsibility to ensure our Engineers ha...

Страница 55: ......

Страница 56: ......

Отзывы: