3. Top Base Assembly
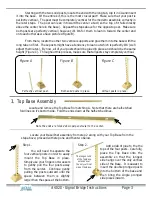
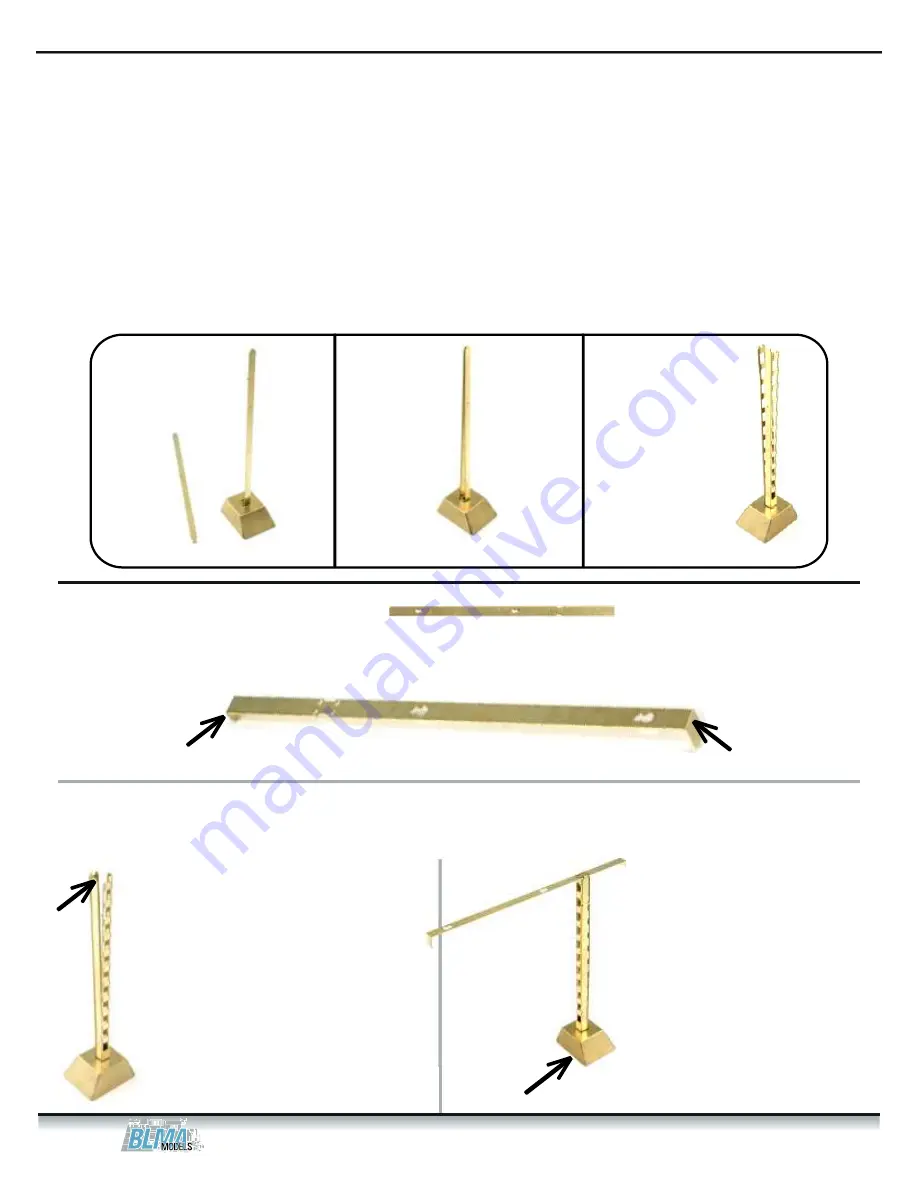
Starting with the two solid posts, locate the end with the long tab, dip it in CA and insert
it into the base. Of the entire kit, this is the most crucial part! Make sure that your post is
perfectly vertical. The post must be completely vertical for the model to assemble correctly in
the later steps. The post can lean in toward the center a tad (so the top of it falls directly
above the center hole in the base). Repeat the steps above for the opposite post. Make sure
both posts are perfectly vertical (however, it’s OK for them to lean in toward the center and
onto each other as we have pictured Figure B).
From there, locate the other two vertical supports and glue them into the base with the
long tab end first. These posts might have a tendency to lean out which is perfectly OK (we’ll
adjust them later.). By now, all of your posts should be glued in place and should be the same
height (Figure C). Throughout this process, make sure that all posts stay completely vertical.
Figure A
Perfectly vertical post.
Figure B
Figure C
Both solid posts in place.
All four posts in place.
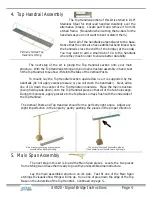
Locate and remove the Top Base from etching A. Note that there are half-etched
fold lines on it’s bottom side. Fold the ends down at the half-etched lines.
Locate your Base/Post assembly from step 2 along with your Top Base from the
step above; proceed with step one and then two below.
You will need to separate the
four vertical posts in order to easily
mount the Top Base in place.
Simply use your fingers or tweezers
to gently pull the four posts away
from the center. Continue gently
pulling the posts outward until the
space between them is slightly
larger then the space at the bottom.
Step 1.
Step 2.
Add a dab of glue to the the
tops of the four posts. Carefully,
place the Top Base onto the
assembly so that the longest
side hangs over the only vertical
side of the Base. It is easiest to
insert the double pronged posts
into the bottom of the base and
then bring the single pronged
side pieces inward.
The longest end
of the Top Base
extends over
the only vertical
side of the Base.
Note the ends are folded down perpendicular to the center.
#4020 - Signal Bridge Instructions Page 3


