Blitz BZX6 Скачать руководство пользователя страница 9

7

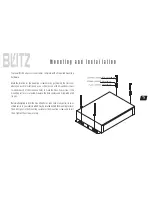
M o u n t i n g   a n d   i n s t a l l a t i o n

Your new Blitz Series crossover comes complete with all required mounting
hardware.

Mark the location for the mounting screw holes by positioning the crossover
where you wish to install it and use a scribe (or one of the mounting screws)
inserted in each of the mounting holes to mark the mounting surface. If the
mounting surface is carpeted, measure the hole centers and mark with a felt
tip pen.

Before attempting to drill the mounting holes, take note of any wires, lines or
other devices in your vehicle which may be located behind the mounting surface!
Then drill pilot in the mounting surface for the mounting screws and insert
then. Tighten the screws securely.

BTS-1 4

ø

 x12N x 4

SW 4

ø

(B) x 4

PW 4

ø

(B) x 4

Содержание BZX6

Страница 1: ...B Z X 6 2 W a y E l e c t r o n i c C r o s s o v e r N e t w o r k w i t h S u b w o o f e r L e v e l C o n t r o l user s manual...

Страница 2: ...d engineered to give you many years un compromised musical service The Blitz Electronic Crossover has been designed using the latest in electronic technology available today When you check the list of...

Страница 3: ...general features precautions features and specifications system wiring mounting and installation noise check and system adjustment troubleshooting 2 3 4 5 6 7 8 9 t a b l e o f c o n t e n t s...

Страница 4: ...Outputs with Gain Controls Slope Rate 12dB Octave Sub Level and Bass Frequency 40 400Hz Variable Remote Control Adjustable Bass Boost Level Control Adjustable Frequency Selector Low Pass 40 400Hz High...

Страница 5: ...disconnect the negative battery ground lead before wiring the system up When you finish the installation be sure to make one more check to be sure everything is done correctly Reinstate all car parts...

Страница 6: ...4 f e a t u r e s a n d s p e c i f i c a t i o n s...

Страница 7: ...changes crossover points from 40Hz 800Hz to 400Hz 8kHz for high frequency high channel drivers By turning the selector you can choose the high pass crossover points from 40Hz 8kHz Allows subwoofer mo...

Страница 8: ...llows sub woofer mode channel to receive signal from either the mix of from front inputs the direct from rear inputs TWEETER SUB MODE SELECTOR SWITCH POSITION DIRECT MIX VIA INPUT SOURCE FRONT REAR FR...

Страница 9: ...ng screws inserted in each of the mounting holes to mark the mounting surface If the mounting surface is carpeted measure the hole centers and mark with a felt tip pen Before attempting to drill the m...

Страница 10: ...um performance NOTE DO NOT MOUNT CROSSOVER UNTIL THE FOLLOWING PROCEDURES HAVE BEEN COMPLETED 1 Preset each amplifier input gain adjustment at the amplifier to half of maximum 2 Before turning the aud...

Страница 11: ...level is increased 3 There is a motor boating type of sound when the engine is running and the audio system volume is set at a reasonably high level Check the red power wire It muse be connected dire...

Страница 12: ...ct to us for warranty service it must be carefully packed and shipped prepaid to You must also include the following items A copy of your sales receipt or other proof of purchase A brief letter indica...

Отзывы: