background image

Installation and Assembly cont. 

Pedestal Models

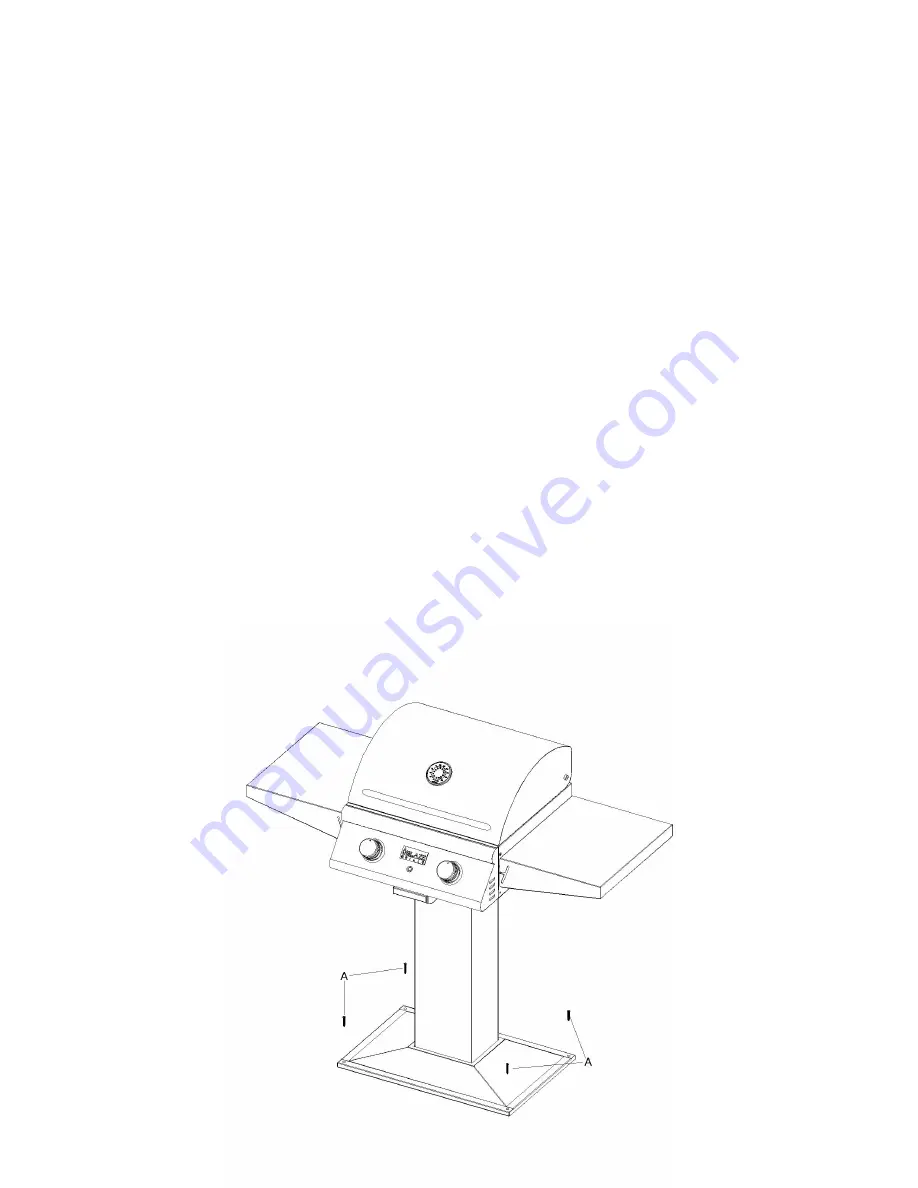
Reference the figure below when installing your pedestal electric grill. 

1.

Using a Phillips-head screwdriver, remove the 4 screws and bumpers on the bottom of the grill.


Discard the bumpers. Align the electric grill onto the top of the post assembly. Using the same 4


screws, fasten the electric grill to the post assembly.

2.

The post assembly base must be securely fastened to a stable, level surface using the lag screws


and shields (not supplied) to ensure the grill remains fixed and upright at all times.

Side Shelf Instructions.

1.Using 3 screws, align and fasten each shelf bracket to the side of the grill.

2. Holding the shelf horizontally, align the slots on the shelf with the pin on the bracket and slide shelf 

into position.

3.

Repeat for the 

opposite

 side.

Note* The shelf is a 2-position shelf: 1. Raised and 2. Lowered

Important: 

BEFORE USE

, the grill base must be securely fastened to a stable, level surface to 

ensure the grill remains fixed and upright at all times. 

Locate the patio mount base in the planned grill location and mark the 4 holes. Drill the marked 

holes to a 1/2” diameter x 1 1/2” depth. Insert the lag shields (not supplied) into the holes, ensure 

that they are flush with the ground. 

Align the holes on the patio mount base over the lag shields (not supplied) in the ground. Secure 

the base with the lag screws (not supplied) using a 7/16” nut driver. 

A. Bolt holes for bolting pedestal to

the ground

A. Bolt holes for bolting

pedestal to the ground

10

Содержание BLZ-ELEC-21

Страница 1: ...f California to cause cancer and birth defects or other reproduc ve harm For more informa on go to www P65Warnings ca gov 1 Optional pedestal mount shown CONTACT INFORMATION Blaze 6620 Greenwell Springs Rd Baton Rouge LA 70805 USA Phone 866 976 9510 CustomerService BlazeGrills com BLAZEGRILLS COM WARNING Observe all local codes and ordinances when installing this appliance If no local codes are ap...

Страница 2: ...FACES WHERE OPENINGS MAY BECOME BLOCKED RISK OF FIRE THE POWER CORD MUST NOT BE PINCHED AGAINST A SHARP EDGE SECURE CORD TO AVOID TRIPPING OR SNAGGING TO REDUCE THE RISK OF FIRE ELECTRIC SHOCK OR PERSONAL INJURY DO NOT RUN CORD UNDER CARPETING DO NOT COVER CORD WITH THROW RUGS RUNNERS OR THE LIKE ARRANGE CORD AWAY FROM TRAFFIC AREAS AND WHERE IT WILL NOT BE TRIPPED OVER THIS ELECTRIC APPLIANCE IS ...

Страница 3: ... Product Specifications Warnings Parts List Locating the Appliance Installation and Assembly Operation Drip Tray Care and Cleaning Troubleshooting Warranty Information Product Registration 4 5 6 7 8 9 12 13 13 14 15 16 17 ...

Страница 4: ...nting a build up of heat in the island cavity and helping provide proper airflow to keep the unit cool 17 7 8 W x 15 3 8 D Flame Stabilizer Grid Electric Element Limited Lifetime Defects in manufacturing and workmanship Cooking grids flame tamers stainless housing and valves against rust through 1 Year Heating Element Heating Element Components and Lighting Systems Appliances must be registered wi...

Страница 5: ...ractor before beginning any project These dimensions create the required air gap underneath this appliance This air gap serves multiple purposes such as preventing a build up of heat in the island cavity and helping provide proper airflow for combustion and or cabinetry ...

Страница 6: ...leaning or servicing Allow to cool before putting on or taking off parts Do not operate appliance with a damaged cord or plug or after the appliance malfunctions or has been damaged in any manner Return appliance to the nearest authorized service facility for examination repair or adjustment The use of accessory attachments not recommended by the appliance manufacturer may cause injuries Do not le...

Страница 7: ...s 11 Heating Element 12 Flame Tamer 2pcs 13 Probe Protecting Tube 14 Back Heating Element Attachment Bracket 15 Front Heating Element Attachment Bracket 16 Hang In Side Bracket 2pcs 17 Hang In Back Bracket 18 Grill Body 19 Thermostat 20 LED Light 21 Time Adjuster 22 Knob Base 2pcs 23 Knob 2pcs 24 Control Panel 25 Sealing Gasket 26 Drip Tray 27 Adjustable Foot 4pcs 28 GFCI 7 ...

Страница 8: ...quids or vapors around the appliance The outdoor kitchen structure itself should be constructed completely out of non combustible materials Adequate Ventilation Ensure there is adequate ventilation for both the appliance grill cart any additional cooking appliances and or island cavity While the amount of venting required varies on a case by case basis consult with your local licensed professional...

Страница 9: ...outdoor appliances The maximum length allowed for the extension cord is 25 feet Do not use damaged extension cords Examine extension cord before use and replace if damaged Keep cord away from heat and sharp edges Important Connection to an extension cord must be kept dry and off the ground Connecting to Electrical Outlet This electrical appliance is equipped with a 3 pronged grounding plug for you...

Страница 10: ...l 2 Holding the shelf horizontally align the slots on the shelf with the pin on the bracket and slide shelf into position 3 Repeat for the opposite side Note The shelf is a 2 position shelf 1 Raised and 2 Lowered Important BEFORE USE the grill base must be securely fastened to a stable level surface to ensure the grill remains fixed and upright at all times Locate the patio mount base in the plann...

Страница 11: ...ill 1 Place the grill on a level non combustible surface 2 Using the adjustable feet ensure the unit is level and free from wobble 3 Route power cord to outlet ensuring there is no contact with heat source or any pinch points Important BEFORE USE the grill base must be securely fastened to a stable level surface to ensure the grill remains fixed and upright at all times Pedestal Model Specificatio...

Страница 12: ... 4 screws fasten the electric grill built in brackets to the unit 3 Carefully lift the unit and slide into the islands pre cut hole Built in specifications and regulations can be found on pages 4 5 and 7 4 Route power cord to outlet ensuring no contact with heat source or any pinch points Important BEFORE USE the grill base must be securely fastened to a stable level surface to ensure the grill re...

Страница 13: ...grill into its own dedicated 20 amp circuit Drip Tray Drippings from grilling flow through specially designed channels and collect in the drip tray After each use wait for the grill to completely cool before carefully pulling out the drip tray to empty it 13 Drop Down Shelf 1 To lower the shelf grab the middle of the shelf on both sides and lift upward Then allow the end of the shelf to rotate dow...

Страница 14: ...Before installing the cover always allow the surface to dry DO NOT cover a damp appliance Drip Tray Clean the drip tray after each use Failure to do so could result in a fire Once the appliance has cooled completely remove the tray by pulling it all the way out until it comes free Clean the tray with hot soapy water and replace ensuring the tray is completely installed in the grill housing If usin...

Страница 15: ...e 2 Contact your dealer SAFETY INFORMATION WARNING DISCONNECT THE APPLIANCE COMPLETELY AND LET COOL PRIOR TO ANY SERVICE ONLY A QUALIFIED SERVICE PERSON SHOULD SERVICE AND REPAIR THIS ELECTRIC APPLIANCE 2 Power not plugged correctly 3 GFI plug may be tripped 15 2 Cooking element does not work 1 No power to unit 2 Bad element 1 Not enough Power to unit 2 Poor connection 1 Assure power is available ...

Страница 16: ...iance will void the warranty Please call Blaze Outdoor Products for more information on correct installation of the appliance Blaze Outdoor Products shall not be liable under this or any implied warranty for incidental or consequential damages and Blaze Outdoor Products liability is limited to the purchase price of the appliance only This warranty gives you specific legal rights and you may also h...

Страница 17: ...______________________________________________________ Street Address Line 2_________________________________________________________ City__________________ State Province Region____________________ Zip Postal Code______________________ Country________________________________ What is the model number of the Blaze product purchased ___________________________________________________________________...

Отзывы: