background image

Blaze Outdoor Products Instructional Book


Page | 25 


If the main burner cotter pins are removed before installing, the main burners must be double checked for the 
correct placement in the grill before operation. When finished ensure that the burners  are aligned  with  the 
valve  orifice  and  seated  in  the  bracket  slot. This  is accomplished by first  placing  the  burner tube shutter 
hole securely over the valve orifice and ensuring the male post on the rear of the burner rests in the 
corresponding slot in the grill chassis. Failure to do so could result in a fire and injury. 


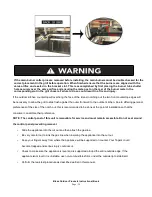
If the outdoor kitchen countertop will overhang the face of the island, notching out the two front countertop edges will 

be necessary to allow the grill to slide flush against the outer front wall to the outdoor kitchen. Due to differing personal 

preferences of the size of the notch out, this is recommended to be done at the point of installation so that the 

consumer can dictate their preference.  

NOTE: The control panel of this unit is removable for service and must remain accessible. Do not seal around 

the control panel preventing removal. 

• 

Slide the appliance into the cut out and then attach the gas line. 

• 

Be very careful not to kink the gas line when lowering the appliance into the cut out. 


• 

Keep your fingers away from where the appliance will be supported on counter. Your fingers could 

become trapped and serious injury could occur. 

• 

Check to make sure the appliance is level and is supported around the entire outside edge. If the 

appliance is not level or is unstable, use non-combustible shims under the outside lip to stabilize it. 

• 

Perform the leak test procedure as described earlier in this manual. 


Содержание BLZ-3LP

Страница 1: ...one 866 976 9510 CustomerService BlazeGrills com BLAZEGRILLS COM DANGER IF YOU SMELL GAS I Shut off the gas supply to the appliance at its source 2 Extinguish any open flames 3 Open grill hood to release any accumulation of gas vapor 4 If a gas odor persists keep away from your appliance and contact your gas supplier or fire department immediately WARNING I Do not store or use gasoline or other fl...

Страница 2: ...ing for Gas Leaks 16 17 ii Unpacking Unit 18 V Gas Connections 19 i Natural Gas Requirements 19 ii Liquid Propane Gas and TankRequirements 19 iii Transporting and Storing LP Gas 20 21 VI Installing the Appliance in a BBQ Island 22 i Outdoor Kitchen Ventilation 23 24 ii Building BBQ Specifications and Instruction 24 26 iii Installation Diagrams 27 VII First Time Operation 28 i Lighting the Applianc...

Страница 3: ...How to Replace Conventional Burner with Infrared Sear Burner 33 ii Preheating the Infrared Burner 33 iii Infrared Burner Cleaning 33 X Fuel Conversion 34 i Gas Regulator 34 35 ii Main Burner 36 iii Rear Burner 36 XI Warranty Registration 37 XII Grill Parts 38 XIII Product Serial Number 39 XIV Blaze Product Registration 40 ...

Страница 4: ... Limited Lifetime on valves 1 Year Ignition components Appliances must be registered within 30 days of purchase to validate this warranty See warranty section for details Model BLZ 4LP BLZ 4NG 4 BURNER Cutout Dimensions 30 5 8 W x 21 1 4 D x 8 1 2 H BTU Output 14 000 BTU per Burner x4 Infrared Back Burner 10 000 BTU Total BTU 68 000 Primary Ignition Push N Turn Flame Thrower Secondary Ignition Fla...

Страница 5: ...e Tamer Flame Stabilizer Grid Zone Cooking Removable Heat Zone Separators Rotisserie Kit Motor Forks Optional Burner Commercial Quality Cast Stainless Steel Gas Type Each grill contains an NG LP Orifice Kit Warranty Limited Lifetime Defects in manufacturing and workmanship Cooking grids Flame Tamers Heat Zone Separators stainless housing as well as the stainless burners against rust through Limite...

Страница 6: ...Blaze Outdoor Products Instructional Book Page 6 BBQ SPECIFICATIONS NOTE ALWAYS have equipment measured by Contractor before beginning any project ...

Страница 7: ...orized service agent NOTE This appliance is not intended for commercial use FOR YOUR SAFETY If you smell gas 1 Shut off gas to the appliance 2 Extinguish any open flame 3 If odor continues immediately call your gas supplier or your fire department General Safety and Installation Warnings Safe operation of the BLAZE GRILL depends upon its proper installation Only a qualified professional installer ...

Страница 8: ...ts must be installed using a Massachusetts licensed plumber or gasfitter A T handle type manual gas valve must be installed in the gas supply line to this appliance This applies to permanently installed natural gas and propane installations This does not apply to propane portable installations using a 20 pound tank APPLIANCE INSTALLATION This gas appliance must be installed in accordance with all ...

Страница 9: ...cket slot This is accomplished by first placing the burner tube shutter hole securely over the valve orifice and ensuring the male post on the rear of the burner rests in the opening in the grill chassis Failure to do so could result in a fire and injury BEWARE OF SPIDERS CAUTION BURNER TUBES MUST BE INSPECTED AND CLEANED BEFORE EACH USE Spiders and small insects occasionally spin webs or make nes...

Страница 10: ...he appliance in the area of this appliance or any other appliance Never store an LP cylinder or tank indoors or within the reachof children Never test the appliance for gas leaks using a lighted match or any other open flame see leak test procedures using soap water solutions see section on Leak Testing The use of accessories regulators or components not recommended by the appliance manufacturer m...

Страница 11: ...is an outdoor appliance Ensure your appliance is positioned safely awayfrom anything that can catch fire Under no circumstance is this appliance to be used indoors Thisincludes garages or any other enclosed area This outdoor cooking gas appliance is not approved to be installed in or on any recreational vehicles and or boats Blaze Grills are for single family residential use only When determining ...

Страница 12: ...ury Maintenance Access When your appliance is installed you should be able to access the gassupply line including the gas piping or hose gas regulator gas cylinder and any shut off valves Allow clear access to the entire gas supply hose and regulator Partial Enclosures Many backyards have areas that are partially closed off such as balconies and pergolas In some cases it is hard to decide whether ...

Страница 13: ...nce Before installation or service disconnect the power supply to the work area by removing the fuse tripping the circuit breaker or unplugging the unit Keep any electrical supply cord and fuel supply hose away from any heated surfaces sharp edges and dripping grease Be certain your appliance is properly installed and grounded by a qualified technician in accordance with applicable codes To guaran...

Страница 14: ...ure that the gas supplied to the appliance conforms to the model you purchased A Natural Gas appliance requires natural gas to operate an LP appliance requires liquid propane gas to operate Never connect the appliance to an unregulated gas supply line Appliances operated without aregulator are unsafe and will not be serviced until installed properly and safely Unsafe operation without agas regulat...

Страница 15: ...B149 1 All Natural Gas installations must conform to local codes or in the absence of local codes the national fuel gas code ANSIZ2223 1a 1998 If there are local codes that apply to outdoor burners you will have to conform to them Installation must conform with local codes or in the absence of local codes with Propane Installation Code CSA B149 1 or Propane Storage and Handling Code B149 2 as appl...

Страница 16: ...oap to one part water Make sure all the control knobs are in the OFF position Turn on the gas o On Natural Gas systems turn the main feed valve to the appliance o On LP systems turn the cylinder valve knob counter clockwise one turn to open Apply the leak testing solution by spraying it on joints of the gas delivery system This includes all valves pipe connections joints lines and every point from...

Страница 17: ... the burners All leaks must be corrected immediately Remember before exchanging an empty bottle for a new one make sure all control valves are in the off position This can create a low flow of gas through the grill This would require the tank to be disconnected from the regulator and then reconnected to reset the regulator Open the valve shut off or ON LP tank Test for leaks by applying liquid soa...

Страница 18: ... and requires very little setup We do however recommend the use of professional help during the installation of your unit as improper installation may affect your warranty Remove the unit from the box along with all accessories and check that no damage has occurred to the unit or any parts Remove all packaging materials labels and protective plastic film before you start cooking Burners Check the ...

Страница 19: ... must be installed in an accessible place Liquid Propane LP Gas and Tank Requirement If your BLAZE Grill is for a Liquid Propane application a L P regulator set for 11 WC must be used and is for use with LP gas only The regulator and hose supplied must be used with a 20 lb LP cylinder A collar to protect the cylinder threads on the customer supplied tank An arrangement for gas vapor withdrawal A s...

Страница 20: ...ders indoors Make sure that when attaching components all connections are secured and fully tightened to prevent leakage Always check for leaks before every use If one is not already available it is required that an ON OFF shutoff valve be installed at the gas supply source and that the gas supply be turned off when either Natural Gas or LP Gas appliances are not in use Transporting and Storing LP...

Страница 21: ... cut melt or damage the line A separate approved gas line might be needed to go between the hose and regulator and the grill to position the rubber line in a safe location 4 Connect the regulator to the LP cylinder Only hand tighten the regulator 5 Check for leaks using a soapy water solution by spraying on all connections including all of the valves fittings lines etc any and all gas connections ...

Страница 22: ... should combustible materials such as a combustible wall be located behind the grill that the needed 5 for lid clearance doesn t satisfy the distance required from a combustible surface Protection from Weather Keep the appliance protected from adverse weather including rain and wind Wind particularly coming into the rear of the grill can affect the exhaust from escaping from the grill This can bac...

Страница 23: ...Propane Gas LP gas is heavier than air and will settle to the lowest levels of the outdoor kitchen If is imperative to provide adequate cross ventilation for the areas where gas can accumulate at these lower levels of the island cavity Should the Propane cylinder be located in the outdoor kitchen itself a plenum wall is required to separate the gas source from the other areas of the outdoor kitche...

Страница 24: ...n the lip of the frame Pay careful attention to the location of the gas line It should be routed away from sources of heat sharp edges and aggressive surfaces and should make as few bends as possible Ensure the gas line connection will be accessible when appliance is installed A safety shutoff valve is required at this gas connection point Before installing the grill into the island cutout the mai...

Страница 25: ...h against the outer front wall to the outdoor kitchen Due to differing personal preferences of the size of the notch out this is recommended to be done at the point of installation so that the consumer can dictate their preference NOTE The control panel of this unit is removable for service and must remain accessible Do not seal around the control panel preventing removal Slide the appliance into ...

Страница 26: ...L BBQ ISLANDS MUST BE MANUFACTURED FROM NON COMBUSTIBLE MATERIAL Minimum clearance to adjacent combustible construction at 14 from sides 16 from back MODEL DESCRIPTION HEIGHT A WIDTH B DEPTH C BLZ 3 25 3 Burner 8 1 2 23 1 4 21 1 4 BLZ 4 32 4 Burner 8 1 2 30 5 8 21 1 4 BLZ 5 40 5 Burner 8 1 2 38 3 8 21 1 4 A distance of 5 will be needed behind the grill for the lid to open and close Remember that s...

Страница 27: ...Blaze Outdoor Products Instructional Book Page 27 Additional Hood Clearance Installation Diagram Installation Method for Low Pressure Gas 5 Gallon LP tank shown Source Natural Gas Regulator Shown ...

Страница 28: ...lied manual gas shut off valve is fully accessible LP hose is clean and inspected for cuts wear abrasion or leaks Replace if necessary with a suitable UL ETL or CSA Listed part with internally threaded connector Lighting the Appliance 1 Open the hood 2 Use caution when lighting burners by standing as far away from the burners as possible Do not put your hands arms head or any body parts close to t...

Страница 29: ...off 9 Close the valve at the gas supply Manually Lighting the Main Burners WARNING Do not use standard size matches or cigarette lighters to perform match lighting procedures Serious burns can occur and lighters can explode 1 Open the hood 2 If you have just attempted to light the burner allow five minutes for any accumulated gas to dissipate Use caution by standing as far away from the burners as...

Страница 30: ...minutes for any accumulated gas to dissipate Use caution by standing as far away from the burners as possible Do not put your hands arms head or any body parts close to the grill when lighting 3 Hold your open flame to the right side of the rear burner 4 Push in and turn the control knob to HIGH 5 If the burner does not light after five seconds turn the control knobs to the OFF position 6 Wait fiv...

Страница 31: ...een in the diagram below Cleaning Your Appliance NOTE Always wait until your appliance is completely cool before cleaning You should clean your appliance after each use to maintain the overall appearance over the life of your appliance After the first use it is normal for your appliance to become discolored in certain areas from the heat produced by the burners A video for cleaning your grill is l...

Страница 32: ...ey were removed prior to installation into an outdoor kitchen To remove burner pull rod upwards and slide burner toward the rear of the appliance Repeat for each burner To clean the burners use a wire brush to clean the exterior of the burner Free all clogged ports of obstructions with a small metal object Clean out any debris through the air shutter and inspect the burner inlet to ensure it is fr...

Страница 33: ...r 4 Replace the heat zone divider and cooking grid Do not use this burner with the flamer tamer reinstalled above the burner Note It is critical that the end of the infrared burner is installed appropriately onto the gas valve to ensure gas flows safely into the burner For additional information contact us at 866 976 9510 or go to Blazegrills com Preheating the Infrared Burner Always preheat the e...

Страница 34: ...und pressure set to approximately 11 of water column pressure If an individual is intending on using Propane provided from a larger tank permanently installed on location the regulator included with the appliance will only need to be converted for use with LP fuel see NG LP Regulator Conversion below Please be aware that this included regulator can only withstand an inbound pressure of 5 PSI or ro...

Страница 35: ...Blaze Outdoor Products Instructional Book Page 35 ...

Страница 36: ...itting and have to replace the valve 7 Once the old orifice is removed replace it with the new orifice repeat for all burners When re installing the orifice do not over tighten or you will strip the brass fitting Very little pressure is needed 8 Inspect burners for proper flame appearance The ideal flame appearance is one that is mostly blue and not lifting off of the burner surface There is an ai...

Страница 37: ...utdoor Products liability is limited to the purchase price of the appliance only This warranty gives you specific legal rights and you may also have other rights which may vary from state to state The warranty expressed on this page is applicable in the United States and Canada only ATTENTION International Customers Please consult your selling dealer or distributor for specifics pertaining to your...

Страница 38: ...Blaze Outdoor Products Instructional Book Page 38 Blaze 3 Burner Blaze 4 5 Burner Note Add one burner one flame tamer one heat separator and one grid for the Blaze 5 Burner ...

Страница 39: ...the Firebox see picture on page 14 You will need this number to properly register your appliance and activate coverage Write this information in the space provided below for your records Appliance model Appliance serial number Type of fuel being used Propane NaturalGas Date purchased Date installed Blaze dealer s name Blaze dealer s address Blaze dealer s phonenumber ...

Страница 40: ...your product electronically on the blaze website vs mailing in the below paperwork blazegrills com First Last Email Phone Street Address Address Line 2 City State Province Region Zip Postal Code Country What is the model number of the Blaze Product purchased What is the serial number on the Blaze product Where did you buy your Blaze product Mail To Blaze Outdoor Products Warranty Registration 6620...

Отзывы: