28
Language
English
a
i
r
t
s
u
A
y
r
t
n
u
o
C
Environment
Ecohome
N
O
N
C
L
First Time Installation
Auto Tunning
OK
1.
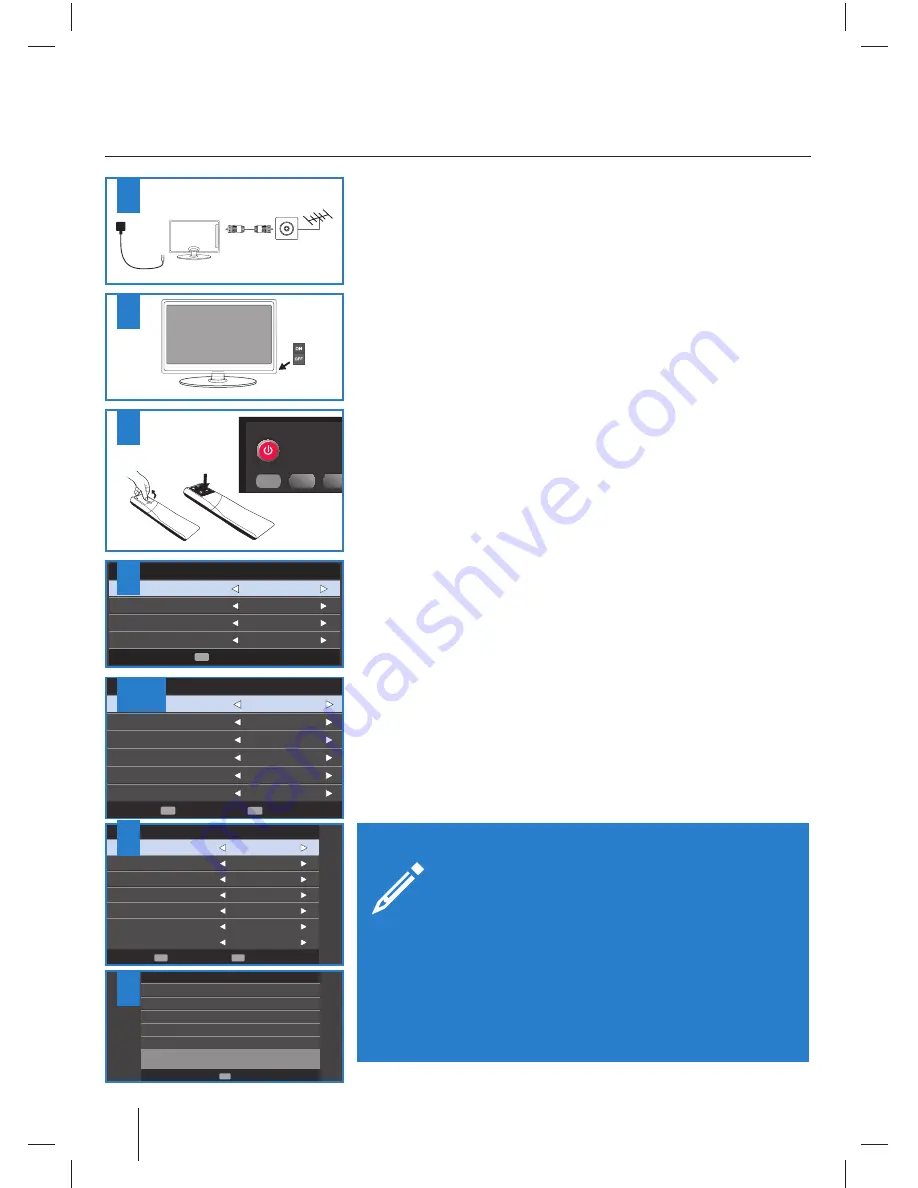
Using the RF cable supplied, connect the TV to the TV Aerial wall socket (Fig A).
Connect the power cable to the Electrical outlet (Fig B).
2.
Turn on the device with marked ON/OFF switch
3.
Insert the batteries supplied into the Remote control and press the Standby
button to power on the TV.
4.
You will now be welcomed with the initial set-up screen. If it does not appear, on
the remote control, please press [MENU] then 8-8-8-8 and the menu will appear.
Press OK on the remote control and tuning will start.
As part of our continuing eff orts to reduce energy consumption, we added a
new Ecohome feature (appears on the screen fi rst installation). This function
helps reduce energy consumption up 15% compared to other modes. The image
brightness is reduced using Ecohome mode. If this setting does not suit your
environment, you can choose from other modes (Note: the professional mode is
the optimal default mode, but consumes 15% more than the Ecohome).
Please select desired language, country and environment. Set LCN* to ON if you
want to arrange found channels by cable provider preferences (only applies to
DVB-C channels).
Press OK button to start the tuning process.
5.
In the next step select the type of digital broadcasting. You can choose between
DVB-T (terrestrial), DVB-C (cable) DVB-S2(satellite). The analog channel will be
searched automatically, as most of the cable network includes analog channels. *
6.
Select DVB-C if your TV is connected to a cable TV network. Keep all default
settings as possible. Then press [OK] to start the search. If DVB-C channels are
missing, contact your network provider for the valid "Network ID" . Then perform
a new search. Press the [MENU], select "Automatic Channel Search" and enter the
network ID. Start your search by clicking [OK]. *
7.
Optional channel presets DVB-S2:
Select "Satellie" in the "Digital-type" in the
menu for the optional channel presets. Here you can choose between the satelli-
te operators. Then the channel preferences of the operator will be imported into
your TV system. If you set country to Austria in previous step you can select form
predefi ned regional settings.
The execution takes about 10 seconds. Confi rm with [OK] button on the remote
control, the scanning starts ..
8.
After successful tuning process, following screen will appear.
If you are missing channels, the reason for this is likely to be signal strength, you
should consider connecting signal booster and re-tuning the TV.
Getting started - initial set up
Tip:
If the TV fi nds some, but not all, of the Digital channels, the TV is
functioning correctly but the signal being received is not strong
enough. (The signal strength needs to be above 85% - you can see
the signal strength the TV is receiving when you change chan-
nels/ programmes) you will need to increase the signal reception in order to
receive all of the channels available. The most economical way to do this is by
purchasing and connecting a ‘signal booster’ in between the TV and the TV
aerial socket. If this does not solve the problem, you will need to upgrade the TV
aerial to a digital hi-gain compatible aerial
Tunning setup
Tune type
ATV + DTV
Digital Type
DVB-C
Scan Type
Full
Network ID
Auto
Frequency
Auto
Symbol Rate
Auto
Start
OK
Back
MENU
Tunning setup
Tune type
DTV
Digital Type
Satellite
Satellite
Astra
Scan Mode
Default
Channel Type
All Channels
Service Type
All
State
WIEN
Start
OK
Back
MENU
Auto Tuning Status
Analog channels found
5
Digital channels found
5
Radio channels found
5
Data channels found
5
Analog channels found
5
EXIT
OK
4
7
5,6 *
8
* - Only for models with DVB-C tuner
STANDB Y
TV/RADIO TV GUID
ATV
1
2
3


