background image

EN 


Drag:  Touch  and  hold  an  item  and  move  your  finger  on  the  screen  until  you  reach  the  target 

position. 


Swipe or slide: Quickly slide your finger across the surface of the  screen, (without dragging an 

item). For example, slide the screen up or down to scroll a list. 


Double-tap: You can tap twice quickly to control the zoom in Maps. 


Pinch:  In  some  applications  (Such  as  Maps,  Browser,  and  Gallery)  you  can  zoom  in  and  out  by 

placing  two  fingers  on  the  screen  at  once  and  pinching  them  together  (to  zoom  out)  or 

spreading them apart (to zoom in). 


Rotate the screen: On most screens, the orientation of the screen changes as you rotate it. You 
can turn this feature on and off. 

6. 

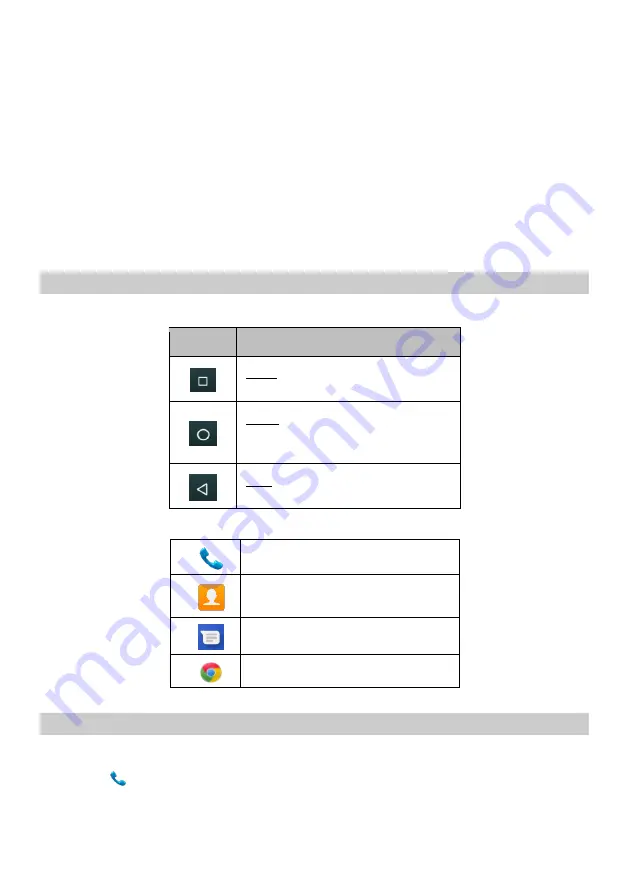
Using the Phone’s Buttons


6.1 Virtual buttons 

Button 

Description 


Apps: Opens the list of recent 

applications. 


Home: returns to Home screen. 

Pressed long opens the Google 
Assistant

TM


Back: returns to the previous screen 

you were working in 

6.2 Menu icons 


Dialer 


Contacts 


Messaging 


Browser (Chrome) 


7. Manage calls 

7.1 Make calls 


Tap the 

  icon on main menu or the home screen to dial the desired number. 


To dial an international number, touch and hold the 0 key to enter the Plus (+) symbol, and then 

enter the international country prefix, followed by the phone number. 

Содержание OT16

Страница 1: ...User manual Mobile phone OT16...

Страница 2: ...9 7 1 Make calls 9 7 2 Flight mode 10 7 3 Receive a call 10 7 4 Emergency calls 10 8 The Home screen 10 8 1 Notification bar 10 8 2 Customize the idle screen 11 9 Connecting to the Internet 11 9 1 Con...

Страница 3: ...ation 17 17 10 Security 17 17 11 Accessibility 17 17 12 Fingerprint 17 17 13 Accounts 17 17 14 Digital Wellbeing parental controls 17 17 15 Google 17 17 16 DuraSpeed 18 17 17 System 18 17 18 About pho...

Страница 4: ...tructed to do so or hospital staff ask for it Electrical medical devices Your phone is a radio transmitter that can interfere with electronic medical devices or implants such as hearing aids pacemaker...

Страница 5: ...ations and do not throw it into household trash The mains power socket used must be close to the charger holder and easily accessible so that it can be used as an on off facility Water resistance The...

Страница 6: ...one layout The following illustration of the phone is for informational purposes only your device may be different 3 Getting started 3 1 Insert the memory card and SIM card Turn off the power and remo...

Страница 7: ...EN 7 3 2 Switch the device on and off Press and hold the Power button to turn on the power Press and hold the power button and select Power off from the Options menu 3 3 Description of device...

Страница 8: ...PIN Password Swipe or None 4 Charging the battery Connect one end of the charger to the device Connect the charger to the power outlet Charging will start regardless of whether the device is turned o...

Страница 9: ...ng them apart to zoom in Rotate the screen On most screens the orientation of the screen changes as you rotate it You can turn this feature on and off 6 Using the Phone s Buttons 6 1 Virtual buttons B...

Страница 10: ...alls without a SIM card For more information contact your network service provider 8 The Home screen When you sign in the home screen opens The Home screen is your starting point to access all the fea...

Страница 11: ...complete the appropriate configuration settings on your device 9 1 Configure the Internet Go to Settings Network Internet Data usage Tap Mobile data By default your network provider sends the Access...

Страница 12: ...or the symbols press and hold to display the list of symbols slide your finger to the symbol you want to enter 11 Multimedia 11 1 Camera Use the camera to take photos and video clips To open the camer...

Страница 13: ...umber Send a message to the phone number Make video call with Google Duo Google account is needed Edit the contact Additional features available on contacts Search search between contacts Your info yo...

Страница 14: ...Sounds and vibration Quick responses Calls Calls settings Fixed Dialling Numbers Call forwarding Call barring Caller ID Call waiting Blocked numbers Voicemail Accessibility Assisted dialling Caller I...

Страница 15: ...ternet Navigate from the Standby screen or from the Main Menu to Settings Under Network Internet you can do the following Wi Fi Turn on the feature to access Wi Fi networks The device automatically di...

Страница 16: ...the Available Devices list select the device you want to exchange data with Before sending data you need to pair your device with another device o To pair make sure the code on the screen matches the...

Страница 17: ...our device to unlock it To use fingerprint recognition to unlock your device you will need to set up a backup lock method such as a PIN pattern or password SIM card lock You can turn the PIN code on o...

Страница 18: ...e battery Do not use a damaged battery or charger Do not short circuit the battery For example a metallic object such as a coin clip or pen may cause a short circuit Do not leave the battery too hot s...

Страница 19: ...se of such devices at a collection point for hazardous waste electronic waste 20 Declaration of Conformity The Blaupunkt OT 16 model complies with the essential requirements and relevant provisions of...

Отзывы: