background image

68

Fig. 1

Fig. 2

D01

D02

T001

T005

T004

T003

T002

D03

T001

T006

T005

T004

T003

T002

T011

T007
T008
T009
T010

D04

T001

T006

T005

T004

T003

T002

T007

D05

D01

T001

T006

T005

T004

T003

T002

T011

T007
T008
T009
T010

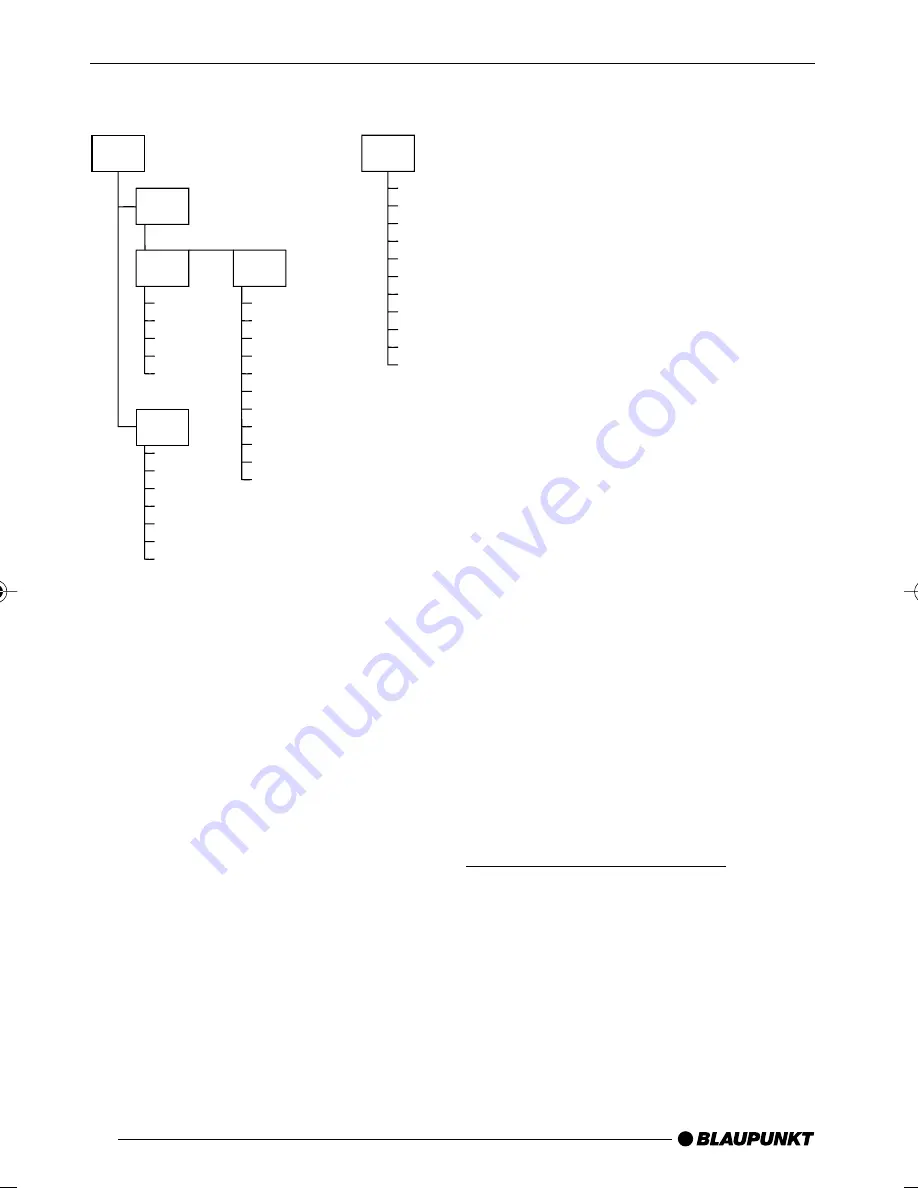
Since using some burner software can
lead to inconsistencies in the way items
are numbered, you should ensure that
the root directory D01 either contains
only subdirectories containing tracks
(Fig. 1) or only tracks (Fig. 2).

You can name each directory using a
PC. The device is capable of display-
ing the directory name. Name the di-
rectories and tracks using your CD
burner software. The software’s in-
struction manual will provide details on
how to do this.

Note:

When naming directories and
tracks you should avoid using ac-
cents and special characters.

If you like your files to be in the correct
order, you should use burner software
that places files in alphanumerical or-
der. If your software does not provide
this feature you also have the option
of sorting the files manually. To do so,
you should place a number (e.g. “001”,
“002”, etc.) at the beginning of each
file name - you must include the lead-
ing zeros.

MP3 tracks can contain additional in-
formation such as the artist, album and
track names (ID3 tags). This device
can display version 1 ID3 tags.

This device can only play MP3 files that
have the “.MP3” file extension.

Note:

To ensure uninterrupted playback,

do not try changing the file exten-
sion to “.MP3” of any files other
than MP3 files and then attempt to
play them!

Do not use “mixed” CDs contain-
ing both non-MP3 data and MP3
tracks.

Do not use mix-mode CDs con-
taining both audio tracks and MP3
tracks.

Switching to MP3 mode

MP3 mode is activated in the same
way as normal CD mode. For further
details, please read the section enti-
tled “Switching to CD mode / Inserting
a CD” in the “CD mode” chapter.

MP3 MODE

2.Bronx_MP75_gb

16.08.2005, 14:22 Uhr

68

Содержание 7 645 805 310

Страница 1: ...Radio CD MP3 http www blaupunkt com Bronx MP75 7 645 805 310 Operating instructions...

Страница 2: ...2 Open here...

Страница 3: ...3 DANSK ENGLISH DEUTSCH FRAN AIS ITALIANO NEDERLANDS SVENSKA ESPA OL PORTUGU S 1 2 3 4 5 6 7 8 9 10 11 12 13...

Страница 4: ...e the display content and close men us 7 button to open the detacha ble control panel flip release panel 8 Joystick and OK button 9 MENU button to open the basic settings menu short press Activate dea...

Страница 5: ...g the button illumination colour 55 Setting the display illumination colour 55 Configuring the spectrum analyser 56 Inverting the appearance of the display content 57 Radio mode 57 Adjusting the tuner...

Страница 6: ...tracks SCAN 73 Repeating individual tracks or whole CDs REPEAT 73 Random track play MIX 73 Naming CDs 74 CLOCK time 75 Setting the clock time 75 Displaying the clock time continuously 76 Equalizer 76...

Страница 7: ...Notes and accessories Thank you for choosing a Blaupunkt product We hope you enjoy using this new piece of equipment Please read these operating instruc tions before using the equipment for the first...

Страница 8: ...The var ious functions of the device are dis played graphically as animations in the display during demo mode You can also deactivate demo mode Press and hold down the MENU button 9 for longer than fo...

Страница 9: ...isplay THEFT PROTECTION Switching on off There are various ways of switching the device on off Switching on off using button 1 To switch on the device press button 1 The device switches on To switch o...

Страница 10: ...high when the device is switched on If the volume was set to maximum before the device was switched off and the power on volume is set to LAST VOL the volume level can be very high when the device is...

Страница 11: ...e settings are saved Note You can also adjust the volume during the telephone call or navi gation announcement using the volume control 2 ADJUSTING THE VOLUME Automatic sound This feature automaticall...

Страница 12: ...ove it down left to reduce the treble When you have finished making your changes press the joystick OK 8 or the AUDIO button Adjusting the right left volume distribution balance To adjust the balance...

Страница 13: ...ngs to suit the installation position in your ve hicle and your own preferences Adjusting the viewing angle Press the MENU button 9 Press the softkey 5 assigned to the DISPLAY display item Press the s...

Страница 14: ...utton 9 to close the menu The settings are saved Setting the display illumination colour When setting the display illumination you can choose one of four preset col ours or mix a colour yourself from...

Страница 15: ...y item If you want to switch back to the previous menu without changing the colour press the softkey 5 assigned to the BREAK display item Press the joystick OK 8 or the MENU button 9 to close the menu...

Страница 16: ...PTY The station name appears in the dis play as soon as the tuner receives it You can optionally display the pro gramme type For further details please read the section entitled Pro gramme type PTY A...

Страница 17: ...t the car radio from switching to alterna tive frequencies that are providing different regional programme con tent Note REG must be activated deactivat ed separately in the radio func tions menu Swit...

Страница 18: ...oftkey 5 assigned to the MW display item for the MW waveband Press the softkey 5 assigned to the LW display item for the LW waveband The main radio menu for the selected waveband is displayed Selectin...

Страница 19: ...on the first page Press the softkey 5 assigned to the SENS display item Press the softkey 5 assigned to the FM or AM display item to adjust the sensitivity for FM or AM Move the joystick 8 up right or...

Страница 20: ...tation to that softkey Storing stations automatically Travelstore You can automatically store the six sta tions providing the best reception in the region only FM The stations are stored in the FMT me...

Страница 21: ...automatically switch from the currently tuned station or from CD mode MP3 mode or CD changer mode to the station whose programme type matches the one you selected Activating PTY To use the PTY functio...

Страница 22: ...g the interference level Setting HiCut Press the TUNER button while in radio mode The first page of the radio functions menu is displayed Press the NEXT button 4 Repeatedly press the softkey 5 assigne...

Страница 23: ...level that you want using the volume control 2 Press the joystick OK 8 or the MENU button 9 to close the menu Traffic information Your device is equipped with an RDS EON receiver EON Enhanced Other N...

Страница 24: ...nserting a CD If there is no CD inserted in the de vice yet press the button 7 The control panel opens out towards you Insert the CD with the printed side uppermost into the CD compart ment The drive...

Страница 25: ...appears briefly in the display Normal playback is then resumed Scanning tracks SCAN You can briefly play scan all the tracks on the CD Press and hold down the joystick OK 8 for longer than two sec on...

Страница 26: ...u can also use this car sound sys tem to play CD Rs and CD RWs that contain MP3 music files Preparing an MP3 CD The various combinations of CD burn ers CD burning software and CD blanks may lead to pr...

Страница 27: ...order you should use burner software that places files in alphanumerical or der If your software does not provide this feature you also have the option of sorting the files manually To do so you shou...

Страница 28: ...MP3 menu again Selecting a directory using the joystick To move up or down to another direc tory repeatedly press the joystick 8 up or down until the number of the directory that you want appears at...

Страница 29: ...s please read the section entitled Setting the scan ning time in the Radio mode chapter Cancelling SCAN and continuing listening to a track To cancel scanning press the joystick OK 8 The currently sca...

Страница 30: ...ine of the display info line Selecting information in the info line In the bottom line of the display info line you can choose between display ing the various items of MP3 informa tion such as track a...

Страница 31: ...ht until fast searching backwards forwards be gins CD changer mode optional To find out which CD changers Com pact Drive MP3 can be used with this device please refer to the Accesso ries chapter in th...

Страница 32: ...K appears briefly in the display To repeat the whole CD press the softkey 5 assigned to the REPEAT display item again whilst the CD changer functions menu is being displayed REPEAT CD appears briefly...

Страница 33: ...f you want an empty space simply select the underscore Move the joystick 8 to the left or right to change the input position To save the name press the joy stick OK 8 Deleting a CD name Listen to the...

Страница 34: ...e displayed in the top line of the display The hours flash Adjust the hours by moving the joystick 8 up or down To adjust the minutes press the joystick 8 to the right The minutes flash Adjust the min...

Страница 35: ...band equal izers and five sound presets The EQ1 EQ3 equalizers can be cal ibrated automatically with the help of a special calibration microphone avail able as an optional accessory from specialist r...

Страница 36: ...positioned between the driver and the front passenger For Situation 3 it should be placed at the centre of the vehicle interior left right front back EQUALIZER Really quiet surroundings are required f...

Страница 37: ...button for longer than two sec onds Press the softkey 5 assigned to the PRESET display item Select one of the presets using the corresponding softkeys 5 Press the joystick OK 8 or the AUDIO button to...

Страница 38: ...To select the frequency repeatedly press the joystick 8 to the left or right until the frequency flashes Adjust the frequency that you want to change by pressing the joystick 8 up or down To adjust t...

Страница 39: ...approx 4 dB Reduce the mid level with Frequency 1000 to 2500 Hz Level 4 to 6 dB Boost the treble range with Frequency 6300 to 10000 Hz Level 2 to 4 dB Sound Impression problem Bass sound is too weak D...

Страница 40: ...r In order for this to work the amplifier and subwoofer must be connected in the manner described in the installation instructions We recom mend you use well matched products from the Blaupunkt or Vel...

Страница 41: ...ce By pressing the AUX1 softkey you can switch between the AUX ILIARY 1 ON and AUXILIARY 1 OFF settings EXTERNAL AUDIO SOURCES Press the softkey 5 assigned to the AUX2 display item By press ing the AU...

Страница 42: ...ext is BLAUPUNKT THEADVAN TAGE IN YOUR CAR Instead of this you can enter your own text up to 35 characters long Press the MENU button 9 Press the softkey 5 assigned to the VARIOUS display item Press t...

Страница 43: ...line of the display Press the joystick OK 8 or the MENU button 9 to close the menu Resetting the device You can reset the device to its factory default settings All custom settings will then be cleare...

Страница 44: ...stortion factor at 4 ohms 4 x 26 watts sine in accordance with DIN 45324 at 14 4 V at 4 ohms 4 x 50 watts max power Tuner Wavebands FM 87 5 108 MHz MW 531 1 602 kHz LW 153 279 kHz FM frequency respons...

Страница 45: ...ent la carte d autoradio remplie Tenete per favore il libretto di apparecchio debitamente riempito in un posto sicuro Bewaar de ingevulde apparaatpas op een veilige plaats V nligen f rvara ifyllt appa...

Страница 46: ...0 94 27 337 210 94 12 711 Ireland IRL 01 46 66 700 01 46 66 706 Italy I 02 369 62331 02 369 62464 Luxembourg L 40 4078 40 2085 Netherlands NL 0800 400 1010 0800 400 1040 Norway N 66 817 000 66 817 157...

Отзывы: