Blaupunkt 32/133O-WB-11B-EGDP Скачать руководство пользователя страница 26

29

29

General Information

USING YOUR TV WITH A SKY DIGITAL SET TOP BOX

Option 1) Connecting your TV to your Sky box (when both the TV and Sky Box are located 
in the same room) 

Depending on your Sky Box & TV model, connect either by SCART or HDMI cables 
(available separately) .

If connecting by SCART, select the ‘Input source’ on the TV as SCART. If your TV does 
not have SCART, please refer to ‘Connections’ pages in this user guide for alternative 
ways to connect.

If connecting by HDMI, select the ‘Input source’ on the TV as HDMI (if the TV has more 
than 1 HDMI port, ensure you select the input source to match the HDMI numbered port 
on the rear of the TV). 

If you wish to use your Sky remote to operate the TV’s functions, you will need a Sky 
remote control (Revision 9 or later) and you will need to program a 4 digit code into it.  
See bottom of this page. 

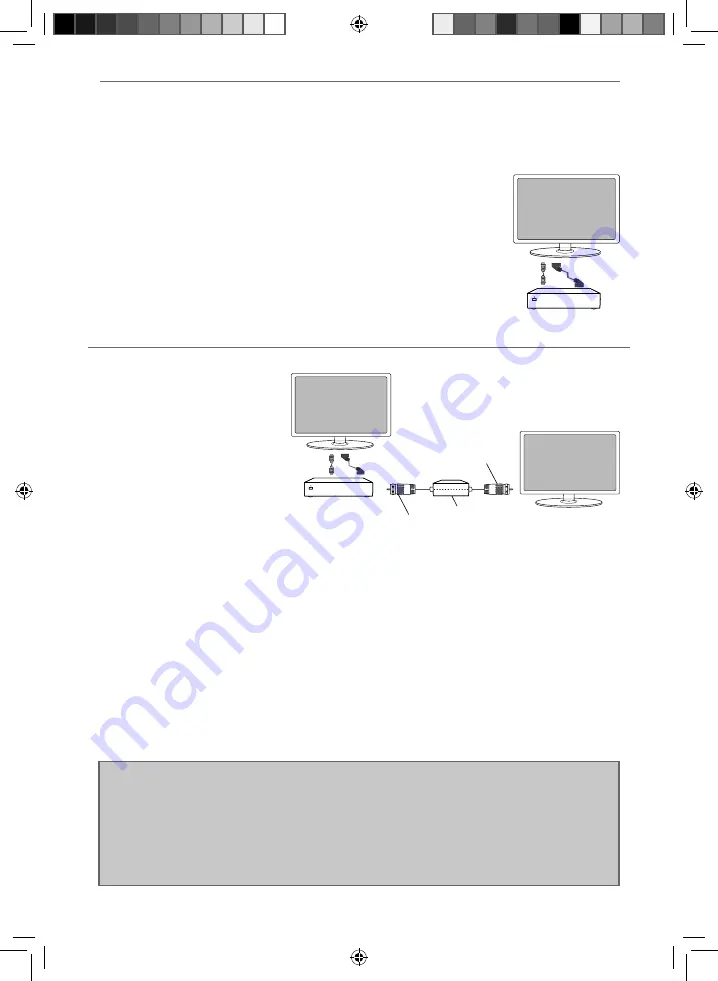
Option 2) Connecting your TV 
to your Sky box (when your 
Sky box is located in a different 
room to the TV) 

Please note, if you are adding a ‘Magic 
Eye/TV Link’ to your system so that 
you can use your Sky remote control 
to change the Sky channel in the room 
where the 2nd TV is located, please 
refer to the instructions included 
with the TV link/magic eye in order to 
ensure the RF or RF2 output on your 
Sky box is powered on. (The red LED 
light on the TV link/magic eye will light 
up if the RF / RF2 output is correctly set 
up)  If you do not have the instructions that came with the TV link/magic eye, instructions on how to do it can be 
found on our web site. 

1) To tune the TV to the Sky box, on the 2nd TV, select the ‘Analogue’ input source. 
2) Select the channel that you wish to store the Sky box/channel on. (If you do not use channels 1-5 because you 
no longer have analogue terrestrial channels after digital switchover, you may choose to select channel 1 to store 
the Sky box/channel, if you still have and use analogue channels 1-5, you may for example decide that channel 6 is 
the best option for you)  
3) Press the corresponding number on the remote control to select the desired analogue channel chosen as per 
point 2 above. 
4) On the TV remote control, press Menu. Now navigate through the menus to select Manual Tuning or Analogue 
Manual tuning (refer to the Tuning/Channel menu section of this user guide if necessary) 
5) Manually tune in the channel (usually, the Sky box is at a frequency between 800Mhz and 850Mhz) once the 
Sky box/channel is found, press ‘OK’ to store it. 

If you wish to use your Sky remote to operate the TV’s functions, you will need a Sky remote control (Revision 9 or 
later) and you will need to programme a 4 digit code into it.  See below. 

RF/COAX cable from 
Sky Box to 2nd TV

Connect to RF 
or RF2 output 
on the Sky box

Connect to the 
Aerial/RF input 
on the 2nd TV

TV Link/Magic Eye 
(optional)

2nd TV in 
another room

Sky Box

HDMI cable or
SCART adapter 


Using a Sky remote or a universal remote to operate your TV 

Sky remote control

 - If you wish to use your Sky remote to operate the basic functions of your TV, you need to 

program a 4 digit code into it. Please note - you will need a Sky Revision 9 remote control (or later).

 The code 

required for this television is 2134.

 If you wish to upgrade/replace your existing Sky remote control to the latest 

version, you can do so on our website.  

Universal remote control

 - If you wish to use a Universal remote control to operate your TV, please refer to the 

website for a full list of codes.  (Please note we only have codes for One for All branded remote controls, if you 
have an alternative brand of Universal remote, please refer to the manufacturer for the code.)

Sky Box

SCART adapter  
or HDMI cable

User Guide - Blaupunkt - 32-133O-WB-11B-EGDU-UK - BLA-MAN-0343.indd   Sec1:29

User Guide - Blaupunkt - 32-133O-WB-11B-EGDU-UK - BLA-MAN-0343.indd   Sec1:29

16/12/2016   11:27:55

16/12/2016   11:27:55

Содержание 32/133O-WB-11B-EGDP

Страница 1: ...HD Ready LED TV with Freeview Saorview and USB media player Model No User Guide 32 133O WB 11B EGP 32 133O WB 11B EGU 32 133O WB 11B EGDP 32 133O WB 11B EGDU...

Страница 2: ...e television set Only use furniture that can safely support the television set Ensure the television set is not overhanging the edge of the supporting furniture Do not place the television set on tall...

Страница 3: ...s follows this is not an exhaustive list TV channel logos e g shopping channel logos and pricing displays especially if they are bright and stationary Moving or low contrast graphics are less likely t...

Страница 4: ...MI Licensing LLC in the United States and other countries HDTV The HD TV Logo is a trademark of DIGITALEUROPE DVB The DVB logo is the registered trademark of the Digital Video Broadcasting DVB project...

Страница 5: ...16 17 Sound Menu 18 Channel Menu 19 Lock Menu 20 Time Menu 21 Settings Menu 22 Network Con guration 23 7 Day TV Guide and Channel List 25 USB Mode Media Player 26 USB Record Freeview Saorview 27 DVD S...

Страница 6: ...repair is in it s original box packaging WHAT IS INCLUDED IN THE BOX 1 x User Guide 1 x Quick Start Guide 2 x AAA Batteries 1 x TV 1 x Remote Control User Guide Quick Start Guide 1 x RF Cable Accessor...

Страница 7: ...nting away from each other g 3 When the stand feet are in the correct position secure the stand feet to the underside of the TV set using the 4 screws provided Attaching the stand feet To complete the...

Страница 8: ...be tted These are available from supermarket websites and other websites and are an easy inexpensive and effective way of ensuring your TV stays safely upright Straps are designed to be attached to th...

Страница 9: ...cle through the sleep options AUDIO To change the audio language if available SUBTITLE To switch the dialogue at the bottom of the screen on off TEXT To enter exit Text TEXT HOLD Teletext mode Hold cu...

Страница 10: ...Press SOURCE 2 Scroll up down using CH CH buttons to the input source you require 3 Press Vol to change input source to the one selected TV Buttons and Input Source Menu Standby Power On Off Displays...

Страница 11: ...nt Video input L R Audio in Audio input for Video Ypbpr YPbPr HD input Ypbpr A B C D E F G H I J K EARPHONE ETHERNET 2 OPTICAL DIGITAL AUDIO OUT ARC 1 SCART RF IN 3 USB 2 0 5V 500mA MAX CI CARD IN VID...

Страница 12: ...mal loss of quality TV Source should be set to the corresponding HDMI port HDMI 1 HDMI 2 etc CONNECTIONS Connecting to a device with SCART output TV source should be set to SCART Note Connecting cable...

Страница 13: ...ecting via the TV s 3 5mm Earphone output this will disable the TV speakers There are two options when connecting a device via the 3 5mm Earphone Output and the Digital Optical Audio Output 3 5mm earp...

Страница 14: ...ack and white Brightness Increase or decrease the brightness of the picture Colour Increases the colour from black and white Tint Lets you increase or decrease the level of tint within the picture onl...

Страница 15: ...bars are shown to ll the 16 9 screen Displays a picture in the full screen mode with out overscan 16 9 signal will be displayed in original proportion Other picture format will be stretched to ll the...

Страница 16: ...rsonal sound settings Off To turn off Digital Output Auto Selects the best settings automatically PCM Select this option if you are connecting to a Stereo Hi via digital audio cable Pulse code modulat...

Страница 17: ...ual Tuning Allows you to manually tune your analogue signal Freeview Manual Tuning Allows you to manually tune your digital signal Channel Edit Allows you to delete move skip and favourite channels Si...

Страница 18: ...ock certain channels manually Parental Guidance Allows you to set the rating to block certain content based on age information TV Button Lock Allows you to lock the buttons on the side of the TV set D...

Страница 19: ...min 30min 60min 90min 120min 180min 240min OSD Timer Lets you adjust the amount of time the On Screen Menu stays on the screen before disappearing Auto standby Set Auto standby between Off 3 hours 4 h...

Страница 20: ...is will be issued with the rmware Contact the helpline or refer to the product support section of the website HDMI CEC Consumer Electronic Control Allows HDMI devices to control each other and allows...

Страница 21: ...he following options Auto Will automatically connect the TV to your home network this is the default setting and is highly recommended Manual Allows you to manually change the IP Netmask Gateway and D...

Страница 22: ...ogramme by pressing INFO 3 Press EXIT to exit the 7 day TV Guide Channel List To view the channel list please ensure that the TV is set to either the analogue or digital source and no menus or TV noti...

Страница 23: ...ll be divided into Photo Music Movie and Text based on le type USB MODE MEDIA PLAYER Tip If you experience a playback issue please ensure the les being used are the correct format example the picture...

Страница 24: ...emory is wiped To restart time shift you must press play pause button Pause Live TV Time Shift Pausing Live TV is very simple Press the play pause button and the television will pause and the live con...

Страница 25: ...et this to listen with a smaller difference between the maximum and minimum volume 1 4 Set this to listen with a smaller difference between the maximum and minimum volume Off Set dynamic range to off...

Страница 26: ...nnel 1 to store the Sky box channel if you still have and use analogue channels 1 5 you may for example decide that channel 6 is the best option for you 3 Press the corresponding number on the remote...

Страница 27: ...Menu followed by 8 8 8 8 to enter the initial setup first time installation menu 4 Press OK let the TV run the full tuning process 5 Once completed turn off the TV reconnect the RF Aerial cable then...

Страница 28: ...Record For TV models with PVR function only When using the USB to record the picture breaks up or experience loss of sound Check the USB memory stick meets the minimum read speed requirements Standard...

Страница 29: ...with built in DVD player 32 133O WB 11B EGDP 32 133O WB 11B EGDU Energy effiency class A Visible screen size diagonal 81 cm 32 inches On mode power consumption 31 0 W Annual energy consumption 1 45 kW...

Страница 30: ...ogressive JPEG Max Resolution 1024 768 jpeg Baseline JPEG Max Resolution 15360 8640 bmp BMP Max Resolution 9600 6400 Pixel Depth 1 4 8 16 24 32 bpp png Non Interlaced Max Resolution 9600 6400 Interlac...

Страница 31: ...BLA MAN 0343 User Guide Blaupunkt 32 133O WB 11B EGDU UK BLA MAN 0343 indd Sec1 36 User Guide Blaupunkt 32 133O WB 11B EGDU UK BLA MAN 0343 indd Sec1 36 16 12 2016 11 27 55 16 12 2016 11 27 55...

Отзывы: