Blackbox KVT109A Скачать руководство пользователя страница 18

17

CHAPTER 4: Installation

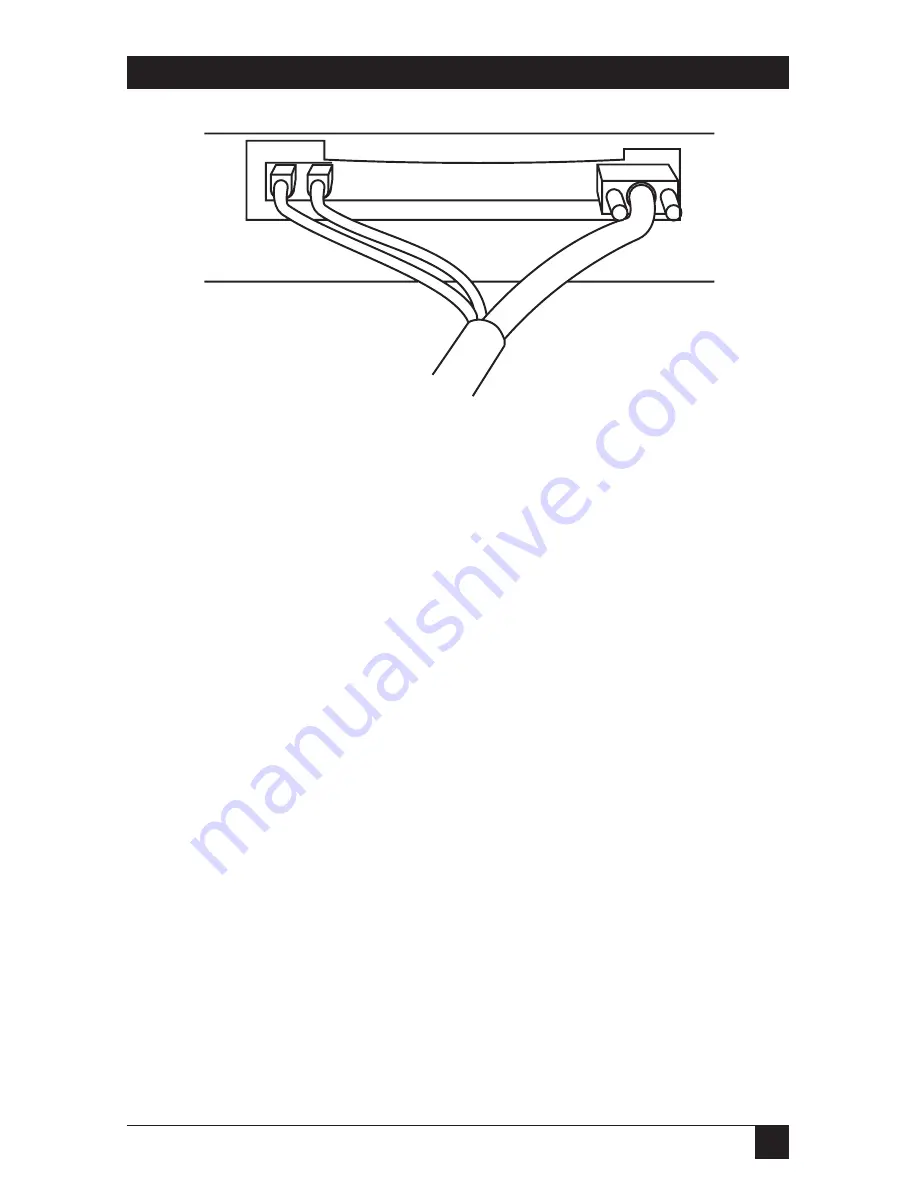
Figure 4-5. Attaching the 3-in-1 cable to a CPU or to a KVM switch with

separate user-port connectors.

Keyboard and mouse strands plug into
PS/2 style 6-pin mini-DIN keyboard and

mouse ports on CPU or switch

Video strand plugs into

HD15 female video port on

CPU or switch

Содержание KVT109A

Страница 1: ...week Call 724 746 5500 or fax 724 746 0746 Mailing address Black Box Corporation 1000 Park Dr Lawrence PA 15055 1018 World Wide Web www blackbox com E mail info blackbox com Copyright 2001 Black Box C...

Страница 2: ...why not We carry a broad line of robust solutions for all these applications Do you have just two PCs and need an economical alternative to keeping two monitors keyboards and mice on your desk Or do y...

Страница 3: ...Macintosh are registered trademarks of Apple Computer Inc IBM PS 2 and RS 6000 are registered trademarks of International Business Machines Corporation Sun Microsystems is a registered trademark of Su...

Страница 4: ...hich case the user at his own expense will be required to take whatever measures may be necessary to correct the interference Changes or modifications not expressly approved by the party responsible f...

Страница 5: ...N OF CONFORMITY This equipment complies with the requirements of the European EMC Directive 89 336 EEC with respect to the EN 55022 Class A and EN 55024 standards as well as the Low Voltage Directive...

Страница 6: ...debe ser montado a la pared o al techo s lo como sea recomendado por el fabricante 8 Servicio El usuario no debe intentar dar servicio al equipo el ctrico m s all a lo descrito en las instrucciones de...

Страница 7: ...stir una antena externa deber ser localizada lejos de las lineas de energia 16 El cable de corriente deber ser desconectado del cuando el equipo no sea usado por un largo periodo de tiempo 17 Cuidado...

Страница 8: ...4 Installation 12 4 1 The Complete Package 12 4 2 Assembling and Installing the ServView 13 4 3 Connecting the Cables 16 5 Operation 18 5 1 Getting Started 18 5 2 The TFT s On Screen Display 19 6 Mai...

Страница 9: ...to the attached CPU or KVM switch depending on cable quality Connectors Both rear mounted 1 HD15 female for composite I O 1 IEC 320 male power inlet Maximum Altitude Operating 10 000 ft 3048 m Storag...

Страница 10: ...mer Input voltage 100 to 250 VAC Input frequency 50 to 60 Hz single phase Input current From 0 5 amps at 250 VAC to 0 7 amps at 100 VAC Consumption 24 watts maximum Size Chassis only 1 65 H x 16 5 W x...

Страница 11: ...Here are some of the other key features of the ServView Integrated 14 1 35 8 cm flat panel display that supports up to 1024 x 768 resolution at refresh rates up to 75 Hz Full 83 key low profile notebo...

Страница 12: ...bjects into any openings in the ServView s housing You could damage the ServView and or give yourself a dangerous electric shock Do not place heavy objects on the ServView s power cord or place it whe...

Страница 13: ...Complete Package Along with the ServView you should have received A telescoping rackmount rail assembly A cable carrier arm 6 8 32 x 1 2 screws 2 8 32 x 1 4 screws 12 10 32 x 3 4 screws A power cord...

Страница 14: ...mounting the ServView in a multiple rack system the racks must be coupled Also keep in mind that only one extendable component at a time should ever be extended from the front of the rack 1 Separate t...

Страница 15: ...nted in 5 Attach the outside rails of the rackmount rail assembly to the rack using the included 10 32 x 3 4 screws one in each of the three holes at each end of each rail 6 With the outside rails mou...

Страница 16: ...hile holding the rail in place back out the top and bottom screws but not the middle screw that you used to mount that end of the rail in step 5 Then place the end of the arm so that the two holes in...

Страница 17: ...s at the CPU switch end of the ServView cable in order to connect a CPU or switch that s farther away than the ServView cable will reach You could also use standard separate VGA and PS 2 extension cab...

Страница 18: ...he 3 in 1 cable to a CPU or to a KVM switch with separate user port connectors Keyboard and mouse strands plug into PS 2 style 6 pin mini DIN keyboard and mouse ports on CPU or switch Video strand plu...

Страница 19: ...t hand end of the keyboard becomes a keypad for number entry Touchpad You can simulate mouse clicks with the ServView s touchpad in either of two ways You can press the standard buttons directly below...

Страница 20: ...e TFT s right hand side shown in Figure 5 1 Figure 5 1 The ServView s TFT control buttons To activate the ServView s on screen display press the Enter key beside of the TFT screen This will cause the...

Страница 21: ...ergonomic issues To make it as easy as possible to see the video on the ServView s TFT screen we recommend that you Adjust the TFT s Brightness and Contrast to enhance readability as necessary In part...

Страница 22: ...e of fuse might prevent the ServView from operating properly and might also pose a risk of shock or fire 6 2 Calling Black Box If you determine that your ServView is malfunctioning do not attempt to a...

Страница 23: ...ecommend that you use the original container If you are shipping the unit for repair please include its power cord and CPU switch cable If you are returning the unit please include everything you rece...

Страница 24: ...NOTES...

Страница 25: ...NOTES...

Отзывы: