background image

Page 15 of 17 


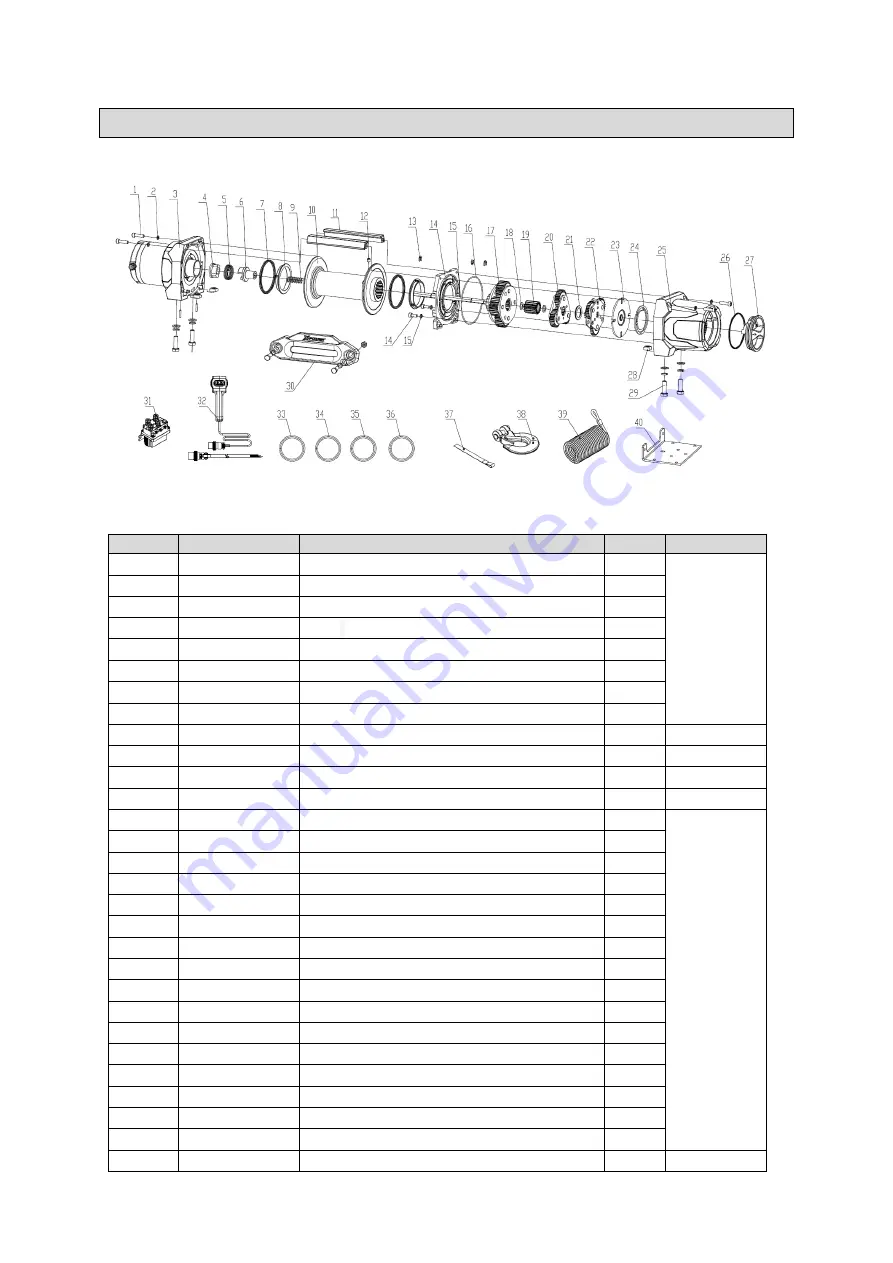
Parts Diagram 


Parts List                                                               

Number 

Part number  

Description


Quantity


Set Number


10801010-1  Screw M5x 25 

A


10801010-2  Washer 

Ø5


10801026-3  Motor Assembly 

10821103-4  Active brake 

10821103-5  Brake Spring 

10821103-6  Driven Brake 

10802015-7  Seal Kit 

10801013-8  Nylon Bearing 

10821103-9  Clutch Spring 

10 

10801010-10  Drum 

11 

10801010-11  Tie Bar 

12 

10801010-12  Screw M6x8 

13 

10801010-13  Open collar  7 

14 

10801013-14  Retarding end cap 

15 

10801010-15  Hexagon Lever 

16 

10801010-16  O-Ring 

Ø

 96 x 

Ø

 1.8 

17 

10801010-17  Gear Carrier Assembly (Output) 

18 

10801010-18  Thrust Shim 

19 

10801010-19  Three-stage Sun Wheel 

20 

10801026-20  Gear Carrier Assembly (Intermediate) 

21 

10801010-21  Washer 

22 

10801026-22  Gear Carrier Assembly (Input) 

23 

10801010-23  Washer 

24 

10801013-24  Skateboard 

25 

10801010-25  Reduction case 

26 

10801013-26  Seal Kit 

27 

10801013-27  Clutch hand wheel 

28 

10801010-28  Square nut M8 

29 

10801010-29  Winch Mounting Hardware 

G


Содержание ATV-WINCH-4500

Страница 1: ...Instructions for Part ATV WINCH 4500 WARNING Read carefully and understand all ASSEMBLY AND OPERATION INSTRUCTIONS before operating Failure to follow the safety rules and other basic safety precautions may result in serious personal injury ...

Страница 2: ...this electric winch Always be aware of the environment and ensure the electric winch is used in a safe and responsible manner Do not allow anyone to operate or assemble the electric winch until they have read this manual and have developed a thorough understanding of how it works Do not modify this electric winch in any way Unauthorized modification may impair the function and or safety and could ...

Страница 3: ...Load 14 minutes 15 seconds rest Wired Remote Controller Wired 10ft 3 1m long Gear Train 3 Stage Planetary Gear Ratio 201 1 Free Spool Cam Activated Brake Auto Load Holding Mechanical Drum Dia X L 2 X 5 50mmx127mm Hook 5 16 Clevis with Spring Loaded Safety Latch Fairlead Aluminum Hawse Fairlead Rope Size Type 0 236 x 50 6 0mmx15 2m Synthetic Rope Battery 12V DC Minimum 20 Ah Battery Cables 8 Gauge ...

Страница 4: ...L SAFETY Stay alert watch what you are doing and use common sense when operating the electric winch Do not use the electric winch while you are tired or under the influence of drugs alcohol or medication A moment of inattention while operating the tool may result in serious personal injury Dress properly Do not wear loose clothing dangling objects or jewelry Keep your hair clothing and gloves away...

Страница 5: ...ent injury or property damage read and understand all instructions before operating winch Wear ANSI Z87 1 compliant safety goggles and heavy duty leather work gloves during operation Do not exceed the rated load capacity Be aware of dynamic loading Sudden load movement may briefly create excess load causing product failure INSTALLATION SAFETY Choose a mounting location that can support the winch a...

Страница 6: ...lead or load to prevent accidental starting Keep rope straight to avoid kinking the rope Keep children and bystanders away while operating Hook onto the object using a pulling point tow strap or chain Do not wrap the rope around the object and hook onto the rope itself Do not use a recovery strap while winching Secure the load after moving Do not lock the mechanism Keep at least 5 full turns of ro...

Страница 7: ...d the rated capacity without damage or weakening Steel reinforcement plates may be needed or a certified welder may need to weld on additional bracing depending on the mounting location 4 Drill holes for the hardware at the marked locations 5 Install the winch using hardware described under the specifications table Mounting the Solenoid Assembly 1 Mount the solenoid box switch controller and socke...

Страница 8: ...yellow cables to their corresponding terminals on the winch Note Wire in the switch controller and socket lead if required according to the diagrams on the above picture 5 Attach the black battery cable directly to the negative terminal of the battery 6 Attach the red battery cable directly to the positive terminal of the battery 7 Lift the socket cover exposing the electrical switch connector Ins...

Страница 9: ...ctions WARNING Read the entire Important Safety Information section at the beginning of this manual including all text under subheadings before setting up or using this electric winch The instructions that follow are basic guidelines only and cannot cover all situations encountered during use The operator and assistants must carefully plan usage to prevent accidents 1 Examine the rope Do not use t...

Страница 10: ...or fray the rope 8 The attachment point must be centered in loop of hook and the hook s safety clasp must be fully closed See image below 9 Do not use a recovery strap while winching They are designed to stretch and can suddenly whip back towards the operator during operation 10 Place a heavy rag or carpet sold separately over the rope span 6 feet from the hook to help absorb the force released if...

Страница 11: ...slip or break it can suddenly whip back towards the winch causing a hazard for anyone in the area Stand far to the side while winching 12 Attach the wired remote controller to the socket on the solenoid assembly see image below 13 Operate the controls briefly to ensure they work properly If operation is reversed the power cables may be connected backwards Correct any such issue before use Rev 0325...

Страница 12: ...ngle in relation to the winch use a pulley sold separately and an anchor point directly in front of the winch as shown in the following picture WARNING Stop the winch and release tension on the rope before moving the rag or carpet placed on it 17 Discontinue using the winch if the battery becomes weak or run down 18 You may wish to keep the engine running while using this winch to continually rech...

Страница 13: ...l and change rigging as needed before continuing pull After Each Use Inspect rope for damage Replace immediately if damaged Wipe external surfaces of the winch with a clean cloth Maintenance WARNING To prevent serious injury disconnect the battery cables before performing any inspection maintenance or cleaning procedures To prevent serious injury from winch failure do not use damaged equipment If ...

Страница 14: ...charge battery 4 Tap solenoid to loosen contacts Apply 12 volts to coil terminals directly A clicking indicates proper activation 5 Replace switch assembly 6 Check for voltage at armature port with switch pressed If voltage is present replace motor 7 Allow to drain and dry Run in short bursts without load until completely dry 8 Have technician service winch Motor runs but rope drum does not turn T...

Страница 15: ...12 Screw M6x8 1 E 13 10801010 13 Open collar 7 3 F 14 10801013 14 Retarding end cap 1 15 10801010 15 Hexagon Lever 1 16 10801010 16 O Ring Ø 96 x Ø 1 8 1 17 10801010 17 Gear Carrier Assembly Output 1 18 10801010 18 Thrust Shim 2 19 10801010 19 Three stage Sun Wheel 1 20 10801026 20 Gear Carrier Assembly Intermediate 1 21 10801010 21 Washer 1 22 10801026 22 Gear Carrier Assembly Input 1 23 10801010...

Страница 16: ... Assembly 1 34 10801027 34 Capstan Negative Power Cord Assembly 1 35 10801027 35 Positive pole power line Assembly for motor 1 36 10801027 36 Motor negative pole power supply wire assembly 1 37 10801001 37 Red Strap 1 J 38 10800601 38 Clevis Hook 1 39 10800500 39 Synthetic rope 1 40 10800206 40 Mounting Plate 1 K Rev 032521 DiscountRamps com 1 888 651 3431 Page 16 ...

Страница 17: ...uct does not meet specifications as depicted in the advertisement the Authorized Dealer will refund the full purchase price of the product Questions regarding the warranty on a specific product and warranty claims should be directed to the Authorized Dealer with whom the purchase transaction was made WARRANTY LIMITATIONS The above warranty does not apply to products that are repaired modified or a...

Отзывы: