background image

Page 13  — English

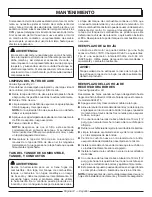
MAINTENANCE

THIS PRODUCT WAS MANUFACTURED WITH A CATALYST MUFFLER

Congratulations! 

You have made an investment toward protecting the environment. In order to maintain this product’s 

original emission level, please refer to the maintenance section below.


MAINTENANCE SCHEDULE


Inspect For 

Clean 

Replace  

Replace 

Maintenance 

Damage Before 

Every 

Every 25 Hours   

Every 

Part 

Each Use 

5 Hours 

or Yearly 

50 Hours

* CATALYTIC MUFFLER ASSEMBLY

..................................................................................................................X

  SPARK SCREEN

 ...............................................................................................................................................X

* AIR FILTER ASSY

   includes:
    Filter Screen ........................................................................ X

* CARBURETOR  ASSY

   includes:
   Gaskets ........................................ X

* FUEL TANK ASSY

   includes:
    Fuel Lines ..................................... X
    Fuel Cap ....................................... X
    Fuel Filter................................................................................................................... X

* IGNITION  ASSY

   includes:
    Spark Plug ................................................................................................................. X

NOTICE:

 THE USE OF EMISSION CONTROL COMPONENTS OTHER THAN THOSE DESIGNED FOR THIS UNIT  

  IS A VIOLATION OF FEDERAL LAW.

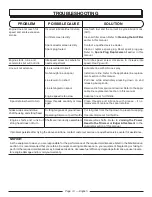
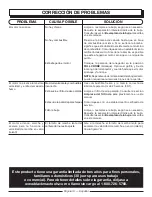
PROBLEM

POSSIBLE CAUSE

SOLUTION

Engine will not start

No spark


No fuel


Engine is flooded

Clean or replace spark plug. Reset spark plug gap. 
Refer to 

Spark Plug Replacement

 earlier in this 

manual.

Push primer bulb until bulb is full of fuel. If bulb does 
not fill, primary fuel delivery system is blocked. Contact 
a qualified service dealer. If primer bulb fills, engine 
may be flooded, proceed to next item.

Set the choke lever to the 

FULL CHOKE

 position. 

Squeeze the trigger and pull the starter grip and rope 
repeatedly until the engine starts and runs. 

NOTE

: Depending on the severity of the flooding, this 

may require numerous pulls of the rope.

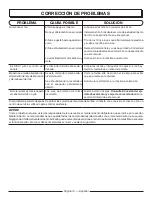
TROUBLESHOOTING

Содержание BM25CSEDG

Страница 1: ... understand the operator s manual before using this product TABLE OF CONTENTS General Safety Rules 2 3 Specific Safety Rules 3 Symbols 4 Features 5 Assembly 5 6 Operation 7 9 Maintenance 10 13 Troubleshooting 13 14 Parts Ordering Service Back Page ADVERTENCIA Para reducir el riesgo de lesiones el usuario debe leer y comprender el manual del operador antes de usar este producto ÍNDICE DE CONTENIDO ...

Страница 2: ...Knob perilla N Curved shaft grass deflector deflector de pasto del eje curvo O Straight shaft grass deflector deflector de pasto para eje recto P Muffler silenciador Q Edger attachment accesorio para cortar bordes R Blade guard protección de la cuchilla S Gear head cabezal de engranajes T Blade cuchilla U Guide wheel rueda guía V Blade guide guía para bordillos W Debris flap aleta protectora X Adj...

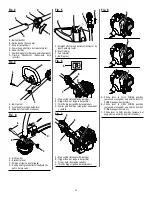
Страница 3: ...illo C Throttle trigger gatillo del acelerador D Starter grip and rope mango del arrancador y cuerda Fig 6 A B C Fig 4 A Bolt perno B Bracket placa C Wing nut tuerca de mariposa D Curved shaft grass deflector deflector de pasto del eje curvo A B C D A Stop switch interruptor de parada B Trigger lock out seguro del gatillo C Primer bulb bomba de cebado D Throttle trigger gatillo del acelerador Fig ...

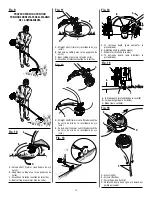
Страница 4: ...cto B Dangerous cutting area área peligrosa de corte C Best cutting area mejor área de corte D Direction of rotation sentido de rotación Fig 11 B A C D A Straight shaft trimmer cut off blade cuchilla de corte de hilo de la recortadora de eje recto B Curved shaft trimmer cut off blade cuchilla de corte de hilo de la recortadora de eje recto Fig 12 B A A D C Fig 13 Fig 14 B C A B A C D A To increase...

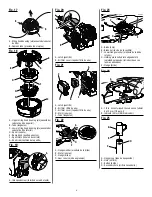
Страница 5: ...ilo inferior D Spool carrete E Bump knob perilla percusiva F Spool slots ranuras de carrete G Knob ribs costillas de la perilla B A D F G E C B C Fig 22 A Flange washer arandela de la brida B Slots ranuras C Flange brida D Gear case caja de engranajes A D C B Fig 23 A Blade hoja B Blade nut tuerca de la cuchilla C Lower flange washer arandela de la brida inferior D Holding pin inserted into aligne...

Страница 6: ...aces Keep cutting attachment below waist Do not use on a ladder or unstable support Stable foot ing on a solid surface enables better control of the unit in unexpected situations Keep all parts of your body away from any moving part To avoid hot surfaces never operate the unit with the bottom of the engine above waist level Do not touch area around the muffler or cylinder of the unit these parts g...

Страница 7: ...ation For such use it may be appropriate to use a product having an anti vibration feature EDGER Replace dull or worn blade do not attempt to sharpen Use this edger for edging along sidewalks driveways flower beds and similar areas Do not use for any other purpose Be thoroughly familiar with the controls Know how to stop the unit and disengage the controls quickly Do not use the edger on or near g...

Страница 8: ...l or use any type of blade on a product dis playing this symbol Cutting Hazard Failure to keep hands and feet away from the blade will result in serious personal injury Hot Surface To reduce the risk of injury or damage avoid contact with any hot surface Gasoline and Lubricant Use unleaded gasoline intended for motor vehicle use with an octane rating of 87 R M 2 or higher This product is powered b...

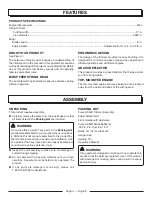
Страница 9: ... discard the packing material until you have carefully inspected and satisfactorily operated the product If any parts are damaged or missing please call 1 800 726 5760 for assistance FEATURES ASSEMBLY PRODUCT SPECIFICATIONS Engine displacement 25cc String Trimmer Cutting width 17 in Line diameter 0 095 in Edger Blade Length 9 in Edging Depth Adjustable from 1 2 in to 2 3 4 in KNOW YOUR PRODUCT See...

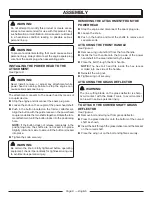
Страница 10: ...are not locked into place Slightly rotate from side to side until the button is locked into place Tighten the knob securely WARNING Be certain the knob is fully tightened before operating equipment check it periodically for tightness during use to avoid serious personal injury REMOVING THE ATTACHMENT FROM THE POWER HEAD Stop the engine and disconnect the spark plug wire Loosen the knob Push in the...
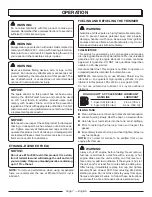
Страница 11: ...pors are highly flammable and explo sive To prevent serious personal injury and property damage handle it with care Keep away from ignition sources and open flames handle outdoors only do not smoke and wipe up spills immediately FUEL MIXTURE This product is powered by a 2 cycle engine and requires pre mixing gasoline and 2 cycle lubricant Pre mix unleaded gasoline and 2 cycle engine lubricant in a...

Страница 12: ... side The use of the unit on the operator s left side will expose the user to hot surfaces and can result in possible burn injury WARNING To avoid burns from hot surfaces never operate unit with the bottom of the engine above waist level Hold the trimmer with your right hand on the rear handle and your left hand on the front handle Keep a firm grip with both hands while in operation Trimmer should...

Страница 13: ...rator to hot surfaces and can result in possible burn injury WARNING To avoid burns from hot surfaces never operate unit with the bottom of the engine above waist level When using the edger attachment hold the unit with your right hand on the rear handle and your left hand on the front handle Keep a firm grip with both hands while in operation The edger should be held at a comfortable position wit...

Страница 14: ...e weaken or destroy plastic which could result in serious personal injury LINE REPLACEMENT See Figure 16 Use only 095 in trimmer line Use original manufacturer s replacement line for best performance Stop the engine and disconnect the spark plug wire Rotate the bump knob clockwise as necessary to align the arrows on the bump knob with the arrows on the string head housing Cut one piece of trimmer ...

Страница 15: ...or adjustment and discontinue use until the repair is made WARNING The cutting attachment should never turn at idle Turn the idle speed screw counterclockwise to reduce the idle RPM and stop the cutting attachment or contact a service dealer for adjustment and discontinue use until the repair is made Serious personal injury could result from the cutting attachment turning at idle CLEANING THE AIR ...

Страница 16: ...achment shaft Slightly rotate the cap from side to side until the button locks into place The secondary hole in the attachment shaft can be used for hanging purposes as well STORING THE PRODUCT Clean all foreign material from the product Store idle unit indoors in a dry well ventilated area that is inaccessible to children Keep away from corrosive agents such as garden chemicals and de icing salts...

Страница 17: ...NITION ASSY includes Spark Plug X NOTICE THE USE OF EMISSION CONTROL COMPONENTS OTHER THAN THOSE DESIGNED FOR THIS UNIT IS A VIOLATION OF FEDERAL LAW PROBLEM POSSIBLE CAUSE SOLUTION Engine will not start No spark No fuel Engine is flooded Clean or replace spark plug Reset spark plug gap Refer to Spark Plug Replacement earlier in this manual Push primer bulb until bulb is full of fuel If bulb does ...

Страница 18: ... and rewind Refer to the appli cable line replacement section in this manual Advance line at full throttle Spool retainer hard to turn Screw threads are dirty or dam aged Clean threads and lubricate with grease if no improvement replace the spool retainer Grass wraps around drive shaft housing and string head Cutting tall grass at ground level Operating trimmer at part throttle Cut tall grass from...

Страница 19: ...ados y el equilibrio No trate de alcanzar demasiado lejos Al tratar de hacerlo puede perder el equilibrio o exponerse al contacto con superficies calientes No utilice la unidad al estar en una escalera o en un soporte inestable Una postura estable sobre una superficie sólida permite un mejor control de l unidad en situaciones inesperadas Mantenga todas las partes del cuerpo alejadas de toda pieza ...

Страница 20: ... parte de propietarios y otros usuarios ocasionales para aplicaciones generales como cortar vegetación ligera y pesada etc No es para uso prolongado Los períodos prolongados de manejo de la unidad pueden causar problemas circulatorios en las manos del operador debido a la vibración Para tal uso puede convenir utilizar una sierra dotada de características de antivibración RECORTAR BORDES Si la hoja...

Страница 21: ...o daños físicos No instale hoja de corte No instale ni utilice ningún tipo de hoja de corte en ningún producto con este símbolo Peligro de corte Si no mantiene las manos y pies alejadas de la hoja de corte se causará serias lesiones corporales Superficie caliente Para reducir el riesgo de lesiones corporales o daños materiales evite tocar toda superficie caliente Gasolina y lubricante Use gasolina...

Страница 22: ...CIA Si falta o está dañada alguna pieza no utilice este producto sin haber reemplazado la pieza Usar este producto con partes dañadas o faltantes puede causar lesiones serias al operador CARACTERÍSTICAS ARMADO ESPECIFICACIONES DEL PRODUCTO Cilindrada del motor 25 cc String Trimmer Ancho de corte 432 mm 17 pulg Diámetro del hilo 2 4 mm 0 095 pulg 0 095 in Recortadora bordes Longitud de la hoja 228 ...

Страница 23: ... Gire levemente los ejes de un lado a otro hasta que el botón quede asegurado en su lugar Apriete firmemente la perilla ADVERTENCIA Asegúrese de que esté bien apretada la perilla antes de utilizar el equipo verifique periódicamente el apriete de la misma durante el uso para evitar lesiones corporales graves DESMONTAJE DEL ADITAMENTO DEL CABEZAL MOTOR Apague el motor y desconecte el cable de la buj...

Страница 24: ...e limpie e inspeccione la junta Vuelva a colocar inmediatamente la tapa del tanque de combustible y apriételo con la mano Limpie todo derrame de combustible NOTA Es normal que salga humo de un motor nuevo después de usarlo por primera vez ADVERTENCIA No permita que su familarización con este producto le vuelva descuidado Tenga presente que un descuido de un instante es suficiente para infligir una...

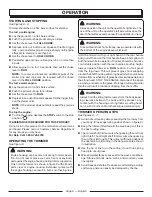
Страница 25: ...ento Presione el botón de bloqueo y apriete el gatillo acelerador a fondo jale del cable de arranque NOTA Si la unidad no arranca repita los pasos previos Para apagar el motor Para apagar el motor coloque el interruptor de STOP en la posición de apagado SI NECESITA ASISTENCIA PARA UTILIZAR ESTE PRODUCTO No devuelva este producto a la tienda donde fue adquirido Por favor llame al Departamento de At...

Страница 26: ...el hilo Para avanzar manualmente el hilo de corte Apague el motor y desconecte el cable de la bujía Empuje hacia adentro el perilla mientras tira del hilo o hilos según sea el caso para avanzar manualmente el hilo CUCHILLA DE CORTE DEL HILO EN EL DEFLECTOR DE HIERBA Vea la figura 12 Esta recortadora está equipada con una cuchilla de corte del hilo instalada en el deflector de pasto Para mejores re...

Страница 27: ...ortadora de bordes corta a lo largo de aceras caminos de entrada macizos de flores bordillos y áreas similares Básese en la guía de la flecha situada en la protección de la hoja para alinear ésta con la superficie de corte FUNCIONAMIENTO Efectúe el corte a un paso estable Si comienza a atas carse la hoja significa que usted está efectuando con demasiada rapidez el corte aminore el paso No fuerce l...

Страница 28: ...iento del cabezal del hilo Alinee las ranuras del alojamiento del cabezal de hilo inferior con las lengüetas del alojamiento del cabezal de hilo superior MANTENIMIENTO Empuje los alojamientos al mismo tiempo hasta que las lengüetas encastren en su lugar NOTA Sostenga el carrete por la perilla mientras completa la instalación Coloque el hilo como se describe en la sección Reabastecimiento del hilo ...

Страница 29: ...sté instalada correctamente y firmemente asegurada Si el accesorio del corte avanza estando el motor en marcha lenta se necesita ajustar el tornillo de marcha lenta del motor Gire el tornillo de velocidad de marcha lenta en el sentido contrario a las manecillas del reloj para reducir las RPM y que se detenga el movimiento del accesorio del corte Si el accesorio del corte aún se mueve al estar el m...

Страница 30: ...ábrica Hacer funcionar el motor con la configuración equivocada a determinada altura puede aumentar las emisiones reducir la eficiencia del combustible perjudicar el funcionamiento y provocar daños irreversibles al motor Los motores que estén configurados para funcionar en una altitud alta no se pueden utilizar en condiciones de altitud estándar Un centro de servicio calificado debe asegurarle que...

Страница 31: ...arranque Oprima el gatillo y tire de la mango del arrancador y cuerda hasta que el motor arranque y funcione NOTA Dependiendo de la intensidad del ahogamiento pueden requerirse numerosos tirones de la cuerda El motor no alcanza la máxima velocidad y emite demasiado humo Mezcladelubricanteycombustible incorrecta Está sucio el filtro de aire pantalla Está sucia la pantalla parachispas Falló la bujía...

Страница 32: ...ndo la hierba alta a nivel del suelo Se está utilizando la recortadora con el anegador parcialmente abierto Corte la hierba alta de arriba hacia abajo para evitar que se enrede en la unidad Accione la recortadora a la máxima aceleración El motor arranca y funciona pero el cabezal del hilo no gira Los ejes se armaron de forma incorrecta Vuelva a armar los ejes Consulte Conexión del eje del cabezal ...

Страница 33: ...NOTES NOTAS ...

Страница 34: ...NOTES NOTAS ...

Страница 35: ...NOTES NOTAS ...

Страница 36: ...tional letters at the end These letters designate manufacturing information and should be provided when calling for service SERVICIO Para obtener piezas o servicio comuníquese con el centro de servicio Para asistencia le suplicamos llamar al 1 800 726 5760 o visitar nuestro sitio en la red mundial en la dirección www blackmaxtools com Asegúrese de proporcionar todos los datos pertinentes al llamar...

Отзывы: