
IMPORTANT SAFETY INSTRUCTIONS
1.
READ ALL INSTRUCTIONS CAREFULLY BEFORE USE. If you do not understand these instructions, need
clarification or further explanation, please call our toll free answer line for assistance at 1-800-304-1316
Monday through Friday 8:00 a.m. until 5:00 p.m. CST.
2.
Do not load Plastic Crate Cart with more than 1200 lbs. (544 kg)
3.
Do not allow children to use the cart unsupervised. This Plastic Crate Cart is not a toy.
4.
Always distribute payload evenly over surface of Crate.
5.
If any parts become damaged, broken or misplaced do not use the Cart until
replacement parts can be obtained.
6.
Do not operate or use on objects that can cause damage to the pneumatic tires or tubes.
Do not inflate tires more than 30 psi.
7.
SAVE THESE INSTRUCTIONS.
ASSEMBLY INSTRUCTIONS
Your Plastic Crate Cart requires assembly. Account for all parts and hardware before beginning assembly. If any parts
are missing, damaged or if you have questions or need additional instructions DO NOT RETURN THIS
PRODUCT TO THE RETAILER, call the manufacturer at 1-800-304-1316.
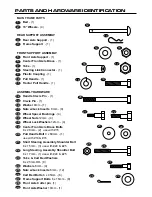
Tools required for assembly: Medium size slot screwdriver, 6, 8, and 12mm open end wrench and /or two medium
adjustable wrenches.
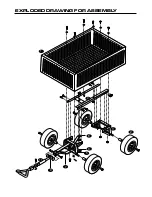
Refer to the exploded drawing and the parts list on the following pages during assembly.
STEP 1
Turn the cart BED upside down. Use the cardboard from the carton to keep from scratching
or damaging the finish.
STEP 2
Assemble the REAR SUPPORT ASSEMBLY to the frame support using 4 - 6 X16mm Frame Support
Bolts and 6mm nuts. Tighten all nuts securely.
STEP 3
The front support assembly is mostly pre-assembled at the factory. Please make sure all bolts and
nuts assembled at the factory are tight.
A. Insert the two remaining shoulder bolts into each end of the Steering Link Connector. Apply 6mm
washers and nuts.
B. Attach the completed Front Support Assembly to the Frame Support using 4 Frame Support Bolts,
washers and nuts.
C. Secure the Center Front Axle Brace to the Frame Support using 8mm bolts, washers and nuts.
STEP 4
Attach the frame support to the crate using the 8mm bolts, washers, and lock nuts.
STEP 5
Install the WHEELS in the following order.
A. Place the Wheel Spacer bushing onto the axle.
B. Place the Wheel onto the axle with the valve stem facing out.
C. Use the 12mm washer and then the 12mm Nut to secure the wheel. Tighten Securely.
STEP 6
Turn the cart upright onto its wheels. Attach the Tractor Pull Handle Yoke Washers and the Plastic Coupling
using the 8 x 60mm pull handle bolt, 8mm washer and nut.