background image

9

CHAPTER 2: Introduction

2.3 Physical Description

2.3.1 F

RONT

P

ANEL

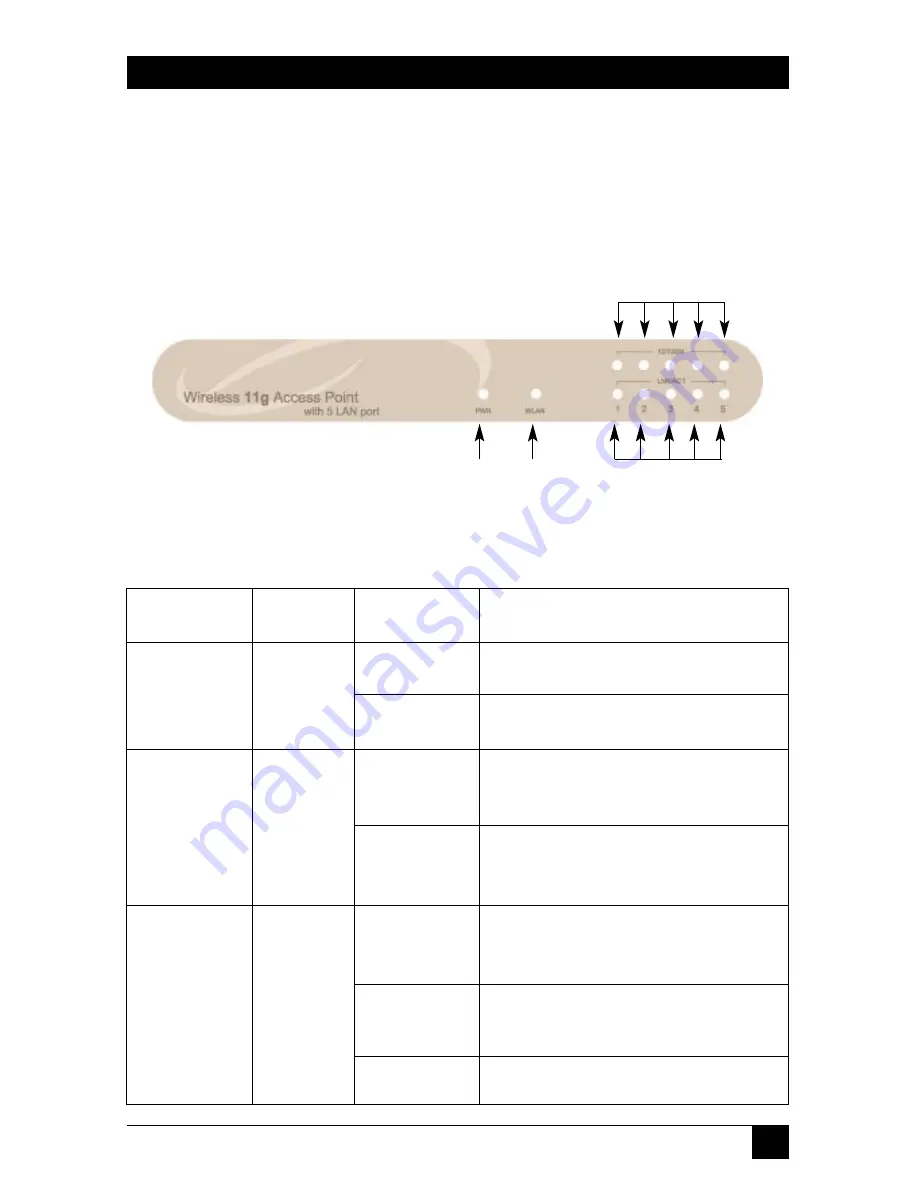
The front panel contains LED indicators that tell you the access point’s current
status. Numbers 1–4 in Figure 2-1 correspond to numbers 1–4 in Table 2-1.

Figure 2-1. Front panel.

Table 2-1. Indicators.

LED

Color

Status

Description

Power

Green

Lit

Power is supplied.

Off

No power.

Wireless

Green

Flash

The antenna is transmitting or

Activity

receiving data.

Off

The antenna is not transmitting 

or receiving data.

LAN

Link/Activity

Green

On

A valid link is established.

Flash

The access point is transmitting  

or receiving data.

Off

No link is established.

Содержание LW6004A

Страница 1: ...1000 Park Drive Lawrence PA 15055 1018 724 746 5500 Fax 724 746 0746 Copyright 2004 Black Box Corporation All rights reserved...

Страница 2: ...5500 FREE technical support 24 hours a day 7 days a week Call 724 746 5500 or fax 724 746 0746 Mailing address Black Box Corporation 1000 Park Drive Lawrence PA 15055 1018 Web site www blackbox com E...

Страница 3: ......

Страница 4: ...ference to radio or telephone reception which can be determined by turning the equipment off and on the user is encouraged to try to correct the interference by one of the following measures Reorient...

Страница 5: ...2 PURE NETWORKING 802 11G WIRELESS ACCESS POINT WITH SWITCH EUROPEAN UNION DECLARATION OF CONFORMITY This equipment complies with the requirements of the European EMC Directive 89 336 EEC...

Страница 6: ...ato el ctrico debe ser montado a la pared o al techo s lo como sea recomendado por el fabricante 8 Servicio El usuario no debe intentar dar servicio al equipo el ctrico m s all a lo descrito en las in...

Страница 7: ...e 15 En caso de existir una antena externa deber ser localizada lejos de las lineas de energia 16 El cable de corriente deber ser desconectado del cuando el equipo no sea usado por un largo periodo de...

Страница 8: ...d trademark of Linus Torvalds Microsoft Windows and Windows NT are either registered trademarks or trademarks of Microsoft Corporation in the United States and or other countries Any other trademarks...

Страница 9: ...Installation 12 4 Configuration Utility 13 4 1 Getting Started 13 4 2 Menu Options 17 4 2 1 Status and Information 17 4 2 2 Wireless Setting 20 4 2 3 Advanced Setting 29 4 2 4 Security 31 4 2 5 MAC A...

Страница 10: ...6 5 5 2 1 Mbps with auto fallback Ethernet 10 100 Mbps autosensing Standards IEEE 802 11b 802 11g IEEE 802 3 IEEE 802 3u Security 64 128 152 bit WEP Data Encryption Frequency Band 2 400 2 4835 GHz Ra...

Страница 11: ...wireless and wired users to get their IP address automatically These versatile features allow you to integrate your wireless and wired Ethernet LAN network seamlessly With the access point s ESSID au...

Страница 12: ...4 in Table 2 1 Figure 2 1 Front panel Table 2 1 Indicators LED Color Status Description Power Green Lit Power is supplied Off No power Wireless Green Flash The antenna is transmitting or Activity rec...

Страница 13: ...LED Color Status Description 10 100 Mbps Green On Network speed is 100 Mbps Off Network speed is 10 Mbps 2 3 2 BACK PANEL The access point s connection ports are located on the back panel see Figure...

Страница 14: ...access point press the reset button with a pencil tip for less than 4 seconds The access point will reboot itself keeping your original configurations 2 If problems persist you experience extreme prob...

Страница 15: ...tations 2 Connect the access point to your router hub or switch Attach one end of standard UTP cable to the access point s LAN port and connect the other end of the cable to a switch a router or a hub...

Страница 16: ...and select Settings then click on Control Panel The Control Panel window will appear 2 Double click on the Network icon The Network window will appear 3 Check the Network Components list If TCP IP is...

Страница 17: ...d 2b Windows 2000 1 Click on the Start button and select Settings then click on Control Panel The Control Panel window will appear 2 Double click on the Network and Dial up Connections icon In the Net...

Страница 18: ...l window select TCP IP Protocol and click on the OK button to start installing the TCP IP protocol You may need your Windows CD to complete the installation 5 After you install TCP IP go back to the N...

Страница 19: ...d then click on the OK button See Figure 4 1 5 You can start configuring the access point Figure 4 1 Enter Network Password screen From a wireless station 1 Make sure your wireless station is in the a...

Страница 20: ...e left hand side To get to this screen enter the user name and password in the Enter Network Password screen see Figure 4 1 then click on the OK button These menu options described in Sections 4 2 2 t...

Страница 21: ...D The ESSID up to 31 printable ASCII characters is the unique name identified in a WLAN The ID prevents the unintentional merging of two co located WLANs Make sure that all stations ESSIDs in the same...

Страница 22: ...the Apply button at the bottom of the screen not shown in Figure 4 2 since you must scroll down to see it to save the above configurations You can now configure other advanced sections or start using...

Страница 23: ...name in AP mode station ad hoc mode station infrastructure mode and AP bridge WDS mode ESSID The ESSID up to 31 printable ASCII characters is the unique name identified in a WLAN The ID prevents the...

Страница 24: ...ive wireless stations that are connecting to the access point Apply button Click on this button to save your changes Cancel button Click on this button to cancel your changes AP mode is used to allow...

Страница 25: ...AP Access Point station bridge or WDS Channel Number Select the appropriate channel from the list provided to correspond with your network settings Channels differ from country to country Channel 1 11...

Страница 26: ...Click on this button to cancel your changes If you want to bridge more than two wired Ethernet networks together you have to use enough access points with AP bridge point to multipoint mode An access...

Страница 27: ...n alias name in AP mode station ad hoc mode station infrastructure mode and AP bridge WDS mode ESSID The ESSID up to 31 printable ASCII characters is the unique name identified in a WLAN The ID preven...

Страница 28: ...point to multipoint mode and AP bridge WDS mode Associated Clients Click on the Show Active Clients button then an Active Wireless Client table will pop up You can see the status of all active wirele...

Страница 29: ...le The Active Wireless Client table see Figure 4 6 and Table 4 5 records the status of all active wireless stations that connect to the access point To get to this screen select the Show Active Client...

Страница 30: ...d packets that are received by this active wireless station TX Rate The transmission rate in Mbps Power Saving Shows if the wireless client is in power saving mode Expired Time The time in seconds bef...

Страница 31: ...another access point and connect to your wireless LAN through the associated access point The wireless site survey see Figure 4 7 searches for all available access points nearby To get to this screen...

Страница 32: ...ter Description Authentication Type There are two authentication types open system and shared key When you select open system wireless stations can associate with this access point without WEP encrypt...

Страница 33: ...traffic indication message It tells clients when the next interval is so it can listen for broadcasts Transmit Rate The data rate is the rate this access point uses to transmit data packets The access...

Страница 34: ...now configure other advanced sections or start using the access point 4 2 4 SECURITY This access point provides complete wireless LAN security functions With these functions you can protect your wirel...

Страница 35: ...ccess point supports a 64 128 152 bit WEP encryption function With this function your data will be transmitted over the wireless network securely Figure 4 10 WEP security selected Table 4 7 WEP securi...

Страница 36: ...ts listed below 64 bit WEP Type in 10 digit hex values in the A F a f and 0 9 range or 5 digit ASCII characters as the encryption keys For example 0123456aef 128 bit WEP Type in 26 digit hex values in...

Страница 37: ...encrypt the data during communication Figure 4 11 802 1x security selected Table 4 8 802 1x security options Parameter Description Use internal MD5 RADIUS Server This is a checkbox that you can selec...

Страница 38: ...ations You can now configure other advanced sections or start using the access point 802 1x WEP Static Key IEEE 802 1x is an authentication protocol Every user must use a valid account to login to the...

Страница 39: ...ys to encrypt your data Only the key you select in the default key will take effect Encryption Key 1 4 The WEP keys are used to encrypt data transmitted in the wireless network Fill in the text box ke...

Страница 40: ...ck on this button to save your changes Cancel button Click on this button to cancel your changes Click on the Apply button at the bottom of the screen to save the above configurations You can now conf...

Страница 41: ...checkbox to keep the encryption key the same Pre shared Select ASCII characters alphanumeric format or hexadecimal Key Format digits in the A F a f and 0 9 range to be the Pre shared Key For example...

Страница 42: ...he screen to save the configurations You can now configure other advanced sections or start using the access point WPA RADIUS Wi Fi Protected Access WPA is an advanced security standard You can use an...

Страница 43: ...keep the encryption key the same RADIUS Server IP The external RADIUS server s IP address Address RADIUS Server Port The external RADIUS server s service port RADIUS Server The external RADIUS server...

Страница 44: ...filtering options Parameter Description MAC Address This table records the wireless stations MAC addresses Filtering Table that you want to allow to access your network The comment field describes th...

Страница 45: ...AC address In the bottom new area type in the MAC address for the wireless station to be added Comment Type in the comment for the wireless station to be added Add button Click on this button to add t...

Страница 46: ...Description Current Password Enter the current password up to a 15 digit alphanumeric string of the access point The default password for the access point is 1234 New Password Enter the password up t...

Страница 47: ...n the Apply button at the bottom of the screen to save the above configurations You can now configure other advanced sections or start using the access point DHCP Server Setting A DHCP server will aut...

Страница 48: ...reached Click on the Apply button at the bottom of the screen to save the above configurations You can now configure other advanced sections or start using the access point 4 2 7 CONFIGURATION TOOL Th...

Страница 49: ...nt configuration to a file named config bin on your PC Click on Save to save the changes Restore Settings You can then use the Restore tool to upload and restore the saved configuration to the access...

Страница 50: ...s system firmware To upgrade your access point s firmware download the firmware file to your local hard disk and enter that file name and path in this field on this page Browse Use this button to find...

Страница 51: ...oint 4 2 9 RESET You can reset the access point s system if any problem exists The reset function essentially reboots your access point s system Figure 4 19 Reset selected If the system stops respondi...

Страница 52: ...mobile workers More than one BSS can be configured as an Extended Service Set ESS Users within an ESS can roam freely between BSSs while maintaining a continuous connection to the wireless network st...

Страница 53: ...ot attempt to alter or repair the unit It contains no user serviceable parts Contact Black Box at 724 746 5500 Before you do make a record of the history of the problem We will be able to provide more...

Отзывы: