25
CHAPTER 3: Installation
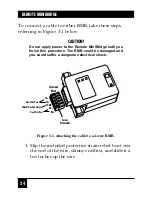
2. Strip off the last inch and a half or so of the cable’s
outer jacket, then strip the last quarter of an inch
or so of the component wires’ insulation.
3. Disconnect the RMB from any electrical power
source, including the LAN interface. Detach the
RMB’s 5-screw terminal block from the rest of the
RMB’s chassis.
4. Unwinding the wires as little as necessary, insert
the bare ends of one pair of the cable’s wires in
the terminal block’s TX– and TX+ (left-hand)
terminals and screw them down securely. Fasten
the other pair to the RX– and RX+ (right-hand)
terminals the same way. Make sure that TX– and
TX+ on each RMB are connected to RX– and
RX+ respectively on the other RMB.
If the cable is shielded, you can connect the
shield to the FGND (center) terminal
of one
RMB only
. (Do
not
attach the shield to the FGND
terminals of both RMBs—this could cause
potentially hazardous electrical “ground loops.”)
5. Verify that all wires are attached securely, then
carefully reattach the terminal block to the RMB.
6. Slide the strain-relief boot back to the end of the
cable and gently ease it over the terminal block.
Содержание LB0010A-A21-R2
Страница 14: ...13 CHAPTER 1 Specifications Weight Fiberoptic models 1 6 oz 50 g All other models 1 oz 30 g ...
Страница 36: ...NOTES ...
Страница 37: ...NOTES ...

