background image

5

How to Use

This appliance is intended for household use only.
GETTING STARTED

1.  After unpacking, before first use, remove all stickers, packing material, and literature.
Note: Please go to www.prodprotect.com/applica to register your warranty.
2.  Wash all parts as instructed in the Care and Cleaning section.
3.  Pour water up to 8-cup level mark in the water reservoir.
Brew it through as instructed in "BREWING," but do not add coffee grounds to the basket 

style paper filter. When done, turn off the coffeemaker and discard the water from  

the carafe.
BREWING

1.  Lift one-piece cover, fill water reservoir with water. Do not overfill. Do not exceed the 

8-cup maximum level.

2.  Place a basket style paper filter into the removable brew basket. Add ground coffee, 

(we recommend 1 to 2 tablespoons for every cup). Make sure basket style paper filter  

is secured in place. Close the lid. 

3.  Place the thermal carafe on the plate and plug in the unit.

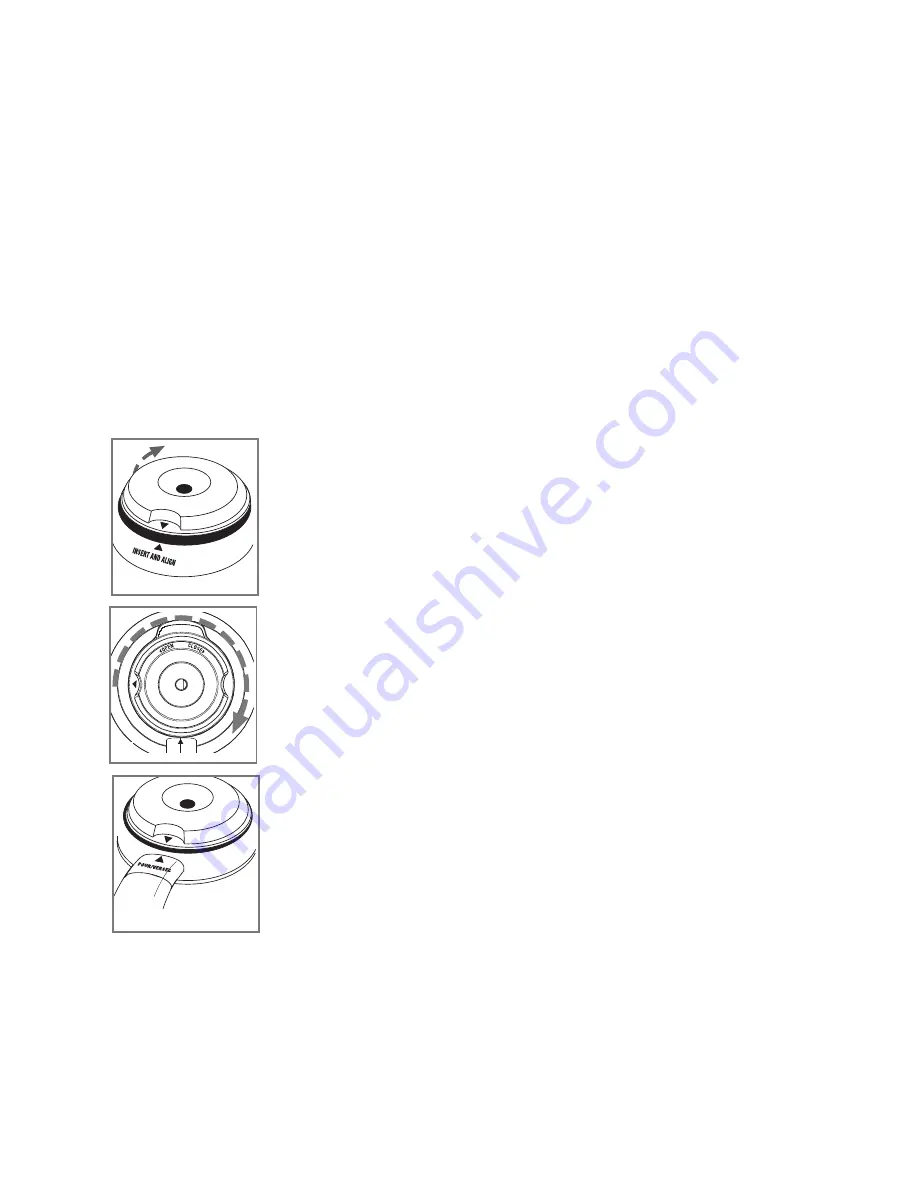
4.  Coffee is brewed directly through the thermal carafe brew-thru 

lid. To insert lid into thermal carafe align brew-thru lid arrow with 

thermal carafe pour arrow, “Insert and Align” insert and twist 

clockwise (B). 

5.  Turn the lid clockwise to the "Close" position for brewing (C). 

Coffee may overflow if the brew-thru lid is not properly in place. 

6.  Thermal carafe keeps coffee hot and may be left away from the 

coffeemaker for serving. To pour coffee, align arrow on the brew-

thru lid with “Pour” arrow on the handle and proceed to serve (D).

7.  Press "ON/OFF" and the indicator light will turn on. For delayed 

brewing, see "SETTING THE CLOCK/TIMER & AUTO-BREW." You 

do not have to set the clock if you want to brew coffee right away.

8.  Replace the carafe on the carafe plate when not serving. Thermal 

carafe will keep coffee hot.

9.  Press "ON/OFF" to turn off unit.
Sneak-A-Cup® Interrupt Feature

You can pour a cup of coffee while coffee is brewing before brewing cycle is complete. 

When finished pouring coffee, replace the carafe immediately under the brew basket.  

The brewing process continues.
Important: To avoid possible overflow after removing the carafe, be sure to replace the 

carafe under the brew basket immediately.

B

POUR/VERSEC

C

D

Содержание SmartBrew DCM2590

Страница 1: ... LAVE LA JARRA ANTES DEL PRIMER USO IMPORTANT LAVER LA CARAFE AVANT LA PREMIÈRE UTILISATION For online customer service and to register your product go to www prodprotect com applica Also view the details for our latest sweepstakes CustomerCare Line USA Canada 1 800 231 9786 Mexico 01 714 2500 Accessories Parts USA Canada Accesorios Partes EE UU Canadá Accessoires Pièces É U Canada 1 800 738 0245 ...

Страница 2: ... the appliance to the nearest authorized service facility for examination repair or adjustment Or call the appropriate toll free number on the cover of this manual The use of an accessory not evaluated for use with this appliance may cause injuries Do not use outdoors Do not let cord hang over the edge of table or counter touch with hot surfaces Do not place on or near a hot gas or electric burner...

Страница 3: ...ORD a A short power supply cord or detachable power supply cord is to be provided to reduce the risk resulting from becoming entangled in or tripping over a longer cord b Longer detachable power supply cords or extension cords are available and may be used if care is exercised in their use c If a long detachable power supply cord or extension cord is used 1 The marked electrical rating of the deta...

Страница 4: ...90 03 5 8 cup 44 oz 1301 ml thermal carafe Part DCM2590 02 6 Control panel 7 Brew thru lid Part DCM2590 05 8 Dual water level indicators on both sides Note indicates consumer replaceable removable parts 1 On Off button 2 On Off indicator light 3 PROGRAM button 4 Digital display 5 HOUR button 6 MINUTES button 7 AUTO ON indicator light 8 AUTO ON button CONTROL PANEL A ...

Страница 5: ...hermal carafe brew thru lid To insert lid into thermal carafe align brew thru lid arrow with thermal carafe pour arrow Insert and Align insert and twist clockwise B 5 Turn the lid clockwise to the Close position for brewing C Coffee may overflow if the brew thru lid is not properly in place 6 Thermal carafe keeps coffee hot and may be left away from the coffeemaker for serving To pour coffee align...

Страница 6: ...o make coffee 4 To check your pre set auto time press PROGRAM and it will display When the clock returns to the current time of day press AUTO ON to reactivate the timer To automatically brew coffee again at the same pre set AUTO ON time prepare coffeemaker for brewing again and press the AUTO ON button Note The Auto Brew function can be canceled at any time by pressing the AUTO ON button a second...

Страница 7: ...age and water hardness During cleaning more steaming occurs than when brewing coffee and may emit spurts of steam 1 Pour white vinegar into water reservoir up to 4 cup line on water level indicator Add water up to 8 cup line 2 Put a basket style paper filter in the removable brew basket and close the one piece cover Set empty thermal carafe with the tightened brew thru lid in the coffeemaker caraf...

Страница 8: ...et service Save your receipt as proof of date of sale Visit the online service website at www prodprotect com applica or call toll free 1 800 231 9786 for general warranty service If you need parts or accessories please call 1 800 738 0245 What does your warranty not cover Damage from commercial use Damage from misuse abuse or neglect Products that have been modified in any way Products used or se...

Страница 9: ...NG RISK OF FIRE OR ELECTRIC SHOCK DO NOT OPEN The lightning symbol refers to dangerous voltage the exclamation symbol refers to maintenance instructions See below WARNING To reduce the risk of fire or electric shock do not remove the cover of the coffeemaker There are no user serviceable parts inside Repair should be done by authorized service personnel only ...

Страница 10: ...ufe averiado que presente un problema de funcionamiento o que esté dañado Devuelva el aparato al centro de servicio autorizado más cercano para que lo examinen reparen o ajusten Si el producto llegase a fallar dentro del período de la garantía llame gratis al número apropiado que aparece en la cubierta de este manual para obtener información relacionada al servicio de mantenimiento del aparato El ...

Страница 11: ... remover la cubierta exterior Este producto no contiene piezas reparables por el consumidor Toda reparación se debe llevar a cabo únicamente por personal de servicio autorizado CABLE ELÉCTRICO a El producto se debe de proporcionar con un cable eléctrico corto o uno separable a fin de reducir el riesgo de tropezar o de enredarse en un cable más largo b Existen cables eléctricos más largos y separab...

Страница 12: ... Nº DCM5290 02 6 Panel de control 7 Tapa de colado Pieza Nº DCM2590 05 8 Indicador del nivel de llenado Reemplazable removible por el consumidor 1 Botón de encendido y apagado ON OFF 2 Luz indicadora de encendido y apagado 3 Botón de programación PROG 4 Pantalla digital 5 Botón de hora HOUR 6 Botón de minutos MINUTES 7 Botón de encendido automatico AUTO ON 8 Luz indicadora de encendido automatico ...

Страница 13: ...olado directamente a través de la tapa de colado Para insertar la tapa en la jarra térmica alinee la flecha de la tapa de colar con la flecha de verter de la jarra térmica inserte y gire Insert and Align B 5 Para colar el café gire la tapa hacia la derecha en la dirección de cierre Close Asegúrese que las flechas coincidan C El café podría rebalsar si la tapa de colar no está bien colocada 6 La ja...

Страница 14: ...CIÓN DEL CAFÉ pero no encienda el aparato hasta que quiera colar café 4 Para verificar la hora anteriormente programada oprima PROGRAM y ésta aparecerá en la pantalla Cuando el reloj indique nuevamente la hora actual del día oprima AUTO ON para reactivar el cronómetro Para colar café automáticamente de nuevo a la misma hora programada anteriormente prepare de nuevo la cafetera para colar y oprima ...

Страница 15: ...Agregue agua hasta alcanzar la marca para 8 tazas 2 Coloque un filtro en el cesto de colar y cierre la tapa 3 Encienda la cafetera y permita que se cuele la mitad de la solución limpiadora dentro de la jarra hasta que el agua alcance aproximadamente el quinto nivel Apague la cafetera y espere 15 minutos para que se ablanden los depósitos 4 Encienda la cafetera y permita que se cuele el resto de la...

Страница 16: ...cio de su país y haga efectiva su garantía si cumple lo indicado en el manual de instrucciones Cómo se puede obtener servicio Conserve el recibo original de compra Por favor llame al número del centro de servicio autorizado Qué aspectos no cubre esta garantía Los productos que han sido utilizados en condiciones distintas a las normales Los daños ocasionados por el mal uso el abuso o negligencia Lo...

Страница 17: ...rtes componentes consumibles y accesorios Procedimiento para hacer válida la garantía Acuda al Centro de Servicio Autorizado con el producto con la póliza de Garantía sellada o el comprobante de compra original ahí se reemplazará cualquier pieza o componente defectuoso sin cargo alguno para el usuario final Esta Garantía incluye los gastos de transportación que se deriven de su cumplimiento Excepc...

Страница 18: ...e portezuelo 500 metros al sur Managua Nicaragua Tel 505 248 7001 Perú Servicio Central Fast Service Av Angamos Este 2431 San Borja Lima Perú Tel 511 2251 388 Panamá Servicios Técnicos CAPRI Tumbamuerto Boulevard El Dorado Panamá 500 metros al sur Tel 3020 480 800 sin costo 507 2360 236 159 Puerto Rico Buckeye Service Jesús P Piñero 1013 Puerto Nuevo SJ PR 00920 Tel 787 782 6175 Republica Dominica...

Страница 19: ...54940 México Tel 55 5831 7070 Del interior marque sin costo 01 800 714 2503 Sello del Distribuidor Fecha de compra Modelo Comercializado por Rayovac de México SA de C V KM 14 5 Carretera Puente de Vigas Col Lechería Tultitlán Estado de México C P 54940 México Tel 55 5831 7070 Servicio y Reparación Art 123 No 95 Col Centro C P 06050 Deleg Cuauhtemoc Servicio al Consumidor Venta de Refacciones y Acc...

Страница 20: ...l dont la fiche ou le cordon est abîmé qui présente un problème de fonctionnement ou qui est endommagé Confier l examen la réparation ou le réglage de l appareil au centre de service autorisé de la région Ou composer le numéro sans frais approprié indiqué sur la page couverture du présent guide L utilisation d accessoires non évalués avec l appareil présente des risques de blessures Ne pas utilise...

Страница 21: ...r de retirer le couvercle extérieur L utilisateur ne peut pas remplacer les pièces de l appareil En confier la réparation seulement au personnel des centres de service autorisés CORDON a Le cordon d alimentation de l appareil est court ou amovible afin de minimiser les risques d enchevêtrement ou de trébuchement b Il existe des cordons d alimentation amovibles ou de rallonge plus longs et il faut ...

Страница 22: ... ON PANNEAU DE COMMANDE 1 Couvercle monobloc pièce n DCM2590 01 2 Diffuseur d eau 3 Réservoir de niveau d eau avec marques pour le nombre de tasses de chaque côté 4 Panier amovible à l intérieur pièce n DCM2590 03 5 Thermoverseuse de 8 tasses 1 301 ml 44 oz avec couvercle pièce n DCM2590 02 6 Panneau de commande 7 Couvercle à infusion directe pieza NºDCM2590 05 8 Fenêtre de niveau d eau Remarque i...

Страница 23: ...e couvercle sur la thermoverseuse aligner la flèche du couvercle sur la flèche de la thermoverseuse Insert and Align B insérer le couvercle et le serrer 5 Tourner le couvercle à la position fermée droit Close pour l infusion Le café risque de déborder lorsque le couvercle n est pas bien en place Se déplacer dans la direction dans le sens des aiguilles d une montre C La thermoverseuse conserve la c...

Страница 24: ...ubrique INFUSION DU CAFÉ mais ne pas mettre l appareil en marche jusqu à ce que vous êtes prêt à faire le café 4 Pour vérifier l heure d infusion automatique enfoncer la touche PROGRAM et l heure d infusion est affichée Lorsque l horloge affiche de nouveau l heure juste enforcer la touche AUTO ON pour remettre la minuterie en marche Pour régler de nouveau l appareil à la même heure d infusion auto...

Страница 25: ...ation de l appareil et de la dureté de l eau Le nettoyage peut dégager plus de vapeur que le cycle d infusion normal et il peut y avoir émission de vapeur 1 Remplir le réservoir de vinaigre blanc jusqu à la marque de 4 tasses de l indicateur de niveau d eau puis ajouter de l eau jusqu à la marque de 8 tasses 2 Placer un filtre en papier de type panier amovible et refermer le couvercle monobloc Dép...

Страница 26: ...mme preuve de la date d achat Visiter notre site web au www prodprotect com applica ou composer sans frais le 1 800 231 9786 pour obtenir des renseignements généraux relatifs à la garantie On peut également communiquer avec le service des pièces et des accessoires au 1 800 738 0245 Qu est ce que la garantie ne couvre pas Des dommages dus à une utilisation commerciale Des dommages causés par une ma...

Страница 27: ... ÉLECTRIQUES NE PAS OUVRIR L éclair représente une tension dangereuse Le point d exclamation indique qu il s agit d importantes consignes d entretien Voir plus bas AVERTISSEMENT Afin d éviter les risques d incendie ou de secousses électriques ne pas retirer le couvercle de la cafetière L utilisateur ne peut réparer aucune des pièces internes En confier les réparations uniquement au personnel d un ...

Страница 28: ...2013 5 9 55 E S F Copyright 2013Applica Consumer Products Inc ...

Отзывы: