background image

8

PROGRAMMING YOUR 
MILL & BREW

™ 

COFFEE MAKER 

1. 

After the digital clock is set, press the PROG button.  The timer icon (     ) will  


begin to flash and display will read 12:00.

2.  Press the HR button and then MIN button to select the time you would  
 

like automatic brewing to begin (for example: 7:30 AM). Make sure the PM light  


is not on, if needed. 

3.  The timer display will flash several times then switch back to the current time of day. 

4.  Press and release the AUTO button to activate the delay start time that was just  
 

programmed. The timer icon (     ) will remain solid, indicating Auto Brew is activated.

5.  When the time of day matches the programmed Auto Brew set time, your  
 

coffeemaker will activate the brew cycle.

6.  To cancel the Auto Brew function, press the AUTO button until the timer 
 

icon (     ) disappears. 

Note: 

To check the preset Auto Brew time, press PROG button and the preset 

Auto Brew time is displayed. Press AUTO button to reactivate the timer. 

Setting the Adjustable Auto-off, Keep Warm Time

This feature allows you to select automatic shutoff times from 0-2 hours in 
30 minute increments. The “Keep Hot” carafe plate will be activated until the 
automatic shutoff time is reached. 

1. 

Press and hold PROG button for 3 seconds. This will show the default (120  


minutes) keep warm time setting.

2.  Press the MIN button to toggle through the keep warm settings (00,  
 

30, 60, 90, 120). The values correlate to length of time (in minutes) the keep  


warm will remain on after brewing.  

3.  Press the PROG button to lock in the keep warm setting.

Note:

 To check the time Auto Brew is set for without making changes, press 

the PROG button to display the Auto Brew time, then press the AUTO button.”

Setting the Brew Strength Selector

The Brew Strength Selector customizes the flavor of your coffee by selecting 
from three brew strength settings.  

1. 

Press the STRONG button to cycle through the different Brew Strength settings  


(3 levels). 

       a.  No bars = regular (default setting)

       b.  1 bar (    ) = strong

       c.  2 bars (    ) = bold

Содержание MILL & BREW

Страница 1: ...MILL BREW 12 CUP PROGRAMMABLE COFFEE MAKER Cafetière programmable de 12 tasses use care manual guide d utilisation et d entretien CM5000BCKT ...

Страница 2: ...oduct Benefits Getting to know your Control Panel Before Brewing Programming your Mill Brew Coffee Maker 4 Elements to Brew the Perfect Cup Tips for a Perfect Cup of Coffee Brewing Coffee Care and Cleaning Troubleshooting Warranty and Customer Service Information 2 3 4 5 6 7 7 8 9 10 11 12 13 14 15 16 ...

Страница 3: ... instruction concerning use of the appliance by a person responsible for their safety Children should be supervised to ensure that they do not play with the appliance POLARIZED PLUG 120V models only This appliance has a polarized plug one blade is wider than the other To reduce the risk of electric shock this plug is intended to fit into a polarized outlet only one way If the plug does not fit ful...

Страница 4: ... 1 Control panel 2 Lift latch 3 Lid 4 Water reservoir cover 5 Easy viewing water window 6 Duralife glass carafe Part CM5000 01 7 Keep hot carafe plate 8 Coffee scoop Part CM5000 02 1 2 3 8 4 5 6 7 Product may vary slightly from what is illustrated ...

Страница 5: ...LL BREW COFFEE MAKER 1 2 in 1 grinder and permanent filter basket Part CM5000 03 2 Washable brew basket Part CM5000 04 3 Lift latch 4 Grinder lid 5 Removable showerhead press highlighted tabs to remove Part CM5000 05 2 1 3 4 5 ...

Страница 6: ...f This feature allows you to select automatic shutoff times from 0 2 hours in 30 minute increments The Keep Hot carafe plate will be activated until the automatic shutoff time is reached Brew Strength Selector Customize the flavor of your coffee by selecting from three brew strength settings regular strong or bold Sneak A Cup Can t wait for the full pot of coffee to finish brewing Sneak A Cup of c...

Страница 7: ...ttings when in that program mode to adjust Keep Warm time Grind Cycles through optimal grind settings 4 6 8 10 12 correlating with the number of cups to be brewed Also turns the grinder OFF for brewing pre ground coffee Strong Use to select the Brew Strength setting 3 levels No bars regular default setting 1 bar strong 2 bars bold Indicates the delay start timer is set Brew strength settings Optim...

Страница 8: ...nished discard water and rinse out the 2 in 1 Grinder and Permanent Filter Basket f Turn off appliance unplug and allow to cool down for 15 minutes before repeating Setting the Digital Clock 1 Plug the coffeemaker into a standard electrical outlet 2 The digital clock display flashes 12 00 3 To set the time press the HR button until the correct hour appears on the display The PM symbol will appear ...

Страница 9: ...is displayed Press AUTO button to reactivate the timer Setting the Adjustable Auto off Keep Warm Time This feature allows you to select automatic shutoff times from 0 2 hours in 30 minute increments The Keep Hot carafe plate will be activated until the automatic shutoff time is reached 1 Press and hold PROG button for 3 seconds This will show the default 120 minutes keep warm time setting 2 Press ...

Страница 10: ...Grind setting to select the optimal grind correlating with the number of cups to be brewed and ensuring proper grind size for this type of coffee maker A truly fresh cup of coffee only comes from freshly ground coffee beans In fact once a coffee bean is broken or ground its flavour will begin to degrade over time Your Mill Brew coffee maker maximizes the freshness of your coffee by grinding the co...

Страница 11: ...acks the minerals necessary to bind to elements of the coffee bean A clean coffee maker is always important Regular cleaning is required for the best tasting coffee Always store your coffee in a cool dry place Once coffee has been opened keep it tightly sealed in an airtight container Do not refrigerate or freeze your daily supply of coffee as contact with moisture will cause the coffee to deterio...

Страница 12: ...er and Permanent Filter 4 Secure the integrated grinder lid back into place Push the lid cover down until it snaps into place or until you hear a click The coffee maker will not operate without the lid being closed all grinder assembly parts in place and the removable showerhead in place 5 Make sure the coffee maker is plugged into a standard electrical outlet 6 a If using whole beans push the GRI...

Страница 13: ... 8 Press the ON OFF Power Button just once to begin the brew cycle If using whole beans the brew cycle will automatically start after grinding 9 The Sneak A Cup feature allows you to pour a cup of coffee before the brewing cycle is complete The carafe must be placed back into the coffeemaker within 20 seconds to prevent overflow Replacing the carafe will restart the brewing process 10 Once the cof...

Страница 14: ... by hand in warm soapy water 5 Wash the glass carafe and Washable Brew Basket either by hand in warm soapy water or in the dishwasher top rack only 6 To clean the inside of the cover and inside of the grinder assembly open the cover leave in the open position and wipe with a damp cloth Note Do not use abrasive cleansers or scouring pads and never immerse the coffee maker housing or power cord in w...

Страница 15: ...grinder OFF 4 Push the ON OFF Power Button and let half the cleaning mixture brew into the carafe until level is around 5 cup mark Turn OFF coffee maker and let it soak for at least 15 minutes 5 Turn ON coffee maker again and brew remaining cleaning mixture into carafe 6 Turn OFF coffee maker and empty the carafe 7 Fill the water reservoir with cold water to the 11 cup line replace carafe on the c...

Страница 16: ...nate brew basket overflows The coffee has been ground too finely Adjust the grind setting cup selection to a lower cup setting The brew basket Sneak A Cup mushroom may be clogged with coffee grounds Free the brew basket of coffee grounds by pushing the mushroom shaped Sneak A Cup part up and down during rinsing Coffee sediment in brewed cup of coffee Coffee grounds are small enough to pass through...

Страница 17: ...new or factory refurbished How do you get service Save your receipt as proof of date of sale Visit the online service website at www prodprotect com applica or call toll free 1 800 231 9786 for general warranty service If you need parts or accessories please call 1 800 738 0245 What does your warranty not cover Damage from commercial use Damage from misuse abuse or neglect Products that have been ...

Страница 18: ... Familiarisation avec le panneau de commande Avant l infusion Programmation de la cafetière Mill Brew 4 facteurs d infusion optimale Conseils pour obtenir la tasse de café idéale Infusion Du Café Entretien et nettoyage Dépannage Renseignements de garantie et service à la clientèle 18 19 20 21 22 23 24 24 25 26 27 28 29 30 31 32 33 ...

Страница 19: ...dans un four chaud Pour débrancher l appareil d abord mettre le bouton de commande en position d arrêt OFF puis retirer la fiche de la prise de courant murale N utiliser cet appareil que pour les fonctions auxquelles il est destiné Garder le couvercle sur la carafe pendant l utilisation Le retrait du couvercle intégré pendant le cycle d infusion peut causer des brûlures et ou blessures Vérifier si...

Страница 20: ...el des centres de service autorisés CORDON 1 Le cordon d alimentation de l appareil est court afin de minimiser les risques d enchevêtrement ou de trébuchement 2 Il existe des cordons d alimentation amovibles ou de rallonge plus longs et il faut s en servir avec prudence 3 Lorsqu on utilise un cordon d alimentation amovible ou de rallonge plus long il faut s assurer que a la tension nominale du co...

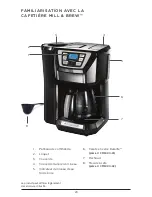
Страница 21: ...ande 2 Loquet 3 Couvercle 4 Couvercle du réservoir à eau 5 Indicateur du niveau d eau facile à lire 6 Carafe en verre Duralife pièce n CM5000 01 7 Réchaud 8 Mesure à café pièce n CM5000 02 1 2 3 8 4 5 6 7 Le produit peut différer légèrement de celui qui est illustré ...

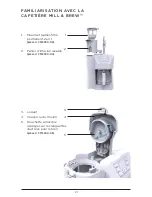
Страница 22: ...en 1 pièce n CM5000 03 2 Panier d infusion lavable pièce n CM5000 04 3 Loquet 4 Couvercle du moulin 5 Douchette amovible appuyer sur les languettes illustrées pour retirer pièce n CM5000 05 2 1 3 4 5 FAMILIARISATION AVEC LA CAFETIÈRE MILL BREW ...

Страница 23: ...e réglable Cette caractéristique permet de sélectionner des délais d arrêt automatique 0 à 2 heures par tranches de 30 minutes Sélecteur du degré d infusion Pour personnaliser la saveur du café en sélectionnant un des trois degrés d infusion suivants moyen fort corsé Fonction Sneak A Cup Vous ne voulez pas attendre que le cycle d infusion soit entièrement terminé Vous pouvez vous servir une tasse ...

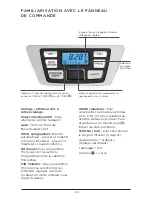
Страница 24: ...loge ou sélectionner les différents réglages du mode réchaud en mode réchaud pour régler la durée GRIND mouture Pour sélectionner la mouture optimale 4 6 8 10 12 correspondant au nombre de tasses à infuser Pour éteindre aussi le moulin pour infuser du café prémoulu STRONG fort Pour sélectionner le degré d infusion 3 degrés Aucune barre ordinaire réglage par défaut 1 barre fort 2 barres corsé Indiq...

Страница 25: ...nent 2 en 1 f Éteindre l appareil le débrancher et le laisser refroidir pendant 15 minutes avant de recommencer Réglage de l horloge numérique 1 Brancher le cordon de la cafetière dans une prise électrique standard 2 L affichage de l horloge numérique clignote et indique 12 00 3 Pour régler l heure appuyer sur le bouton HR jusqu à ce que l heure exacte soit affichée Le symbole PM apparaît dans le ...

Страница 26: ...outon AUTO pour réactiver la minuterie Réglage de la fonction d arrêt automatique mode réchaude Cette caractéristique permet de sélectionner des délais d arrêt automatique 0 à 2 heures par tranches de 30 minutes Le mode réchaud sera activé jusqu à ce que le délai d arrêt automatique soit écoulé 1 Presser et maintenir enfoncé le bouton PROG pendant 3 secondes L afficheur indique la durée du mode ré...

Страница 27: ...male correspondant au nombre de tasses à infuser et d assurer que la taille des particules de café est appropriée à la cafetière Une tasse de café réellement fraîche n est produite que par des grains de café fraîchement moulus En fait une fois qu un grain de café est rompu ou moulu sa saveur commence aussitôt à se dégrader La cafetière Mill Brew maximise la fraîcheur du café car la mouture des gra...

Страница 28: ...t dépourvue des minéraux nécessaires à la fusion des éléments du café Une cafetière propre est toujours importante Un nettoyage régulier est requis pour assurer le bon goût du café Conserver toujours le café dans un endroit frais et sec Une fois que l emballage du café a été ouvert conservez le dans un contenant bien fermé et hermétique Ne pas réfrigérer ou congeler la portion quotidienne de café ...

Страница 29: ...n 1 4 Refermer le couvercle du moulin intégré Appuyer sur le couvercle jusqu à ce qu il ferme bien ou jusqu au déclic La cafetière ne fonctionnera pas si le couvercle n est pas fermé si les pièces du moulin ne sont pas en place et si la douchette amovible n est pas installée 5 S assurer que la cafetière est branchée dans une prise de courant standard 6 a Dans le cas de grains entiers appuyer sur l...

Страница 30: ...ton marche arrêt pour lancer le cycle d infusion Dans le cas de grains entiers le cycle d infusion commence immédiatement après la mouture 9 La fonction Sneak A Cup vous permet de vous servir une tasse de café avant la fin du cycle d infusion La carafe doit être replacée dans la cafetière dans les 20 secondes suivantes pour éviter les débordements En remettant la carafe en place le cycle d infusio...

Страница 31: ...se 5 Laver la carafe en verre et le panier d infusion lavable à la main à l eau tiède savonneuse ou au lave vaisselle panier supérieur seulement 6 Pour nettoyer l intérieur du couvercle et l intérieur du moulin ouvrir le couvercle le laisser en position ouverte et essuyer à l aide d un linge humide Remarque Ne pas utiliser de nettoyants abrasifs ou de tampons à récurer et ne jamais immerger le boî...

Страница 32: ...u symbole indiquant d éteindre la cafetière 4 Appuyer sur le bouton marche arrêt et laisser le mélange nettoyant infuser dans la carafe jusqu à ce que le niveau atteigne à peu près 5 tasses Éteindre la cafetière et laisser tremper pendant 15 minutes au moins 5 Allumer la cafetière et faire infuser le reste du mélange nettoyant dans la carafe 6 Éteindre la cafetière et vider la carafe 7 Remplir le ...

Страница 33: ...a mouture et choisir un nombre de tasses inférieur Il est possible que le champignon du panier d infusion Sneak A Cup soit obstrué de marc de café Pour retirer le marc de café du panier d infusion appuyer sur la partie en forme de champignon du panier Sneak A Cup en le relevant et en l abaissant pendant le rinçage Résidus de grains de café dans la tasse infusée Le marc de café est suffisamment fin...

Страница 34: ... du service Conserver son reçu de caisse comme preuve de la date d achat Visiter notre site web au www prodprotect com applica ou composer sans frais le 1 800 231 9786 pour obtenir des renseignements généraux relatifs à la garantie On peut également communiquer avec le service des pièces et des accessoires au 1 800 738 0245 Qu est ce que la garantie ne couvre pas Des dommages dus à une utilisation...

Страница 35: ...en République populaire de Chine T22 5001058 BLACK DECKER and the BLACK DECKER Logo are registered trademarks of The Black Decker Corporation or one of its affiliates and used under license Le nom et le logo BLACK DECKER sont des marques déposées de The Black Decker Corporation ou une de ses sociétés affiliées et sont utilisés sous licence ...

Отзывы: