background image

1

GL650
GL660

GL660P

GL670

GL670P

Содержание GL650

Страница 1: ...1 GL650 GL660 GL660P GL670 GL670P ...

Страница 2: ...2 English 8 Deutsch 16 Français 24 Italiano 32 Nederlands 40 Español 48 Português 56 EÏÏËÓÈÎ 64 Copyright Black Decker ...

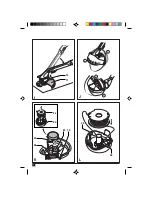
Страница 3: ...3 A 8 9 10 11 3 2 6 5 7 12 15 14 13 8 4 1 8 9 10 11 5 7 12 14 15 13 8 2 3 1 4 ...

Страница 4: ...4 C B D 16 11 20 17 18 20 19 19 ...

Страница 5: ...5 F E H G 7 6 5 7 ...

Страница 6: ...6 J I K 10 11 D A C B 24 22 12 23 26 21 L 25 25 ...

Страница 7: ...7 N M 27 27 27 27 28 O P ...

Страница 8: ...trimmer GL650 GL660 GL660P GL670 GL670P has been designed for trimming and finishing lawn edges and to cut grass in confined spaces This tool is intended for consumer use only SAFETY INSTRUCTIONS Warning symbols The following symbols are used in this manual Denotes risk of personal injury loss of life or damage to the tool in case of non observance of the instructions in this manual Denotes risk o...

Страница 9: ...e stopped rotating before leaving the appliance unattended and before changing cleaning or inspecting any parts of the appliance When not in use the appliance should be stored in a dry place Children should not have access to stored appliances Inspection and repairs Before use check the appliance for damaged or defective parts Check for misalignment and seizure of moving parts breakage of parts da...

Страница 10: ...iance has been designed for one voltage only Always check that the power supply corresponds to the voltage on the rating plate This appliance is designed for use on AC mains power supplies only Do not attempt to use on any other supply This appliance is double insulated in accordance with EN 60335 therefore no earth wire is required Prevent body contact with earthed or grounded surfaces e g metal ...

Страница 11: ...g B Unplug the tool Remove the screw 16 from the housing Place the guard 11 onto the tool as shown Firmly press the guard until it snaps into place Secure the guard with the screw 16 Never use the tool unless the guard is properly fitted Releasing the cutting line fig A In transit the cutting line is taped to the spool housing Remove the tape holding the cutting line 15 to the spool housing 14 Fit...

Страница 12: ... Move the switch handle up or down to the desired height Tighten the locking ring by turning it clockwise GL670 GL670P Adjusting the trimmer head angle fig I The adjustable trimmer head angle allows you to set the optimum trimming angle regardless of your length It also allows you to trim under benches and shrubs Let the guard 11 rest on the ground Keeping the pedal 10 depressed with your foot mov...

Страница 13: ...pprox 9 cm from the spool cover Align the tabs 21 on the spool cover with the holes 26 in the housing fig K Push the cover onto the housing until it snaps securely into place If the cutting lines protrude beyond the trimming blade 12 cut them off so that they just reach the blade Winding new line onto an empty spool fig M N P You may wind new cutting line onto an empty spool Replacement packs of c...

Страница 14: ...uth Africa Australia and New Zealand Proof of purchase will be required Should your Black Decker product become defective within the guarantee period due to faulty materials or workmanship we guarantee to either replace all defective parts or at our discretion to replace the unit free of charge provided that The product is returned to us or one of our authorised repair agents with proof of purchas...

Страница 15: ...orised repair agents OTHER OUTDOOR TOOLS Black Decker has a full range of outdoor power tools that make life in the garden easy If you would like further information on the following products please contact our Service and Information Centre see the address page towards the end of this manual or your local Black Decker retailer String trimmers Chainsaws Cordless shear Hedgetrimmers Lawnmowers Lawn...

Страница 16: ... Director of Engineering Spennymoor County Durham DL16 6JG United Kingdom BESTIMMUNGSGEMÄSSE VERWENDUNG Ihr Black Decker Rasentrimmer GL650 GL660 GL660P GL670 GL670P wurde zum Trimmen von Rasen zum Beschneiden von Rasenkanten sowie zum Schneiden von Gras an schwer zugänglichen Stellen entwickelt Dieses Gerät ist nicht für den gewerblichen Einsatz vorgesehen SICHERHEITSHINWEISE Warnsymbole Folgende...

Страница 17: ...Netzstecker gezogen haben Sicherheit anderer Personen Untersagen Sie Kindern sowie Personen die sich mit dem Inhalt dieser Anleitung nicht auskennen die Verwendung dieses Geräts Halten Sie Kinder Besucher und Tiere dem Arbeitsbereich fern und sorgen Sie dafür daß Sie das Gerät und das Netzkabel nicht berühren Denken Sie daran daß der Benutzer für Unfälle und Schäden haftet Nach dem Gebrauch Schalt...

Страница 18: ... Arbeiten Sie nicht auf steilen Hängen Achten Sie auf einen sicheren Stand Beachten Sie daß frisch geschnittenes Gras feucht und schlüpfrig ist Gehen Sie beim Trimmen entlang Rasenkanten sowie in der Nähe von Kiespfaden und wegen vorsichtig vor da Steine und Erde durch den Schneidfaden weggeschleudert werden können Legen Sie das Gerät nicht ab bevor der Schneidfaden zum Stillstand gekommen ist Ver...

Страница 19: ...tfernen Sie die Schraube 16 aus dem Gehäuse Bringen Sie die Schutzhaube 11 gemäß der Abbildung auf dem Gerät an Drücken Sie die Schutzhaube auf das Gerät bis sie einrastet Befestigen Sie die Schutzhaube mit Hilfe der Schraube 16 Verwenden Sie das Gerät nur wenn die Schutzhaube ordnungsgemäß montiert ist Lösen des Schneidfadens Abb A Ab Werk ist der Schneidfaden mit Klebeband am Spulengehäuse befes...

Страница 20: ...ltung arbeiten können Setzen Sie das Gerät mit der Schutzhaube 11 auf den Boden Während Sie den Feststellknopf 6 gedrückt halten bewegen Sie den Handgriff 5 in die gewünschte Position Lassen Sie den Feststellknopf los GL660 GL660P GL670 GL670P Verstellen der Gerätehöhe Abb A H Dieses Gerät hat einen Teleskopschaft so daß Sie es auf eine komfortable Höhe einstellen können Setzen Sie das Gerät mit d...

Страница 21: ...Sie regelmäßig die Lüftungsschlitze im Gerät mit Hilfe einer weichen Bürste oder eines trockenen Tuches Reinigen Sie regelmäßig den Schneidfaden und die Fadenspule mit Hilfe einer weichen Bürste oder eines trockenen Tuches Verwenden Sie regelmäßig einen stumpfen Schaber um Gras und Schmutzreste von der Unterseite der Schutzhaube zu entfernen Anbringen einer neuen Fadenspule Abb K L Neue Spulen mit...

Страница 22: ...törung damit nicht behoben wird wenden Sie sich bitte an den Black Decker Kundendienst Bevor Sie die folgenden Schritte vornehmen ziehen Sie den Netzstecker Das Gerät läuft langsam Überprüfen Sie ob sich das Spulengehäuse frei drehen kann Bei Bedarf reinigen Sie es sorgfältig Überprüfen Sie ob die Länge des aus dem Spulengehäuse hervorstehenden Schneidfadens größer als 9 cm ist Ist dies der Fall d...

Страница 23: ...i normalem Gebrauch abnutzen Defekte die auf unsachgemäße Behandlung zurückzuführen sind Defekte die auf Nichteinhaltung der Vorschriften und Hinweise in dieser Anleitung zurückzuführen sind Es sind nur Black Decker Zubehör und Ersatzteile zu verwenden die von Black Decker ausdrücklich als zum Betrieb mit dem betreffenden Gerät geeignet bezeichnet werden Andernfalls können Leistungseinbußen eintre...

Страница 24: ...oke Directeur du Développement Spennymoor County Durham DL16 6JG Royaume Uni UTILISATION PREVUE Votre coupe bordures Black Decker GL650 GL660 GL660P GL670 GL670P a été conçu pour tailler et arranger les bordures de pelouse ainsi que pour couper l herbe dans des espaces réduits Cet outil a été conçu pour une utilisation exclusivement domestique INSTRUCTIONS DE SECURITE Symboles de prévention Les sy...

Страница 25: ... ou le câble d alimentation Souvenez vous que l utilisateur peut être tenu responsable de tout accident ou dommage subi par des tiers ou par des biens appartenant à des tiers Après utilisation Eteignez l outil débranchez le et assurez vous que les pièces rotatives ont cessé de tourner avant d abandonner l outil ou avant de changer de nettoyer ou d inspecter une partie de l outil Rangez l outil dan...

Страница 26: ...er N utilisez jamais de fil de coupe en métal ou de fil de pêche F R A N Ç A I S Prenez garde à ne pas vous blesser avec la lame de coupe du fil Ne touchez pas la lame Après avoir tiré sur le fil de coupe remettez toujours l outil en position normale avant de l allumer Veillez à ne pas laisser le câble à proximité du fil de coupe Surveillez toujours la position du câble SECURITE ELECTRIQUE L outil...

Страница 27: ...e 15 à la protection de la bobine 14 Mise en place du protecteur de plante fig C Le protecteur de plante fait partie des accessoires standard fournis avec le GL660P GL670P Pour d autres modèles il est disponible en option Placez le protecteur de plante 17 sur le carter protecteur comme indiqué Vérifiez qu il soit orienté dans le bon sens Placez les deux capuchons en plastique 18 sur le protecteur ...

Страница 28: ...r 11 au sol Faites tourner la bague 7 dans le sens inverse des aiguilles d une montre Levez ou baissez la poignée à la hauteur voulue Serrez la bague en la faisant tourner dans le sens des aiguilles d une montre F R A N Ç A I S GL670 GL670P Réglage de l angle de la tête du coupe bordures fig I En réglant l angle de la tête du coupe bordures vous avez la possibilité de choisir l angle de coupe parf...

Страница 29: ... 24 du couvercle de la bobine Enlevez toute trace de saleté ou d herbe du couvercle de la bobine et du boîtier Prenez la bobine neuve et enfoncez la sur le bossage du couvercle de la bobine Faites lentement tourner la bobine jusqu à ce qu elle soit bien en place Saisissez l une des extrémités des fils de coupe et faites glisser le fil dans l un des œillets 25 fig L Tirez environ 9 cm de fil hors d...

Страница 30: ...compagné d un avis indiquant les anomalies constatées ainsi que d une preuve de garantie certificat de garantie dûment rempli et portant le cachet du revendeur ou ticket de caisse F R A N Ç A I S Répétez l opération précédente pour le second fil de coupe sur la partie inférieure de la bobine Laissez le fil dans les encoches restées libres 27 Procédez comme expliqué ci dessus pour installer la bobi...

Страница 31: ...om Vous pouvez également contacter notre Centre de Service et d Informations à l adresse indiquée à la fin de ce manuel Si votre produit a besoin d être réparé veuillez l envoyer ou le porter à un agent de réparation agréé en fournissant une preuve d achat si vous demandez une réparation sous garantie De plus amples informations peuvent être obtenues directement chez nos agents AUTRES OUTILS DE JA...

Страница 32: ...i Ricerca e Sviluppo Spennymoor County Durham DL16 6JG United Kingdom USO PROGETTATO Il vostro tosaerba Black Decker GL650 GL660 GL660P GL670 GL670P è stato progettato per tosare e rifinire i cigli dei prati oltre che per tagliare erba in spazi ridotti L utensile é stato progettato per un uso individuale ISTRUZIONI DI SICUREZZA Simboli di sicurezza I seguenti simboli vengono usati nel presente man...

Страница 33: ... coloro che non abbiano familiarità con l attrezzo Non permettere a bambini altre persone o animali di avvicinarsi alla zona di lavoro toccare l utensile o il cavo di alimentazione Ricordare che l operatore è responsabile dell esposizione di altre persone o della loro proprietà a eventuali pericoli o incidenti Dopo l uso Spegnere l utensile estrarre la spina dalla presa e verificare che le parti m...

Страница 34: ...ia completamente fermato Impiegare unicamente filo di tipo corretto della Black Decker Non impiegate fili di taglio metallici o fili di pesca Fare attenzione a evitare lesioni provocate dalla lama di tosatura Non toccare la lama Dopo avere esteso il nuovo filo di taglio riportare sempre l utensile nella posizione operativa normale prima di accenderlo Attenzione a tenere il cavo dell alimentazione ...

Страница 35: ...l trasporto il filo di taglio è fissato all alloggiamento della bobina Rimuovere il nastro che ferma il filo di taglio 15 all alloggiamento della bobina 14 Installazione del proteggipiante fig C Il proteggipiante è un accessorio in dotazione standard con il GL660P e il GL670P Per altri modelli è disponibile come accessorio optional Collocare il proteggipiante 17 sopra la protezione come illustrato...

Страница 36: ...bbassare l impugnatura sino a raggiungere l altezza desiderata Serrare l anello di bloccaggio ruotandolo in senso orario GL670 GL670P Regolazione angolare della testa tosatrice fig I La possibilità di regolare l angolazione della testa tosatrice consente di impostare un angolo di tosatura ottimale a prescindere dalla propria altezza Consente inoltre di effettuare la tosatura sotto panchine e arbus...

Страница 37: ...l alloggiamento 23 fig K Estrarre la bobina vuota 24 dal relativo coperchio Rimuovere ogni traccia di sporcizia ed erba dal coperchio della bobina e dall alloggiamento Inserire la nuova bobina nella protuberanza del coperchio della bobina Ruotare leggermente la bobina sino ad alloggiarla Sganciare l estremità di uno dei fili di taglio e guidare il filo in uno degli occhielli 25 fig L Il filo deve ...

Страница 38: ...nto Spingere il coperchio nell alloggiamento fino a bloccarlo in posizione Se il filo di taglio fuoriesce oltre la lama di tosatura tagliarlo in modo che raggiunga solo la lama Se l alimentazione automatica del filo continua a non funzionare oppure se la bobina è inceppata tentare quanto segue Pulire accuratamente l alloggio e il coperchio della bobina Estrarre la bobina e controllare se la leva p...

Страница 39: ...ost vendita In alternativa telefonate al nostro Centro Informazioni e Servizi il cui numero è situato sul retro di questo manuale Black Decker offre un servizio post vendita nazionale attraverso centri di assistenza diretti È nostro obiettivo fornire un servizio eccellente riparazioni veloci grande disponibilità di ricambi e accessori ALTRI UTENSILI DI GIARDINAGGIO La Black Decker ha una gamma com...

Страница 40: ...of Engineering Spennymoor County Durham DL16 6JG United Kingdom GEBRUIK VOLGENS BESTEMMING Uw Black Decker strimmer GL650 GL660 GL660P GL670 GL670P is ontworpen voor het strimmen en afwerken van graskanten alsmede voor het strimmen van gras in besloten ruimtes Deze machine is uitsluitend bedoeld voor consumentengebruik VEILIGHEIDSVOORSCHRIFTEN Pictogrammen In deze handleiding worden de volgende pi...

Страница 41: ...tact heeft genomen Veiligheid van anderen Verbied kinderen en personen die niet van de inhoud van deze handleiding op de hoogte zijn het gebruik van de machine Houd kinderen bezoekers en dieren buiten het werkgebied en laat ze de machine of de elektriciteitskabel niet aanraken Onthoud dat de gebruiker verantwoordelijk kan worden gesteld voor ongelukken of gevaren aan andere mensen of hun eigendomm...

Страница 42: ... werk op steile taluds Zorg altijd voor een juiste stabiele houding Houd er rekening mee dat pas gemaaid gras vochtig en glad is Ga voorzichtig te werk bij graskanten en grindpaden en wegen omdat stenen en grond door de snijdraad kunnen worden weggeslingerd Zet de machine niet neer voordat de snijdraad volledig tot stilstand is gekomen Gebruik uitsluitend het geschikte type Black Decker snijdraad ...

Страница 43: ...ine zoals afgebeeld Duw de beschermkap stevig aan totdat hij op zijn plaats klikt Bevestig de beschermkap met de schroef 16 Gebruik de machine nooit zonder dat de beschermkap naar behoren is aangebracht Losmaken van het snijdraad fig A Voor transport wordt het snijdraad aan de spoelbehuizing vastgeplakt Verwijder de tape waarmee het snijdraad 15 aan de spoelbehuizing 14 is vastgeplakt Aanbrengen v...

Страница 44: ...e hoogte kunt instellen Laat de beschermkap 11 op de grond rusten Draai de kraag 7 linksom Beweeg de handgreep omhoog of omlaag naar de gewenste hoogte Draai de kraag rechtsom totdat hij vastzit GL670 GL670P Instellen van de hoek van de strimkop fig I Door de instelbare strimkop kunt u de optimale strimhoek instellen ongeacht uw lichaamslengte Hierdoor kunt u tevens onder banken en struiken strimm...

Страница 45: ...it het spoeldeksel Verwijder vuil en gras uit het spoeldeksel en de behuizing Neem de nieuwe spoel en druk hem op de as in het spoeldeksel Draai de spoel een beetje totdat hij vastzit Haal het uiteinde van een van de snijdraden los en voer het draad door een van de ogen 25 fig L Het draad dient ca 9 cm uit het spoeldeksel te steken Haal het uiteinde van de andere snijdraad los en voer het draad do...

Страница 46: ...ndien de automatische draadvoeding nog steeds niet werkt of de spoel vastzit probeer dan de volgende suggesties Reinig zorgvuldig het deksel en de behuizing van de spoel Verwijder de spoel en controleer of de hefboom vrij kan bewegen Verwijder de spoel en wikkel het snijdraad af wind het daarna weer netjes op de spoel zoals hierboven beschreven Plaats de spoel terug volgens instructies GEBRUIKTE M...

Страница 47: ...stekende service snelle reparaties een uitgebreide voorraad onderdelen en volledige ondersteuning Mocht uw machine defect raken lever hem dan in bij de handelaar bij wie u hem heeft gekocht of stuur hem naar een van onze servicecentra ANDERE MACHINES VOOR GEBRUIK IN DE TUIN Black Decker heeft een compleet scala aan machines die het leven in de tuin vereenvoudigen Als u meer informatie over de volg...

Страница 48: ... s2 2 5 m s2 Brian Cooke Director de Ingeniería Spennymoor County Durham DL16 6JG United Kingdom RECORTADORA GL650 GL660 GL660P GL670 GL670P FINALIDAD Su recortabordes Black Decker GL650 GL660 GL660P GL670 GL670P está diseñado para recortar y rematar bordes de césped y para cortar el césped en espacios reducidos Esta herramienta está pensada únicamente para consumo doméstico INSTRUCCIONES DE SEGUR...

Страница 49: ...ón de corriente antes de desenchufarlo del tomacorriente Seguridad de otras personas Crianças ou qualquer pessoa que não tenha lido este manual de instruções ou não esteja familiarizada com a ferramenta não a deverá utilizar No permita que niños otras personas o animales se acerquen al área de trabajo ni toquen la herramienta o el cable de corriente Recuerde que el operador es responsable de los a...

Страница 50: ... muestra en las ilustraciones Nunca encienda la herramienta en ninguna otra posición Encienda la herramienta solamente cuando las manos y los pies estén alejados del cable de corte Evite el contacto corporal con el cable de corte mientras la herramienta esté en funcionamiento No trabaje en cuestas empinadas Asegúrese de estar parado firmemente Tenga en cuenta que el césped recién cortado está húme...

Страница 51: ...corte en línea 13 Guía para ribetear 14 Alojamiento del carrete 15 Hilo de corte MONTAJE Antes de proceder al montaje compruebe que la herramienta está apagada y desenchufada Montaje de la protección fig B Desenchufe la herramienta Retire el tornillo 16 del alojamiento Coloque la protección 11 en la herramienta tal y como se indica Presione firmemente sobre la protección hasta que encaje en su sit...

Страница 52: ...ndario puede ajustarse para proporcionar un equilibrio y confort óptimos Deje que la guarda 11 descanse en el suelo Cuando mantenga pulsado el botón del mango 6 mueva el mango 5 hasta la posición que desee Suelte el botón del mango GL660 GL660P GL670 GL670P Ajuste de la altura de la herramienta fig A H Esta herramienta tiene un cuerpo telescópico para ajustarlo a una altura que le resulte cómoda D...

Страница 53: ...e con un cepillo suave o un paño seco Utilice periódicamente un raspador romo para eliminar la hierba y la suciedad existente debajo de la protección Colocación de una nueva bobina de hilo de línea de corte fig K L Encontrará repuestos de bobinas de hilo de línea de corte en su concesionario Black Decker número de catálogo A6441 También se dispone de cajetines con carrretes de hilo de corte número...

Страница 54: ...pruebe que la línea de corte no sobresale más de 9 cm de la caja de la bobina de hilo Si así fuera corte lo que sobre para que llegue justo hasta la hoja de corte No funciona el avance automático de la hoja de corte Mantenga los topes pulsados y retire la tapa de la bobina de hilo Tire de la hoja de corte hasta que asome 9 cm del alojamiento Si no queda suficiente hoja de corte en el carrete insta...

Страница 55: ...le en Internet información completa sobre nuestro servicio postventa en www 2helpU com Como alternativa puede ponerse en contacto con nuestro Centro de Servicio e Información en la dirección que figura al final de este manual Black Decker le ofrece una extensa red de servicios postventa en todo el país Nuestro objetivo es ofrecerle el mejor servicio reparaciones rápidas todos los repuestos disponi...

Страница 56: ...G United Kingdom FINALIDADE DA FERRAMENTA O aparador GL650 GL660 GL660P GL670 GL670P da Black Decker foi projectado para aparar e acertar orlas bem como cortar relva em espaços limitados Esta ferramenta destina se apenas para uso doméstico INSTRUÇÕES DE SEGURANÇA Símbolos Os seguintes símbolos são usados neste manual Indica risco de ferimentos perda de vida ou danos na ferramenta no caso do não cu...

Страница 57: ...danos causados a pessoas ou à sua propriedade Após o uso Desligue a remova o plugue da tomada e antes de trocar limpar ou inspeccionar qualquer peça da ferramenta certifique se de que haja cessado o movimento das peças giratórias Quando fora de uso armazene a ferramenta em local seco Mantenha as ferramentas armazenadas fora do alcance de crianças Inspecção e reparações Antes do uso verifique a exi...

Страница 58: ...stender fio de nylon novo sempre coloque a ferramenta de volta à sua posição normal de funcionamento antes de ligá la Cuide para que o cabo de alimentação eléctrica fique longe do fio de corte Esteja sempre atento ao posicionamento do cabo SEGURANÇA ELÉCTRICA A ferramenta foi concebida para uma única tensão Verifique sempre se a tensão da rede corresponde à voltagem indicada na placa de identifica...

Страница 59: ...70P como acessório standard No caso de outros modelos está disponível como acessório opcional Coloque o protector de plantas 17 sobre o resguardo conforme o mostrado Assegure se de que a orientação esteja correcta Coloque as duas tampas de plástico 18 no protector de plantas alinhando as marcas 19 situadas nas mesmas com as existentes no resguardo 11 Fixe as tampas com ajuda dos parafusos 20 Não o...

Страница 60: ...ilidade de ajuste do ângulo da cabeça do aparador permite definir o ângulo de apara óptimo independentemente do comprimento Permite também efectuar a apara debaixo de bancos e arbustos Coloque o resguardo 11 no solo Carregue no pedal 10 com o pé e mova o corpo do aparador para cima ou para baixo conforme a necessidade Solte o pedal Como ligar e desligar a ferramenta fig A Para ligar a ferramenta c...

Страница 61: ...ie o para o interior dos orifícios 25 fig L O fio deverá projectar se aproximadamente 9 cm da tampa da bobina Solte a extremidade do outro fio e guie o para o interior do outro orifício O fio deverá projectar se aproximadamente 9 cm da tampa da bobina Alinhe as linguetas 21 da tampa da bobina com os orifícios 26 do compartimento fig K Carregue na tampa colocando a no compartimento até que se encai...

Страница 62: ...remente Remova a bobina desenrole o fio de nylon e enrole o novamente de forma ordenada conforme descrição acima Recoloque a conforme instruções FERRAMENTAS INDESEJADAS E O AMBIENTE Leve a sua ferramenta velha a um centro de assistência técnica Black Decker onde ela será eliminada de um modo seguro para o ambiente GARANTIA Se o seu produto se avariar por defeito de montagem ou de material durante ...

Страница 63: ... os produtos a seguir mencionados contacte o nosso Serviço a Clientes veja a página de endereços no final deste manual ou contacte o revendedor local da Black Decker Aparadores Electrosserras Tesoura de relva Corta sebes Corta relvas Vassouras para relvado Aspiradores de folhas Trituradores Nem todos os produtos estão disponíveis em todos os países P O R T U G U Ê S ...

Страница 64: ... m s2 Brian Cooke È ı ÓÙ ÌË ÓÔÏÔÁ Spennymoor County Durham DL16 6JG United Kingdom E E Eπ ªE Ã ÌË Ó ÊÈÓÈÚ ÛÌ ÙÔ fiÚÙÔ GL650 GL660 GL660P GL670 GL670P ÙË Black Decker ÂÈ Û Â È ÛÙ ÁÈ ÙÔ ÊÈÓ ÚÈÛÌ fiÚÙÔ Î È ÎÚˆÓ Ì ÔÚÓÙÔ Ú Î ıÒ Î È ÁÈ ÙËÓ ÎÔ fiÚÙÔ Û ÂÚÈÔÚÈÛÌ ÓÔ ÒÚÔ ÙÔ ÙÔ ÂÚÁ ÏÂ Ô ÁÈ ÙÔÓ Î Ô ÚÔÔÚ ÂÙ È ÌfiÓÔ ÁÈ ÂÚ ÛÈÙ ÓÈÎ Ú ÛË πE º Eπ Ì ÔÏ ÛÊ Ï ÙÈ ÚÔ ÛÂ Ô ËÁ  ÚËÛÈÌÔ ÔÈÔ ÓÙ È Ù ÎfiÏÔ ı Û Ì ÔÏ Ì ÔÏ ...

Страница 65: ... ÙÚÔÊÔ ÔÛ ÚÈÓ Ê ÈÚ ÛÂÙ ÙÔ ÊÈ fi ÙËÓ Ú ÛÊ ÏÂÈ ÙÚ ÙˆÓ ªËÓ Â ÈÙÚ ÂÙ Û ÌÈÎÚ È È Û ÙÔÌ Ô ÂÓ Ô Ó È ÛÂÈ ÙÔ ÂÁ ÂÈÚ ÈÔ Ô ËÁÈÒÓ Ô ÂÓ Ô Ó ÂÍÔÈÎÂȈı Ì ÙÔ ÂÚÁ ÏÂ Ô Ó ÙÔ ÂÈÚÈÛÙÔ Ó ªËÓ Â ÈÙÚ ÂÙ ÛÂ È È Â ÈÛÎ ÙÂ Ò Ó ÏËÛÈ Ô Ó ÛÙÔ ÒÚÔ ÂÚÁ Û Ó ÁÁ Ô Ó ÙÔ ÂÚÁ ÏÂ Ô ÙÔ Î ÏÒ ÈÔ ÙÚÔÊÔ ÔÛ ÂÙ fi Ë Û Ë Â ı ÓË ÁÈ Ù Ì Ù ÎÈÓ ÓÔ ÁÈ ÙÚ ÙÔ ÙËÓ ÂÚÈÔ Û ÙÚ ÙˆÓ Ì ÔÚÂ Ó Î Ù ÏÔÁÈÛÙ ÛÙÔ ÂÈÚÈÛÙ ªÂÙ ÙË Ú ÛË ÛÙ ÙÔ ÂÚÁ ÏÂ Ô Ê ÈÚ ÛÙÂ...

Страница 66: ...ÙÂ Ô ÔÈ ÔÙ ÙÌ Ì Ù ÙÔ ÂÚÁ ÏÂ Ô ÚÈÓ ÚËÛÈÌÔ ÔÈ ÛÂÙ ÙÔ ÂÚÁ ÏÂ Ô Â Èˆı Ù fiÙÈ ÛÙË È ÚÔÌ ÎÔ Û ÂÓ Ú Ô Ó ÎÏ È ÙÚÂ Û ÚÌ Ù Ô ÔÈÔ ÔÙ ÏÏÔ ÂÌ fi ÈÔ ÃÚËÛÈÌÔ ÔÈ ÛÙ ÙÔ ÂÚÁ ÏÂ Ô ÌfiÓÔ ÛÙË ÛˆÛÙ ı ÛË Ì ÙÔ Ó Ì ÎÔ ÎÔÓÙ ÛÙÔ ÊÔ fi ˆ ÂÈÎÔÓ ÂÙ È ÔÙ ÌËÓ Ó ÂÙ ÙÔ ÂÚÁ ÏÂ Ô Ó Ú ÛÎÂÙ È ÛÂ Ô ÔÈ ÔÙ ÏÏË ı ÛË Ó Ù ÙÔ ÂÚÁ ÏÂ Ô ÌfiÓÔ fiÙ Ó Ù ÚÈ Î È Ù fi È Ú ÛÎÔÓÙ È Ì ÎÚÈ fi ÙÔ Ó Ì ÎÔ ÔÊ ÁÂÙ ÙË ÛˆÌ ÙÈÎ Â Ê Ì ÙÔ Ó Ì ÎÔ fiÙ ...

Страница 67: ... ÙÔ Ó Ì ÎÔ ÚÔÛ ÂÙ ÓÙ ÙË ı ÛË ÙÔ Î Ïˆ Ô EƒπEà ªE À EÀ π Û ÛÎÂ Û ÂÚÈ ÂÈ 1 ªË Ó ÊÈÓÈÚ ÛÌ ÙÔ fiÚÙÔ 1 ÚÔÊ Ï ÎÙ Ú Ì ÛÙ ÚÈÍË 1 ÛÙËÌ ÚÔÛÙ Û Ê ÙÒÓ Ì ΠÙÔ ÂÍ ÚÙËÌ ÙˆÓ ÌfiÓÔ ÛÙÔ GL660P GL670P 1 ËÁ Â Ú ÛË Ê ÈÚ ÛÙ ÚÔÛÂÎÙÈÎ fi ÙË Û ÛÎÂ Û fiÏ Ù ÎÔÌÌ ÙÈ E π Eƒπ ƒ º ÂÈÎ A 1 È Îfi ÙË on off 2 3 ÛÙËÌ Û ÁÎÚ ÙËÛË Î Ïˆ Ô 4 À Ô Ô Î Ïˆ Ô ÙÚÔÊÔ ÔÛ 5 µÔËıËÙÈÎ Ï 6 Ô Ì Ï GL670 GL670P 7 ÂÚÈÏ ÌÈÔ 8 ÁÎÈÛÙÚ Ê Ï ÍË Î Ïˆ Ô 9 Â...

Страница 68: ...ÎÔ ÙÔ ÏÔÔÙ ËÙ fi ˆ ÂÈÎÔÓ ÂÙ È ÛÙËÓ ÂÈÎ E ÂÈÙÔ ÚÁ ÊÈÓÈÚ ÛÌ ÙÔ fiÚÙÔ ÂÈÎ D F È ÙË ÏÂÈÙÔ ÚÁ ÊÈÓÈÚ ÛÌ ÙÔ fiÚÙÔ Ë ÎÂÊ Ï ÊÈÓÈÚ ÛÌ ÙÔ Ú ÂÈ Ó Ú ÛÎÂÙ È ÛÙË ı ÛË Ë Ô Ô ÂÈÎÔÓ ÂÙ È ÛÙËÓ ÂÈÎ D Ó ÂÓ Ú ÛÎÂÙ È ÛÂ Ù ÙË ı ÛË Ú ıÌ ÛÙÂ ÙËÓ ˆ ÎÔÏÔ ıˆ ÙÚ ÙÂ ÙÔ ÂÚÈÏ ÌÈÔ 7 ÂÍÈfiÛÙÚÔÊ ÂÚÈÛÙÚ ÙÂ ÙÔ ÛÒÌ ÙË ÌË Ó ÊÈÓÈÚ ÛÌ ÙÔ ÚÈÛÙÂÚfiÛÙÚÔÊ ˆ fiÙÔ Ë ÎÂÊ Ï ÙË Ó ÚÂıÂ ÛÙË ı ÛË ÊÈÓÈÚ ÛÌ ÙÔ fiÚÙÔ Ê ÍÙÂ ÙÔ ÂÚÈÏ ÌÈÔ ÛÙÚ ÊÔÓÙ ÙÔ ÂÍÈfiÛ...

Страница 69: ... Ì ÌÈÎÚ Ù ÙËÙ ÂÏ ÙÙÒÛÙ ÙÔ ÊÔÚÙ Ô ÙÔ ºÈÓ ÚÈÛÌ ÎÚˆÓ Ì ÔÚÓÙÔ Ú Ô Î Ï ÙÂÚÔ ÔÙ ÏÂÛÌ ÎÔ Â ÈÙ Á ÓÂÙ È fiÙ Ó ÙÔ ıÔ ÙË Ì ÔÚÓÙÔ Ú Â Ó È ÌÂÁ Ï ÙÂÚÔ fi 50 mm ªË ÚËÛÈÌÔ ÔÈ Ù ÙÔ ÂÚÁ ÏÂ Ô ÁÈ ÙË ËÌÈÔ ÚÁ Ì ÔÚÓÙÔ Ú È Ó ËÌÈÔ ÚÁ ÛÂÙÂ Ì ÔÚÓÙÔ Ú ÚËÛÈÌÔ ÔÈ ÛÙ ÙÔ ÂÚÁ ÏÂ Ô ËÌÈÔ ÚÁ Ì ÔÚÓÙÔ Ú ËÁ ÛÙ ÙÔ ÂÚÁ ÏÂ Ô fi ˆ ÂÈÎÔÓ ÂÙ È ÛÙËÓ ÂÈÎ E ºÚÔÓÙ ÛÙÂ Ô Ô ËÁfi Ì ÔÚÓÙÔ Ú Ó Ú ÛÎÂÙ È ÓÙÈÎÚÈÛÙ Ì ÙÔ ÎÚÔ ÙÔ fiÚÙÔ È Ó È ÌÔÚÊÒÛÂ...

Страница 70: ... Ï ÌÌ ÙË ÔÌ Ó E ı ÁÚ ÌÌ ÛÙ ٠٠ÎÈ 21 ÛÙÔ Î Ï ÌÌ ÙË ÔÌ Ó Ì ÙÈ Ô 26 Ô Ú Ô Ó ÛÙÔ ÂÚ ÏËÌ ÂÈÎ K ÚÒÍÙ ÙÔ Î Ï ÌÌ Óˆ ÛÙÔ ÂÚ ÏËÌ Ì ÚÈ Ó ÎÔ Ì ÒÛÂÈ Î ÓÔÓÈÎ ÛÙË ı ÛË ÙÔ π E Ó Ù Ó Ì Ù ÎÔ ÂÍ Ô Ó fi ÙË Ï ÔÎÔ Ó Ì ÙÔ 12 Îfi Ù ٠ÚÔÎÂÈÌ ÓÔ Ó ÊÙ ÓÔ Ó ÎÚÈ Ò ÛÙË Ï ÏÈÁÌ Ó Ô Ó Ì ÙÔ Û ÂÈ ÔÌ Ó ÂÈÎ M N P ª ÔÚ ÙÂ Ó Ù Ï ÍÂÙÂ Ó Ô Ó Ì ÎÔ Û ÂÈ ÔÌ Ó ÓÙÈ ÚfiÛˆ fi Û ÙË Black Decker È ı ÙÂÈ ÓÙ ÏÏ ÎÙÈÎ Î Ù Ó Ì ÙÔ ÎÔ Îˆ ÈÎfi ...

Страница 71: ...ÙÔ ÂÚ ÏËÌ ÙË ÔÌ Ó Ê ÈÚ ÛÙ ÙËÓ ÔÌ Ó Î È ÂÏ ÁÍÙÂ Ó Ô ÌÔ Ïfi Ì ÔÚÂ Ó ÎÈÓËı ÂÏ ıÂÚ Ê ÈÚ ÛÙ ÙËÓ ÔÌ Ó Î È ÍÂÙ Ï ÍÙ ÙÔ Ó Ì ÎÔ Î È ÛÙË Û Ó ÂÈ Ù Ï ÍÙ ÙÔ ÚÔÛÂÎÙÈÎ Î È ÏÈ Û ÌÊˆÓ Ì ÙËÓ Ú Óˆ ÂÚÈÁÚ Ê ÓÙÈÎ Ù ÛÙ ÛÙ ÙËÓ ÔÌ Ó Û ÌÊˆÓ Ì ÙÈ Ô ËÁ  π E Eƒ Eπø π Eƒπµ Ú ÒÛÙ ÙÔ ÂÚÁ ÏÂ Ô Û ÛÂ Ó ÂÍÔ ÛÈÔ ÔÙËÌ ÓÔ ÛÙ ıÌfi Û ÓÙ ÚËÛË È Ù ÓÈÎÔ ÙÔ ı ÌÂÚÈÌÓ ÛÔ Ó ÁÈ ÙËÓ È ıÂÛ ÙÔ Î Ù ÙÚfi Ô Ô ÂÓ Ï ÙÂÈ ÙÔ ÂÚÈ ÏÏÔÓ E À Ï Ù Ú...

Страница 72: ... Ô ıÂÈ Û Ì Ô Ï Ú Î ÏÒ Â ÈÎÔÈÓˆÓ ÛÙÂ ÌÂ ÙÔÓ ÙÔ ÈÎfi ÓÙÈ ÚfiÛˆ Ô ÙË Black Decker Ì ÙÔ ÚÔÈfiÓ Û ÚÂÈ ÂÙ È Â ÈÛÎÂ Ú Î ÏÒ ËÁ ÓÂÙÂ ÙÔ ÛÙÂ ÏÙÂ ÙÔ Û Ó Ô Ù ÂÍÔ ÛÈÔ ÔÙËÌ Ó service ÙË Black Decker Ú ÔÓÙ ÙËÓ fi ÂÈ Ë ÁÔÚ Û Black Decker ÚÔÛÊ ÚÂÈ Ó ÂıÓÈÎfi ÎÙ Ô Â ÓÈÎ EÍ ËÚ ÙËÛË Ó ı ÏÂÙÂ Ó Ì ıÂÙÂ ÂÚÈÛÛfiÙÂÚÂ ÏÂ ÙÔÌ ÚÂÈÂ ÁÈ ÙÈ ÚÔÛÙÈı ÌÂÓÂ ËÚÂÛ Â Ô ÚÔÛÊ ÚÔÓÙ È fi ÙËÓ Black Decker Ú Î ÏÒ Â ı ÓıÂ ÙÂ ÛÂ Ó Ô Ù ÂÍÔ ÛÈÔ Ô...

Страница 73: ...1 E13015 GL650 123 GL660 117 120 119 118 106 108 117 122 144 121 143 141 140 144 122 142 131 109 116 132 106 117 117 110 111 101 114 115 GL660P 07 08 2000 104 113 112 www 2helpU com GL660P 147 148 149 837 836 ...

Страница 74: ...6 GL670 119 106 118 106 117 107 124 125 117 109 107 108 121 103 105 117 105 128 126 127 129 120 102 122 123 131 837 132 110 111 114 115 104 113 112 101 07 08 2000 www 2helpU com 116 117 GL670P 133 134 135 GL670P 1 ...

Страница 75: ...75 ...

Страница 76: ...76 ...

Страница 77: ...77 ...

Страница 78: ...Black Decker Nederland BV Tel 076 5082000 Florijnstraat 10 4879 AH Etten Leur Fax 076 5038184 New Zealand Black Decker Tel 09 579 7600 81 Hugo Johnson Drive Fax 09 579 8200 Penrose Auckland New Zealand Norge Black Decker Norge A S Tlf 22 90 99 00 Postboks 248 Leirdal 1011 Oslo Fax 22 90 99 01 Internet www blackdecker no Österreich Black Decker Vertriebsges m b H Tel 01 66116 0 Erlaaerstraße 165 12...

Страница 79: ...o del rivenditore Data d acquisto Adres van de dealer Aankoopdatum Dirección del detallista Fecha de compra Morada do revendedor Data de compra Återförsäljarens adress Inköpsdatum Forhandlerens adresse Innkjøpsdato Forhandler adresse Indkøbsdato Jälleenmyyjän osoite Ostopäivä ÈÂ ı ÓÛË ÓÙÈ ÚÔÛÒ Ô ÌÂÚÔÌËÓ ÁÔÚ Name Name Nom Nome Naam Nombre Nome Namn Navn Navn Nimi ÓÔÌ Address Adresse Adresse Indiriz...

Страница 80: ...reen ja postita kuori paikalliseen Black Decker osoitteeseen EÏÏËÓÈÎ Ú Î ÏÒ Îfi ÂÙÂ Ùfi ÙÔ ÎÔÌÌ ÙÈ Î È Ù ÚÔÌ Û ÙÂ ÙÔ Ì Ûˆ ÌÂÙ ÙËÓ ÁÔÚ ÙÔ ÚÔ fiÓÙÔ Û ÛÙËÓ ÈÂ ı ÓÛË ÙË Black Decker ÛÙËÓ EÏÏ English Please complete this section immediately after the purchase of your tool and send it to Black Decker in your country If you live in Australia or New Zealand please register by using the alternative guarant...

Отзывы: