manualshive.com logo in svg
background image

www.blackanddecker.eu

FSM16CD

7

9

8

10

Содержание FSM16CD

Страница 1: ...www blackanddecker eu FSM16CD 7 9 8 10 ...

Страница 2: ...2 12 12 13 12 16 B C E F A D ...

Страница 3: ... household use only Safety Instructions Warning Read all safety warnings and all instructions Failure to follow the warnings and instructions listed below may result in electric shock fire and or serious injury Warning When using mains powered appliances basic safety precautions including the following should always be fol lowed to reduce the risk of fire electric shock personal injury and materia...

Страница 4: ...g your steam mop and when changing the accessories on your steam mop Do not wear slippers or open toed footwear u The lid may become hot during use u The intended use is described in this manual The use of any accessory or attachment or the performance of any operation with this appliance other than those recommended in this instruction manual may present a risk of personal injury u Retain this ma...

Страница 5: ...damage u Do not use the appliance if any part is damaged or defective u Have any damaged or defective parts repaired or replaced by an authorized repair agent u Never attempt to remove or replace any parts other than those specified in this manual Safety of others u This appliance can be used by per sons with reduced physical sensory or mental capabilities or lack of experi ence and knowledge if t...

Страница 6: ...utlet Never modify the plug in any way Un modified plugs and matching outlets will reduce risk of electric shock u If the supply cord is damaged it must be replaced by the manufacturer or an authorised Black Decker Service Centre in order to avoid a hazard Extension cables Class 1 product u A 3 core cable must be used as your appliance is earthed and of Class 1 construction u Up to 30m 100 ft can ...

Страница 7: ... system Note Do not use chemical cleaners with your steam mop water tank Note Fill the water tank with clean tap water Note In areas of hard water the use of de ionised water is recommended u Remove the water tank 3 u Open the filler cap 16 by lifting it up u Fill the water tank 3 with water Warning Your water tank has a 460ml capacity Do not over fill the tank u Re fit the filler cap 16 u Re fit ...

Страница 8: ...onto the cleaning pad 6 u Connect the steam mop to the mains u Press the ON OFF button 1 It takes approximately 15 seconds for the steam mop to heat up u Press the Autoselect button 2 till the required setting is reached u Pulling the handle 4 back will activate the steam pump After a few seconds steam will start to come out of the steam head Note When first filled or after running dry it can take...

Страница 9: ... 4 in the upright position the cable neatly wrapped around the cable tidy hooks 9 10 and secured with the cable tidy clip 19 your steam mop will stand on its own for storage Alternatively there is a hanging bracket 20 built into the hand grip 21 which will allow your steam mop to be hung from a suitable hook on the wall Always ensure that your wall hook is capable of supporting the weight of the s...

Страница 10: ...ossible solutions The steam mop is producing too little steam during use 14 The steam mop has 3 set tings Press the autoselect button 2 to increase the amount of steam being produced 15 Press the steam burst button 18 to temporarily increase the amount of steam Steam is escaping from unexpected areas of the unit 16 Refer to the assembly chapter of the manual for correct fitting instructions of all...

Страница 11: ...à d autres fins que celles recommandées dans ce manuel d instruction peut présenter un risque de blessures Gardez ce manuel pour référence ultérieure Utilisation de votre appareil u N orientez pas la vapeur vers des per sonnes des animaux des appareils électriques ou des prises u Ne laissez pas l appareil sous la pluie u Ne plongez pas l appareil dans l eau u Ne laissez pas l appareil sans surveil...

Страница 12: ...s de chaus sons ou de sandalettes u Le couvercle peut devenir chaud peut pendant l utilisation u La vapeur peut s échapper de l appareil pendant l utilisation u Toutes les précautions doivent être prises pour utiliser l appareil NE TOUCHEZ AUCUNE PIÈCE qui pour rait devenir chaude u Mettez l appareil hors tension et placez le manche en position verticale avant de retirer le réservoir d eau u Si la...

Страница 13: ...composants électriques comme l intérieur d un four par exemple L appareil ne doit pas être laissé sans surveillance tant qu il est branché au secteur L appareil ne doit pas être utilisé s il a chuté s il présente des signes visibles de dommages ou s il fuit Gardez l appareil hors de portée des enfants lorsqu il est sous tension ou pendant qu il refroidit Risques résiduels mentionné dans les consig...

Страница 14: ...lenchée La flèche sur le manche 4 doit être alignée avec le haut du corps du balai vapeur 12 Fixation de l embout vapeur figure B u Glissez l extrémité inférieure du corps du balai vapeur 12 sur l embout vapeur 5 jusqu à ce qu elle soit enclenchée u L embout vapeur peut être retiré du boîtier du balai vapeur en appuyant sur le bouton de dégagement 13 sur le manche et en dégageant le boîtier du bal...

Страница 15: ...te 15 et appuyez dessus fermement u Soulevez le balai vapeur pour dégager l accessoire moquette 7 Attention À l arrêt placez toujours votre balai vapeur en positionnant le manche 4 à la verticale et veillez à éteindre le balai vapeur lorsque vous ne l utilisez pas Utilisation Important Cet appareil détruit 99 9 des bactéries et germes pour autant qu il soit utilisé conformément aux consignes décri...

Страница 16: ... Pour remplir d eau et continuer à nettoyer désinfecter placez le manche 4 en position verticale et éteignez le balai vapeur Débranchez l appareil de la prise retirez le réservoir d eau 3 pour le remplir Attention Ne laissez jamais longtemps le balai vapeur au même endroit À l arrêt placez toujours le balai vapeur en positionnant le manche 4 à la verticale et veillez à éteindre le balai vapeur lor...

Страница 17: ...iquette du patin nettoyeur Remplacement des prises secteur RU et Irlande uniquement Si une nouvelle prise secteur doit être installée u Mettez au rebut la vieille prise u Branchez le fil brun dans la borne de la nouvelle prise u Branchez le fil bleu à la borne neutre u Branchez le fil vert jaune à la borne de terre Attention Suivez les instructions de montage fournies avec les prises de bonne qual...

Страница 18: ...ur le bouton du jet de vapeur 18 pour augmenter momentanément la quantité de vapeur Problème Étape Solutions proposées L appareil laisse la vapeur s échapper par des points non prévus à cet effet 16 Consultez le chapitre Assemblage du manuel pour obtenir les instructions d installation de tous les ac cessoires et pièces Où trouver plus d informations accessoires pour mon balai vapeur 17 www blacka...

Страница 19: ...19 ...
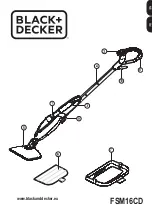
Страница 20: ... 210 Bath Road Fax 01753 512365 www blackanddecker co uk Slough Berkshire SL1 3YD emeaservice sbdinc com France Black Decker France S A S Tel 04 72 20 39 20 www blackanddecker fr 5 allée des Hêtres Fax 04 72 20 39 00 B P 30084 69579 Limonest Cédex N704203 REV 0 03 2019 ...

Отзывы: