background image

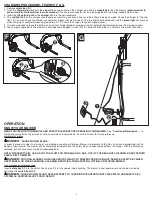
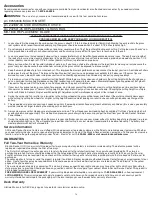
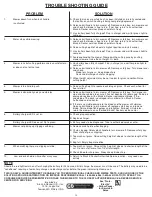
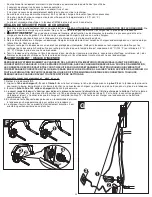
CHARGING PROCEDURE- FIGURES F & G

1. Remove s

afety key F-1

.

2. Align the 

charger plug F-2

with the 

arrow F-4

on top and insert the charger plug into the 

receptacle F-3

on the mower

(green terminal to

green terminal, white terminal to white terminal)

. The charger connector can only be plugged into the mower receptacle one way. 

3. Insert the 

120 volt plug G-3

of the 

charger G-1

into the wall receptacle.

4. The 

red light G-2

on the charger should come on indicating you have power and the battery is being charged. Check the charger for the red

light, if it is not on check the charger connector for proper alignment (step 2). The red light should extinguish and the 

green light

will come on

when charging is complete (takes approximately 12 - 20 hours to charge a fully discharged mower).

5. It is recommended to leave the battery on constant charge (between mowing uses) for optimum performance during the mowing season.

6. The charger supplied with this product is intended to be plugged in such that it is correctly orientated in a vertical or floor mount position.

OPERATION

KNOW YOUR MOWER

READ THIS INSTRUCTION MANUAL AND SAFETY RULES BEFORE OPERATING YOUR MOWER.

See 

“Functional Description” - 

to

familiarize yourself with the location of various controls and adjustments. Save this manual for future reference. 

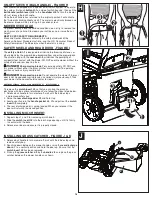
SAFETY KEY

DANGER :

SHARP MOVING BLADE.

In order to prevent accidental start-up or unauthorized use of your Cordless Mower, a removable Safety Key  has been incorporated into the

design of your mower. The mower will be completely disabled when the Safety Key has been removed from the mower. With the Safety Key

removed, you will have access to the charger receptacle. 

NOTE: THE SAFETY KEY HAS A SLOT TO ALLOW FOR STORAGE ON A NAIL, OUT OF THE REACH OF CHILDREN. DO NOT TETHER

SAFETY KEY TO MOWER.

DANGER:

ROTATING BLADES CAN CAUSE SERIOUS INJURY. TO PREVENT SERIOUS INJURY, REMOVE SAFETY KEY WHEN

UNATTENDED, OR WHEN CHARGING, CLEANING, SERVICING, TRANSPORTING, LIFTING, OR STORING MOWER.

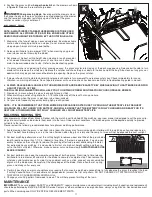
TO TURN MOWER ON

Insert 

safety key F-1

into the switch housing, until it is fully seated inside housing. The mower is now operational and can be started by 

activating the

switch lever H-2

.

DANGER:

SHARP MOVING BLADE. NEVER ATTEMPT TO OVERRIDE THE OPERATION OF THIS SWITCH AND SAFETY KEY

SYSTEM AS SERIOUS INJURY COULD RESULT.

9

F

G

Содержание CM1836

Страница 1: ...INSTRUCTIVO ANTES DE USAR EL PRODUCTO VEA EL ESPAÑOL EN LA CONTRAPORTADA P PL LE EA AS SE E R RE EA AD D B BE EF FO OR RE E R RE ET TU UR RN NI IN NG G T TH HI IS S P PR RO OD DU UC CT T F FO OR R A AN NY Y R RE EA AS SO ON N If you have a question or experience a problem with your Black Decker purchase go to HTTP WWW BLACKANDDECKER COM INSTANTANSWERS If you can t find the answer or do not have ac...

Страница 2: ...NT SAFE PRACTICES FOR WALK BEHIND MOWERS This mower is capable of amputating hands and feet and throwing objects Failure to observe the following safety instructions could result in seri ous injury or death GENERAL OPERATION 1 Read understand and follow all instructions on the mower and in the instruction manual before starting 2 Do not put hands or feet near or under the mower Keep clear of the d...

Страница 3: ... These limits are designed to provide reasonable protection against harmful interference in a residential installation This equipment generates uses and can radiate radio frequency energy and if not installed and used in accordance with the instructions may cause harmful interference to radio communications However there is no guarantee that interference will not occur in a particular installation...

Страница 4: ...sharp Always use protective gloves when handling the mower blade IF YOU are using a grass catcher check it frequently for wear and deterioration If excessively worn replace with new bag for your safety USE EXTREME CAUTION when reversing or pulling mower toward you WARNING Some dust created by this product contains chemicals known to the State of California to cause cancer birth defects or other re...

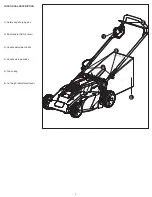
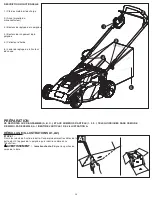
Страница 5: ...FUNCTIONAL DESCRIPTION 1 Safety key charging port 2 Bail Handle Switch lever 3 Handle adjustment bolts 4 Handle storage knobs 5 Grass bag 6 Cut height adjustment lever 2 1 3 4 5 6 5 ...

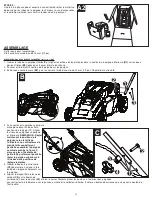
Страница 6: ...A2 STEP1 Open the top flaps of the box Carefully cut down the sides of the box on the opposite end of the handle and fold the flap down as shown WARNING Sharp blade Keep body parts away from blade STEP2 With the carton end cut open remove the cardboard filler handle tubes charger accessory bag and grass bag and push the mower out of the opened carton 6 A 1 A2 ...

Страница 7: ...y want to adjust the upper handle to one of the two remaining height adjustment positions 5 Insert the carriage bolt C2 until the head of the bolt is fully seated against the handle 6 Align the cord retainer C3 with the carriage bolt Install the knob C4 tightening securely The knobs should always be on the outside of the handles to avoid interference with the rear door and grass bag Insert carriag...

Страница 8: ... be kept on constant charge when not in use The battery should be charged in its proper orientation The battery prefers to be charged in a cool dry place The battery does not need to be fully discharged before recharging 2 to 3 initial charging cycles may be required after purchase to achieve maximum run time capacity A fully charged battery can be safely stored down to 40 C 40 F The battery is ma...

Страница 9: ...ion OPERATION KNOW YOUR MOWER READ THIS INSTRUCTION MANUAL AND SAFETY RULES BEFORE OPERATING YOUR MOWER See Functional Description to familiarize yourself with the location of various controls and adjustments Save this manual for future reference SAFETY KEY DANGER SHARP MOVING BLADE In order to prevent accidental start up or unauthorized use of your Cordless Mower a removable Safety Key has been i...

Страница 10: ...e this mower without either the grass catcher or mulch insert in operating position as serious injury could result DANGER Sharp moving blade Do not operate the mower if the rear door is not closed under spring tension as serious injury could result Take your mower to the nearest service center for repair REMOVING MULCH INSERT FIGURE I To remove the mulch insert I 3 so that you can bag the grass or...

Страница 11: ...D WILL ENSURE THAT THE BATTERY IS FULLY CHARGED AND READY FOR ITS NEXT USE STORING MOWER NOT FULLY CHARGED WILL SHORTEN BATTERY LIFE MULCHING MOWING TIPS Your mower was shipped from Black Decker with the mulch insert installed While mulching your new mower is designed to cut the grass clip pings into small pieces and distribute them back into the lawn Under normal conditions the mulched grass will...

Страница 12: ... N 1 to keep blade from turning as shown in figure N Install flange nut with the flange against the blade spacer and securely tighten BLADE SHARPENING KEEP BLADE SHARP FOR BEST MOWER PERFORMANCE A DULL BLADE DOES NOT CUT GRASS CLEANLY OR MULCH PROPERLY USE PROPER EYE PROTECTION WHILE REMOVING SHARPENING AND INSTALLING BLADE ENSURE THAT SAFETY KEY IS REMOVED Sharpening the blade twice during a mowi...

Страница 13: ...from area between handles when lowering OFF SEASON STORAGE 1 In warmer climates to ensure optimal performance it is recommended that the mower battery be maintained on constant charge 2 The mower may be stored with the charger disconnected if all of the following conditions are met the battery is fully charged before storing Failure to store fully charged will shorten battery life the average temp...

Страница 14: ...r continually slows down while cutting try setting the wheels for a higher cutting height Excessive motor loading can result in uneven cutting and quicker discharge of the battery 9 Three good ideas to enhance your lawnʼs appearance Vary the mowing direction frequently mow horizontally on hillsides this is also a good safety practice and do not forget to overlap the mowing path on each pass 10 Alw...

Страница 15: ...th a Black Decker replacement blade If the underside of the deck is damaged return mower to a Black Decker Authorized service center B If there is no visible damage to the blade and the mower still vibrates Release bail handle to turn mower off remove safety key and remove blade Rotate blade 180 degrees and retighten If mower still vibrates return the mower to an authorized Black Decker service ce...

Страница 16: ...i dʼavoir choisi Black Decker Consulter le site Web www BlackandDecker com NewOwner pour enregistrer votre nouveau produit À L LI IR RE E A AV VA AN NT T D DE E R RE ET TO OU UR RN NE ER R C CE E P PR RO OD DU UI IT T P PO OU UR R Q QU UE EL LQ QU UE E R RA AI IS SO ON N Q QU UE E C CE E S SO OI IT T Si des questions ou des problèmes surgissent après l achat d un produit Black Decker consulter le ...

Страница 17: ...ec les pieds nus ou des sandales Toujours mettre des chaussures épaisses 7 Ne pas tirer la tondeuse vers lʼarrière sauf en cas dʼabsolue nécessité Regarder vers le bas et derrière soi avant et pendant tout déplacement en marche arrière 8 Ne jamais diriger lʼéjection en direction dʼune personne Éviter dʼéjecter les substances contre un mur ou un obstacle Les substances pourraient ricocher vers lʼop...

Страница 18: ...e dépannage lʼinspection le transport le stockage ou avant de la laisser 8 Contrôler régulièrement les composants du collecteur dʼherbes et la protection de lʼéjecteur et en cas de besoin nʼutiliser que des pièces de rechanges recommandées par Black Decker 9 Les lames de tondeuses sont tranchantes Recouvrir la lame ou mettre des gants et être très prudent lors de lʼentretien 10 Prendre soin ou rem...

Страница 19: ...usement lʼoutil avant toute utilisation ultérieure afin dʼassurer un fonctionnement adéquat selon sa fonction prévue Vérifier lʼalignement des pièces mobiles la présence de grippage des pièces mobiles et de rupture de pièces lʼassemblage et tout autre problème pouvant nuire au fonctionnement de lʼoutil Un dispositif de protection endommagé ou toute autre pièce endommagée doit être réparé ou rempla...

Страница 20: ... SE REPORTER AUX DIAGRAMMES A B C ET AUX NUMÉROS DʼARTICLE 1 2 3 TELS QUʼINDIQUÉS DANS CE MODE DʼEMPLOI PAR EXEMPLE A 1 IDENTIFIE LʼARTICLE 1 DE LʼILLUSTRATION A DÉBALLAGE ILLUSTRATIONS A1 A2 ÉTAPE 1 Ouvrir les rabats du haut de la boîte Couper prudemment les côtés de la boîte étant à lʼopposé de la poignée puis rabattre comme dans lʼillustration AVERTISSEMENT lame tranchante Éloigner les parties ...

Страница 21: ...er la poignée supérieure monopièce dans lʼune des trois positions de réglage C1 Aligner les trous des poignées supérieure et inférieure REMARQUE Régler maintenant la position de la poignée selon la taille de lʼutilisateur Les utilisateurs de grande taille souhaiteront peut être assembler la poignée comme le montre la figure C alors que les utilisateurs de petite taille préféreront peut être régler...

Страница 22: ... tondeuse et réinitialiser à la position de réglage de hauteur voulue Tourner la poignée de réglage de la hauteur vers lʼavant de la tondeuse diminue la hauteur de coupe et la tourner vers lʼarrière augmente la hauteur de coupe HAUTEUR APPROXIMATIVE DE COUPE RECOMMANDÉE La hauteur de coupe devrait être à la position la plus élevée par temps chaud et à une position basse pour les secteurs ombragés ...

Страница 23: ...ur à l écart de sources d eau de chaleur comme les radiateurs appareils de chauffage cuisinières etc des flammes ou de produits chimiques Tenir le cordon du chargeur à l écart de bords tranchants pour ne pas l endommager AVERTISSEMENT RISQUE D INCENDIE DÉBRANCHER SYSTÉMATIQUEMENT LE CHARGEUR DE LA SOURCE D ALIMENTATION PRISE MURALE AVANT DE RETIRER LE CONNECTEUR DU CHARGEUR SOUS CERTAINES CONDITIO...

Страница 24: ...yer de couper trop d herbe à la fois Ralentir la tonte ou augmenter la hau teur de coupe CONFORME AUX NORMES DE SÉCURITÉ DE LA CPSC Les tondeuses Black Decker sont conformes aux normes de sécurité de lʼAmerican National Standards Institute et de la Consumer Product Safety Commission Commission de surveillance des produits de consommation des États Unis La lame se déplace lorsque le moteur fonction...

Страница 25: ...RE ET RETIRER TOUTE PIERRE BÂTON FIL OS ET AUTRES DÉBRIS QUI POURRAIENT ÊTRE PROJETÉS PAR LA LAME EN ROTATION 1 Tondre les pentes en diagonale jamais de haut en bas Être extrêmement prudent lors des virages sur les pentes Ne pas tondre les pentes excessivement inclinées Toujours maintenir un bon équilibre 2 Relâcher la manette étrier pour ÉTEINDRE la tondeuse lorsque vous traversez toute surface g...

Страница 26: ...à un réglage élevé puis de couper une seconde fois à la hauteur de coupe finale Si non couper des rangées plus étroites et lentement TOUJOURS SʼASSURER QUE LA LAME EST AFFÛTÉE 3 Pour un meilleur rendement éliminer toute accumulation dʼherbe dans le châssis De temps en temps relâcher la manette étrier pour éteindre la tondeuse et attendre lʼimmobilisation complète de la lame Puis retirer la clé de ...

Страница 27: ...ENT ET NE DÉCHIQUETTE PAS CORRECTEMENT PORTER UNE PROTECTION OCULAIRE ADÉQUATE LORS DU RETRAIT DE LʼAFFÛTAGE ET DE LʼINSTALLATION DE LA LAME SʼASSURER QUE LA CLÉ DE SÛRETÉ EST RETIRÉE Deux affûtages par saison sont normalement suffisants dans des conditions normales Le sable émousse rapidement la lame Si la pelouse pousse sur un sol sablonneux des affûtages plus fréquents seront nécessaires REMPLA...

Страница 28: ...anger lʼoutil sur des engrais ou des produits chimiques ou à proximité de ceux ci Un tel rangement risque de provoquer une corrosion rapide TRANSPORT ET RANGEMENT DANGER des lames en mouvement rotation risquent de provoquer de graves blessures Relâcher la manette étrier pour éteindre la tondeuse et retirer la clé de sûreté avant de soulever de transporter ou de ranger la tondeuse La ranger dans un...

Страница 29: ...e temps choquent les tiges dʼherbe sensibles ce qui produit un système superficiel de racines et la pelouse éprouve de la difficulté par la suite à atteindre lʼeau dans le sol 3 Des spécialistes en soins de la pelouse déclarent quʼune bonne partie des problèmes de pelouse rencontrés provient de coupes trop rapprochées La profondeur et la résistance des racines de lʼherbe sont presque exactement pr...

Страница 30: ...açons suivantes La première façon consiste en un simple échange chez le détaillant qui lʼa vendu pourvu quʼil sʼagisse dʼun détaillant participant Tout retour doit se faire durant la période correspondant à la politique dʼéchange du détaillant habituellement de 30 à 90 jours après lʼachat Une preuve dʼachat peut être requise Vérifier auprès du détaillant pour connaître sa politique concernant les ...

Страница 31: ... vérifier que la lame n est pas tordue ou endom magée Si la lame est endommagée la remplacer avec une lame de rechange Black Decker Si la face inférieure du châssis est endommagée confier la réparation à un centre de réparations Black Decker autorisé B Si aucun dommage visible à la lame n est déterminé et que la tondeuse vibre toujours relâcher l anse pour éteindre la tondeuse retirer la clé de sû...

Страница 32: ...ANUAL DE INSTRUCCIONES CONSERVE ESTE MANUAL PARA FUTURAS CONSULTAS L LE EA A E EL L M MA AN NU UA AL L A AN NT TE ES S D DE E D DE EV VO OL LV VE ER R E ES ST TE E P PR RO OD DU UC CT TO O P PO OR R C CU UA AL LQ QU UI IE ER R M MO OT TI IV VO O Si tiene una consulta o algún inconveniente con su producto Black Decker visite HTTP WWW BLACKANDDECKER COM INSTANTANSWERS Si no encuentra la respuesta o ...

Страница 33: ...uciones básicas de seguridad para minimizar el riesgo de incendio descarga eléctrica y lesiones personales LEA TODAS LAS INSTRUCCIONES PARA REDUCIR EL RIESGO DE LESIONES Antes de utilizar la herramienta asegúrese de que todas las personas que la utilicen hayan leído y comprendido todas las instrucciones de seguridad y demás información incluida en este manual Guarde estas instrucciones y revíselas...

Страница 34: ...a podadora deje que se enfríe 5 Si golpea un objeto extraño suelte el estribo de suspensión para apagar la podadora espere que la hoja se detenga retire la llave de seguri dad y luego examine la unidad Antes de reiniciar la operación con la podadora repare los daños 6 Nunca realice ajustes o reparaciones con el motor en funcionamiento o con la llave de seguridad colocada en la podadora 7 Siempre r...

Страница 35: ... cables y sus dimensiones adecuadas VERIFIQUE QUE NO HAYA PIEZAS DAÑADAS Antes de volver a utilizar la podadora se debe controlar cualquier protección u otra pieza que esté averiada para determinar si funcionará correctamente y realizará la función para la que fue diseñado Verifique la alineación de las piezas móviles la rotura de piezas el montaje y cualquier otra condición que pueda afectar su o...

Страница 36: ...ACIÓN CONSULTE LOS DIAGRAMAS A B C Y LOS NÚMEROS DE LOS ÍTEMS 1 2 3 SEGÚN SE INDICA EN EL MANUAL POR EJEMPLO LA INDICACIÓN A 1 SER REFIERE AL ÍTEM 1 DE LA FIGURA A DESEMBALAJE FIGURAS A1 A2 PASO 1 Abra las aletas superiores de la caja Corte cuidadosamente los lados de la caja en el extremo opuesto al mango y doble la aleta hacia abajo como se muestra ATENCIÓN Punto de pliegue Para evitar pellizcos...

Страница 37: ...o lado 4 Deslice el mango superior de una pieza a una de las tres posiciones de ajuste C1 alineando los orificios de los mangos superior e inferior NOTA Ajuste la posición del mango en este momento según su preferencia de altura Es posible que los usuarios de mayor estatu ra deseen ensamblar el mango como se muestra en la Figura C en tanto que los usuarios de menor estatura quizá quieran ajustar e...

Страница 38: ...ismo tiempo La podadora se ajusta de 32 mm 1 1 4 pulgadas a 89 mm 3 1 2 pulgadas con seis incrementos que están marcados en la unidad 3 Coloque su mano izquierda sobre el mango de ajuste de altura E1 y su mano derecha sobre la parte inferior del mango principal E2 4 Separe el mango de ajuste de altura E1 de la podadora y vuelva a ponerlo en la posición de ajuste de altura deseada Si se gira el man...

Страница 39: ...e mantenimiento Black Decker autorizado 5 Siempre realice la carga de la podadora en un área seca a resguardo del clima No deje la podadora o el cargador expuesto a la lluvia No realice la carga en lugares húmedos No cargue la podadora cuando la temperatura está por encima de 40 C 104 F o por debajo de 5 C 41 F 6 Mantenga la podadora y el cargador lejos del agua fuentes de calor como radiadores ca...

Страница 40: ...LA PODADORA SIN SUPERVISIÓN O CUANDO LA CARGUE LIMPIE MANTENGA TRANSPORTE LEVANTE O GUARDE PARA ENCENDER LA PODADORA Inserte la llave de seguridad F 1 en el alojamiento del interruptor hasta que se asiente por completo en el interior del alojamiento La podadora ahora está lista para usar y se puede arrancar accionando la palanca del interruptor H 2 PELIGRO HOJA MÓVIL FILOSA NUNCA INTENTE ANULAR LA...

Страница 41: ...se pueden producir lesiones graves Lleve la podadora al centro de mantenimiento más cercano para su reparación CÓMO RETIRAR LA PIEZA PARA MANTILLO FIGURA I Para quitar la pieza para mantillo I 3 para poder embolsar el césped o descargarlo mediante el conducto de descarga opcional siga los pasos a continuación 1 Suelte el estribo de suspensión para apagar la podadora espere hasta que se detenga la ...

Страница 42: ...menudo especialmente durante los períodos de crecimiento rápido NOTA SE RECOMIENDA RECARGAR LA PODADORA DESPUÉS DE SU USO LA CARGA FRECUENTE NO DAÑA LA BATERÍA Y DE ESTA MANERA USTED SE ASEGURA QUE ESTÉ TOTALMENTE CARGADA PARA LA PRÓXIMA VEZ QUE DESEE UTILIZAR LA PODADORA SI GUARDA LA PODADORA SIN CARGARLA POR COMPLETO SE ACORTARÁ LA VIDA ÚTIL DE LA BATERÍA CONSEJOS PARA EL CORTE DEL CÉSPED PARA F...

Страница 43: ...alto del ventilador M 5 verifique que el lado GRASS SIDE LADO DE CÉSPED de la hoja quede en dirección hacia el piso cuando vuelva la podadora a su posición vertical normal Después de instalar la hoja M 4 coloque el aislador M 3 de manera que los rebordes elevados de un lado enganchen en los bordes de la hoja Ahora instale el espaciador M 2 para que se asiente en el interior de los rebordes elevado...

Страница 44: ... varias veces revise las sujeciones externas para verificar que estén firmemente ajustadas CÓMO EVITAR LA CORROSIÓN Los fertilizantes y otros productos químicos de jardinería contienen agentes que aceleran considerablemente la corrosión de los metales Si utiliza la podadora en áreas donde se han aplicado fertilizantes y otros productos químicos limpie la unidad inmediatamente después de finalizar ...

Страница 45: ... que se autorenuevan en cada primavera El césped nuevo se debe cortar cuando alcanza una altura de 63 mm 2 1 2 pulg 2 No corte el césped de una altura excesiva de una sola vez la pauta a seguir es no cortar nunca más de 1 3 de la altura de la hoja durante cada sesión de corte El corte de césped demasiado corto da como resultado un sistema radicular de poca profundidad lo que hace que el césped ten...

Страница 46: ...ra apagar la unidad retire la llave de seguridad y retire la hoja Haga girar la hoja 180 grados y vuelva a ajustarla Si la podadora sigue vibrando envíela a un centro de mantenimiento autorizado de Black Decker 6 El LED del cargador de la batería no se enciende A Verifique la conexión del enchufe B Reemplace el cargador 7 El LED del cargador de la batería no cambia a verde A Se debe someter la bat...

Страница 47: ...roducto con flete pago a un Centro de mantenimiento propio o autorizado de Black Decker para su reparación o reemplazo según nuestro criterio Le pueden solicitar el comprobante de compra Los Centros de mantenimiento autorizados y de propiedad de Black Decker se detallan en la sección Herramientas eléctricas Tools Electric de las páginas amarillas de la guía telefónica Esta garantía no se extiende ...

Страница 48: ...ntas de Morelia Gertrudis Bocanegra No 898 Col Ventura Puente Morelia Michoacán Tel 01 443 313 85 50 Enrique Robles Av de la Solidaridad No 12713 Col La Pradera Irapuato Guanajuato Tel 01 462 626 67 39 Hernández Martinez Jeanette Prolongación Corregidora Nte No 1104 Col Arboledas Queretaro Qro Tel 01 442 245 25 80 SOLAMENTE PARA PROPOSITOS DE MEXICO PARA OTRAS LOCALIDADES LLAME AL 01 800 847 2309 ...

Отзывы: