background image

Page 8

PROTECTION FROM HEAT AND MOISTURE

•  Do not install your freezer in any location where heavy moisture is present or if 

the location is not properly insulated.  This freezer is not designed to operate in 

temperature setting below 55° Fahrenheit.

•  Location for the freezer should be on a hard surface and away from direct sunlight 

and heat source, e.g., radiators, baseboard heaters, cooking appliances, etc.

STARTING YOUR NEW FREEZER

1.  After cleaning your freezer thoroughly, wipe the outside with a soft dry cloth, the 

interior with a clean moist cloth.

2. Insert the power supply cord into the electrical outlet.
3.  Turn the thermostat dial to an initial setting of “7” for 24 hours and then set the 

freezer to your desired setting.

NOTE:

 · As the door gets pressed in during shipping, the gasket may have to be reset.  

This is done to prevent the cool refrigerated air from escaping.  If there is a 
gap between the door gasket and the cabinet, set the gasket by gently pulling 
it out of the seal gap.

SET UP & USE

Содержание BCFK35

Страница 1: ...r BLACK DECKER purchase go to www blackanddecker com instantanswers If you can t find the answer or do not have access to the Internet call 844 299 0879 from 10 30 a m to 6 30 p m EST Mon Fri to speak with an agent Please have the catalog number available when you call SAVE THIS MANUAL FOR FUTURE REFERENCE CATALOG NUMBER BCFK35 BCFK51 BCFK70 BCFK356 BCFK516 BCFK706 0 1 2 3 4 5 6 7 ...

Страница 2: ...oduct _____________________________ Model number _____________________________ Serial number _____________________________ Date of purchase CONTENTS PRODUCT REGISTRATION SAFETY INFORMATION Important Safety Instructions 3 4 Refrigerant 4 Grounding Instructions 5 SET UP USE Installation Guide 7 Starting your New Freezer 8 Parts Features 9 Operation Instructions 9 10 CLEANING CARE 11 12 TROUBLE SHOOT...

Страница 3: ...nel so as to minimize the risk of possible ignition due to incorrect parts or improper service 6 Do not use any electrical device or any sharp instrument in defrosting the freezer 7 After the freezer is in operation do not touch the cold surfaces in the freezer compartment particularly when hands are damp or wet Skin may adhere to these extremely cold surfaces 8 Do not refreeze foods that have bee...

Страница 4: ...FRIGERANT GAS WARNINGS DANGER Risk of fire or explosion Flammable refrigerant used DO NOT use mechanical devices to defrost freezer DO NOT puncture refrigerant tubing DANGER Risk of fire or explosion Flammable refrigerant used To be repaired only by trained service personnel DO NOT puncture refrigerant tubing CAUTION Risk of fire or explosion Flammable refrigerant used Consult repair manual owner ...

Страница 5: ...green with or without yellow stripes is the equipment grounding conductor If repair or replacement of the cord or plug is necessary do not connect the equipment grounding conductor to a live terminal Check with a qualified electrician or service person if the grounding instructions are not completely understood or if in doubt as to whether the tool appliance is properly grounded Do not modify the ...

Страница 6: ...e grounding plug and a 3 slot receptacle that will accept the plug on the appliance b The marked electrical rating of the extension cord must equal to or greater than the electrical rating of the appliance The longer cord should be arranged so that it will not drape over the counter top or table top where it can be pulled on by children or tripped over unintentionally NOTE Neither BLACK DECKER nor...

Страница 7: ...ld be placed must be flat hard solid and even The freezer should not be placed on any soft material such as foam plastic carpeting etc 6 The following are recommended minimum clearances around the freezer for proper air circulation Sides 3 4 19mm Back 2 50mm NOTE The appliance must be correctly connected to the power supply WARNING It is important to keep the power cord away from the compressor at...

Страница 8: ...es etc STARTING YOUR NEW FREEZER 1 After cleaning your freezer thoroughly wipe the outside with a soft dry cloth the interior with a clean moist cloth 2 Insert the power supply cord into the electrical outlet 3 Turn the thermostat dial to an initial setting of 7 for 24 hours and then set the freezer to your desired setting NOTE As the door gets pressed in during shipping the gasket may have to be ...

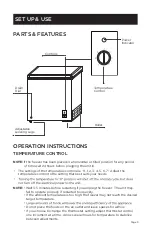
Страница 9: ...s before restarting if you unplug the freezer The unit may fail to operate properly if restarted too quickly If the ambient temperature is too high the freezer may not reach the desired target temperature Do not place the foods on the air outlet and leave spaces for airflow If you choose to change the thermostat setting adjust thermostat control one increment at a time Allow several hours for temp...

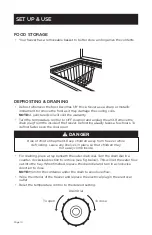
Страница 10: ...ter keep the door open SET UP USE Drain Dial To close To open DANGER Risk of child entrapment Keep children away from freezer while defrosting Leave any shelves in place so that children may not easily climb inside For draining place a tray beneath the outer drain dial Turn the drain dial in a counter clockwise direction to remove see fig below This will let the water flow out into the tray When f...

Страница 11: ...solution to wipe down your freezer Rinse with clean warm water and dry with a soft cloth Do not use harsh chemicals abrasives ammonia chlorine bleach concentrated detergents solvents or metal scouring pads Some of these chemicals may dissolve damage and or discolor your freezer DOOR GASKET Clean door gaskets every three months according to general instructions Gasket must be kept clean and pliable...

Страница 12: ...uminium foil wax paper or paper towels This will interfere with cold air circulation making the freezer less Organize food to reduce door openings and extended searches Remove as many items as needed at one time and close the door as soon as possible HOW TO DEFROST Defrost the freezer compartment when the frost accumulated is about 1 8 thick Set the temperature control dial to 0 before defrosting ...

Страница 13: ...to be operating properly test the outlet with another appliance IF NONE OF THE ABOVE SOLVES THE PROBLEM CONTACT A QUALIFIED TECHNICIAN DO NOT TRY TO ADJUST OR REPAIR THE FREEZER YOURSELF IMPORTANT DO NOT RETURN THIS PRODUCT TO THE STORE If you have a problem with this product please contact the BLACK DECKER Customer Satisfaction Center at 844 299 0879 or service appliance com DATED PROOF OF PURCHA...

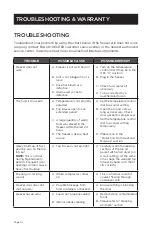
Страница 14: ...r a heat source A Set the temperature control dial to a cooler setting B Open the top lid only as long as necessary Check door gasket for proper seal C Set the temperature control dial to a colder setting temporarily D Please look in the Protection From Heat and Moisture section Heavy build up of frost possibly also on the top lid seal NOTE This is normal during high humidity periods Frequent door...

Страница 15: ...ated with the replacement of the unit 13 Food loss for loss due to product failure or delay in service repair or replacement 14 Service calls to instruct you how to use your product 15 Service calls to repair or replace the house fuse reset the circuit breaker or correct the wiring in the house REPAIR OR REPLACEMENT AS PROVIDED UNDER THIS WARRANTY IS THE EXCLUSIVE REMEDY OF THE CUSTOMER BLACK DECK...

Страница 16: ...e trademarks of The Black Decker Corporation used under license All rights reserved Product in this box may differ slightly from that pictured Does not affect function Not all accessories shown in photography are included in this package Imported by W Appliance Inc 1356 Broadway New York NY 10018 March 2020 Printed in China ...

Отзывы: