


6
7
When disconnecting charger, disconnect AC cord, and then remove the 12 volt DC accessory plug
from the vehicle accessory outlet.
hanging the Battery Charger
The hanging hook allows you to position the battery charger for convenient, hands-free operation.
CAUTION: TO REDUCE THE RISK OF PRODUCT DAMAGE:
• When charger is hung by the hanging hook, do not shake the charger or object that it is hanging from.
• Do not hang the charger from any electrical wires or anything that it is not secure.
• Only use the hanging hook for hanging the charger. The hanging hook is not intended to support
additional weight. Do not hang anything additional to the hanging hook or risk of breakage may
occur.
tRoUBleshootiNg
Unit Not Charging
• Check that the charger is properly connected to a live 120 volt AC outlet.
• If the battery to be charged has fallen below 2 volts, the battery cannot be recharged with this unit.
CARe AND MAiNteNANCe
storage
• Store the unit in a clean, dry, cool place when not in use.
• Clean the unit casing and cords (as necessary) with a dry (or slightly damp) cloth. Ensure that unit
is completely disconnected from battery and power source before cleaning.
• To maintain the operating condition and maximize the life of the charger cords, always coil them
loosely for storage. Do not wrap them around the unit or crimp them with a tight band.
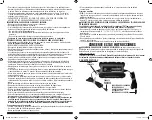
Fuse Replacement (12 Volt DC Charging Adapter)
1. Remove plug from accessory outlet. Remove the gold cap by turning counter clockwise and lifting off.
2. Remove center pin and spring. Remove fuse.
3. Replace fuse with same type and size fuse (8 amp).
4. Replace center pin and spring inside plug.
5. Replace gold cap by turning clockwise.
ACCessoRies
Recommended accessories for use with your tool may be available from the manufacturer. If you need
assistance regarding accessories, please contact the manufacturer at 1-877-571-2391.
WARNING:
The use of any accessory not recommended for use with this appliance could be
hazardous.
seRViCe iNFoRMAtioN
Whether you need technical advice, repair, or genuine factory replacement parts, contact the
manufacturer at 1-877-571-2391.
oNe-YeAR liMiteD WARRANtY
The manufacturer warrants this product against defects in materials and workmanship for a period
of ONE (1) YEAR from the date of retail purchase by the original end-user purchaser (“Warranty
Period”).
If there is a defect and a valid claim is received within the Warranty Period, the defective product can
be replaced or repaired in the following ways: (1) Return the product to the manufacturer for repair or
replacement at manufacturer’s option. Proof of purchase may be required by manufacturer. (2) Return
the product to the retailer where product was purchased for an exchange (provided that the store is a
participating retailer). Returns to retailer should be made within the time period of the retailer’s return
policy for exchanges only (usually 30 to 90 days after the sale). Proof of purchase may be required.
Please check with the retailer for their specific return policy regarding returns that are beyond the time
set for exchanges.
This warranty does not apply to accessories, bulbs, fuses and batteries; defects resulting from normal
wear and tear, accidents; damages sustained during shipping; alterations; unauthorized use or repair;
neglect, misuse, abuse; and failure to follow instructions for care and maintenance for the product.
oPeRAtiNg iNstRUCtioNs
Preparing to Charge
1. Remove battery completely from boat/airplane or any confined area before charging.
2. If it is necessary to remove battery from vehicle to charge, or to clean terminals, always remove
grounded terminal from battery first. Make sure all accessories in the vehicle are off, so as not to
cause an arc.
3. Clean battery terminals, taking care to avoid getting corrosive material in eyes.
4. Add distilled water in each cell until battery acid reaches level specified by battery manufacturer.
This helps purge excessive gas from cells. Do not overfill. For a battery without cell caps
(maintenance free), carefully follow manufacturer’s charging instructions.
5. Study all battery manufacturer’s specific precautions, such as removing or not removing cell caps
while charging, and recommended rates of charge.
Charger location
• Locate charger as far away from battery as cables permit.
• Never place charger directly above battery being charged; gases from battery will corrode and
damage charger.
• Never allow battery acid to drip on charger.
• Never operate charger in a closed-in area or restrict ventilation in any way.
• Marine batteries must be removed and charged on shore.
• Do not set a battery on top of charger.
Charging Using the supplied Battery Clips
WARNING: A spark near the battery may cause an explosion. To reduce the risk of a spark near
the battery, position AC and DC cords away from hood, door, or moving engine parts.
1. Insert the double barrel tip of the battery clamp cable into the double barrel tip of the battery
charger cable (male-to-female and female-to-male). Then plug the battery charger’s power cord into
an AC outlet. The power LED will light blue to indicate that the charger is plugged in and ready.
2. Check polarity of battery posts. Positive (POS, P, +) battery post usually has larger diameter than
negative (NEG, N, –) post.
3. Determine which post of battery is grounded (connected) to the chassis. If negative post is
grounded to chassis (as in most vehicles), see 4. If positive post is grounded to the chassis, see 5.
4. For negative-grounded vehicle, connect positive (red) clamp from battery charger to positive
(POS, P, +) ungrounded post of battery. Connect negative (black) clamp to vehicle chassis or
engine block away from battery. Do not connect clip to carburetor, fuel lines, or sheet-metal body
parts. Connect to heavy gauge metal part of the frame or engine block.
5. For positive-grounded vehicle, connect negative (black) clamp from battery charger to negative
(NEG, N, –) ungrounded post of battery. Connect positive (red) clamp to vehicle chassis or engine
block away from battery. Do-not connect clip to carburetor, fuel lines or sheet-metal body parts.
Connect to a heavy gauge metal part of the frame or engine block.
Note:
If the clamps are incorrectly connected with regard to polarity, the reverse polarity/fault LED ( ) will light. Unplug the charger; then
remove the clamps. Reconnect the clamps properly.
6. When the unit is properly connected and charging, the battery charging LED ( ) will light yellow
to indicate the battery is charging.
7. When the charging complete LED ( ) lights green, the battery is fully charged.
When disconnecting charger, disconnect AC cord, remove clamp from vehicle chassis, and then
remove clamp from battery terminal.
Charging Using the 12 Volt DC Accessory Plug
1. Insert the double barrel tip of the 12 volt DC accessory plug cable into the double barrel tip of the
battery charger cable (male-to-female and female-to-male). Then plug the battery charger’s power
cord into an AC outlet. The power LED will light blue to indicate that the charger is plugged in and
ready.
2. Insert the gold-colored tip of the 12 volt DC accessory plug into the vehicle’s 12 volt DC accessory
outlet. Rotate the adapter slightly to make sure there is good contact.
3. When the unit is properly connected and charging, the battery charging LED ( ) will light to
indicate the battery is charging.
4. When the charging complete LED ( ) lights, the battery is fully charged.
BC6BDW_ManualENSP_061213.indd 6-7
6/12/2013 3:04:44 PM


