background image

18


RELM Wireless Corp.

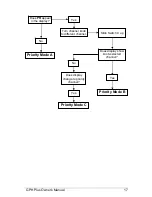
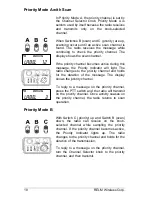
Priority Mode A with Scan 

In Priority Mode A, the priority channel is set by 
the Channel Selector knob. Priority Mode A is 
seldom used by itself because the radio receives 
and transmits only on the knob-selected 
channel. 

When Switches B (scan) and C (priority) are up, 
scanning occurs until an active scan channel is 
found. The radio receives the message while 
continuing to check the priority channel. The 
display shows the scan channel.   

If the priority channel becomes active during this 
message, the Priority Indicator will light. The 
radio changes to the priority channel and holds 
for the duration of the message. The display 
shows the priority channel. 

To reply to a message on the priority channel, 
press the PTT switch and the radio will transmit 
on the priority channel. Once activity ceases on 
the priority channel, the radio returns to scan 
operation. 

Priority Mode B 

With Switch C (priority) up and Switch B (scan) 
down, the radio can receive on the knob-
selected channel while sampling the priority 
channel. If the priority channel becomes active, 
the Priority Indicator lights up. The radio 
changes to the priority channel and holds for the 
duration of the transmission.   

To reply to a message on the priority channel, 
turn the Channel Selector knob to the priority 
channel, and then transmit. 

PR          RX SCN 

 LABEL    12   

PR          RX SCN 

 LABEL      3   


Содержание GPH Plus

Страница 1: ......

Страница 2: ... FCC OCCUPATIONAL USE REQUIREMENTS 3 RADIO CONTROLS 6 BASIC OPERATION 7 CHANNEL GUARD OPERATION 8 CHANNEL GROUPS 9 PROGRAMMABLE TOP SWITCHES FUNCTION MENU 11 SCAN OPERATION 12 PRIORITY SCAN 15 USER SELECTED CHANNEL GUARD 21 OTHER OPERATIONAL FEATURES 22 ALPHANUMERIC DISPLAY 25 CLONING PROCEDURE 27 BATTERY INSTALLATION AND REMOVAL 31 DEFINITIONS AND ACRONYMS 32 WARRANTY 33 SERVICE 33 ...

Страница 3: ...rformance from your new radio FCC REQUIREMENTS Your radio must be properly licensed by the Federal Communications Commission prior to use Your BK Radio dealer can assist you in meeting these requirements Your dealer will program each radio with your authorized frequencies signaling codes etc and will be there to meet your communications needs as your system expands SAFETY PRECAUTIONS Do not operat...

Страница 4: ...hich when used improperly can cause biological damage Very high levels of x rays for example can damage tissues and genetic material The energy levels associated with radio waves from portable 2 way radios when properly used are not great enough to cause biological damage Experts in science engineering medicine health and industry work with organizations to develop standards for exposure to RF ene...

Страница 5: ...EEE and ICNIRP exposure limits for occupational controlled RF exposure environment at operating duty factors of up to 50 transmitting and is authorized by the FCC for occupational use only In terms of measuring RF energy for compliance with the FCC exposure guidelines your radio radiates measurable RF energy only while it is transmitting during talking not when it is receiving listening or in Stan...

Страница 6: ...distance is important because RF exposures decrease with distance from the antenna Antenna should be kept away from eyes When worn on the body always place the radio in a BK Radio approved clip holder holster case or body harness for this product Using approved body worn accessories is important because the use of BK Radio or other manufacturer s non approved accessories may result in exposure lev...

Страница 7: ...TT PUSH TO TALK SPEAKER MICROPHONE LCD DISPLAY CHANNEL SELECT ON OFF VOLUME SQUELCH CODE GUARD G R P PRG TX RX SCNID CG DPH RADIO WITH KEYBOARD DISPLAY COVERED OR NOT INSTALLED REDUCED VIEW BK RADIO CG OFF SQ VOL 16 1 2 3 4 5 6 7 8 9 10 11 12 13 14 15 A B C KEYBOARD GPH RADIO WITH KEYPAD DISPLAY COVERED REDUCED VIEW RX SCN TX PRG ID CG P R G RX SCN TX PRG ID CG P R G ALPHANUMERIC DISPLAY SQUELCH C...

Страница 8: ...ived TRANSMIT 1 Press the PTT Push To Talk switch When the transmitter is on the red Transmit Indicator glows and TX appears in the display 2 Talk in a normal voice with the microphone one to two inches from your mouth 3 Release the PTT switch to stop transmitting If the Transmit Indicator does not glow when you press the PTT switch the battery pack may need to be charged If so the display will in...

Страница 9: ...he volume to a comfortable level 4 Set Channel Guard Mode by turning the Squelch knob off counterclockwise into the Channel Guard position A message will be heard only when the proper Channel Guard value is received CHANNEL GUARD TRANSMIT 1 Turn the Squelch knob on clockwise and monitor the Channel Guard channel before transmitting or if Busy Channel operation is enabled check the yellow LED NOTE ...

Страница 10: ...on the keypad to display the current group number 2 Press a number key for the new group number Only valid group entries will be accepted When changing groups invalid entries will not be accepted and the radio remains in the previously selected group 3 Press the ENT key or wait 5 seconds The radio returns to normal operation for the new group and the selected channel is displayed All selected scan...

Страница 11: ...on is programmed to allow selection of the group and or channel with the keypad 1 Press 2 Press the number of the group you want to change to 3 Press again 4 Press the number of the channel you want to change to 5 Press the ENT key or wait 5 seconds The radio returns to normal operation for the new channel and the selected channel is displayed If the group or channel is locked to a switch position...

Страница 12: ...ample both low power select and RTA could be enabled by the same switch NOTE Assume for this Owner s Manual that Switch A has been programmed for Low Power Switch B has been programmed for Scan and Switch C has been programmed for Priority Scan To access functions on the keypad FCN key menu 1 Press the FCN key to display the function menu 2 Repeatedly press FCN to step through the menu 3 Press PRI...

Страница 13: ...own The display indicates scan operation by flashing SCN or two flashing dashes at the right side of the display if Numeric Display Mode is selected Scan operates only while the radio is not transmitting The radio checks for signals on channels in the preset Scan List as well as the channel selected by the Channel Selector knob When a signal is detected scanning stops and the message is received T...

Страница 14: ...or example a Nuisance Channel can be temporarily removed from the Scan List by sliding Switch B scan down and then back up TRANSMIT WITH SCAN ON When Switch B scan is up the radio transmits on the channel selected by the Channel Selector knob unless Talkback Scan is enabled or Priority Scan is enabled see Priority Scan operation 1 Select a transmit channel by turning the Channel Selector knob 2 Pr...

Страница 15: ... Channel Selector knob If the channel is already on the Scan List SCN appears in the display 3 Press the ENT key to add a channel to the Scan List A short beep sounds and SCN appears in the display 4 Press the CLR key to remove a channel from the Scan List A short beep sounds and SCN disappears from the display GROUP SCAN Channels on each Channel Scan List in groups on the Group Scan List are scan...

Страница 16: ...el Guard with Switch C Priority up The Squelch knob in the Channel Guard position fully counterclockwise detent position and The Priority Channel s programmed with Channel Guard If a message is received on a priority channel the radio receiver locks on to the priority channel and checks to see if the proper Channel Guard value is present If the signal contains the proper Channel Guard value the ra...

Страница 17: ...ual Priority Scan is automatically disabled when Group Scan is on OLD STYLE BK PRIORITY SCAN The radio can be programmed with one of three Priority Modes A B or C The table below shows how the priority channels and the transmit channels are selected in each mode Mode A Mode B Mode C Priority Channel Channel Knob Preset Preset Transmit Channel Channel Knob Channel Knob Priority Channel WHICH MODE I...

Страница 18: ...es PR appear in the display No Priority Mode A Yes Turn channel knob to different channel Slide Switch C up Does display show knob selected channel No Does display change to priority channel Yes Priority Mode C Yes Priority Mode B ...

Страница 19: ...e priority channel and holds for the duration of the message The display shows the priority channel To reply to a message on the priority channel press the PTT switch and the radio will transmit on the priority channel Once activity ceases on the priority channel the radio returns to scan operation Priority Mode B With Switch C priority up and Switch B scan down the radio can receive on the knob s...

Страница 20: ...nd Switch B scan down the radio samples the fixed priority channel at the preset rate If activity occurs on the priority channel the radio changes to the priority channel and holds for the duration of the transmission To reply to a message on the priority channel press the PTT switch The radio transmits only on the priority channel when Switch C priority is up Once activity has ceased on the prior...

Страница 21: ... Slide Switches B scan and C priority down 2 Turn the Channel Selector knob to the channel you want to enter as the new Priority 1 channel 3 Press the PRI key A short beep sounds and PR appears in the display indicating that the displayed channel is now the Priority 1 channel NOTE If the radio is programmed for Dual Priority operation only the Priority 1 channel can be changed with the PRI key NOT...

Страница 22: ...r knob to Channel 5 3 Press the 9 key on the keypad The display shows CG The radio will now operate on the frequencies of Channel 5 with Channel 9 Channel Guard values The display shows the Channel Guard channel 9 and then the selected channel 5 4 Press the key to display the Channel Guard channel briefly The display shows the group number followed by the Channel Guard channel and then the selecte...

Страница 23: ...nds This timer is also used to allow for Talkback Scan HI LO POWER Each channel in the radio can be individually programmed to always transmit in Low Power Mode regardless of the position of the radio s top switch or keypad FCN menu setting If the programming for the channel allows high power transmissions the power level can be selected with a top switch or the keypad menu DTMF ENCODING Keypad eq...

Страница 24: ...ealer can program the duration of the Time Out Timer 15 225 seconds or disabled BUSY CHANNEL If the radio has been programmed for Busy Channel operation it will operate in one of the following three Modes Busy Channel Indication Busy Channel Lockout Busy Channel Lockout with Override BUSY CHANNEL INDICATION The yellow Busy Channel Indicator glows if there is carrier activity on the selected channe...

Страница 25: ...ent the radio can transmit on that channel even if the Squelch knob is in the Channel Guard position If the radio detects an incorrect value or carrier activity only the transmitter is disabled If an attempt is made to transmit an alert tone will be generated and the display will show the word BUSY until the channel becomes available or the PTT switch is released whether the Squelch knob is in or ...

Страница 26: ...eric Mode displaying channel numbers instead of labels Display annunciators indicate the following information Alphanumeric Indication PR Priority Channel G N A PRG Programming Mode TX Transmit RX Receive SCN Scan List Channel Flashing SCN indicates scanning in progress and RX SCN indicates receiving on a scanned channel ID Programming Mode Automatic Numeric Identification ANI CG User Channel Guar...

Страница 27: ...key again to display the channel number 3 Press and hold the key to display the channel label 4 Press ENT Each label can include up to eight characters with decimal points available between characters Characters can include A Z 0 9 _ h or a blank space GROUP LABELS The display can show group labels in addition to group numbers To display a group label turn scanning functions off then 1 Press the k...

Страница 28: ...s 1 Make sure the battery packs for both radios are charged 2 Attach the master switch end of the cloning cable to the side connector of the Master radio NOTE One plug of the cloning cable has a push button master switch This plug must be attached to the Master radio 3 Turn on the Master radio 4 Select the group to be cloned from the Master radio 5 Put the Master radio in Programming Mode by press...

Страница 29: ... and go back to Step 3 on the previous page changing the channel group as required If cloning is finished turn off the Clone and disconnect the cloning cable Normal radio operation will occur when you turn on the Clone 12 If the download was not successful the Master will display FAIL and multiple beeps will follow Failure of downloading can be due to Improper connection Failure to turn on the Clo...

Страница 30: ...show the ID number of the master for example 100 3 Press the CLR key press 125 Do not press the ENT key Now 125 is in temporary memory 4 Press connect the cloning cable to the Clone radio and download by pressing FCN ID number 125 is now stored in the permanent memory of the clone 5 After downloading press CLR on the Master radio Disconnect the Clone The Master radio display will show that 125 is ...

Страница 31: ...30 RELM Wireless Corp SCAN LIST CLONING When a Master radio downloads to a Clone the Scan List is also transferred See page 16 in this manual for selecting the Scan List ...

Страница 32: ... 2 Position the battery pack at the 30 offset seating the two metal studs in their recess 3 Apply upward pressure to the pack while twisting the pack to its original position The metal tab will click locking the pack in position REMOVING THE BATTERY 1 Turn the radio off 2 Push up the metal tab on the side of the case while twisting the battery pack approximately 30 3 Remove battery pack from the r...

Страница 33: ...tandard push button telephone ENT Enter FCN Function GRP Group Label Individual Personality The information programmed with a PC on both a global and by channel basis that tells the radio exactly how to operate LCD Liquid Crystal Display PR Priority Channel PRG Program PRI Priority PTT Push To Talk RTA Repeater Talk Around RTX Channel Ready to Transmit Channel RX Receive SCN Scan SQ Squelch Squelc...

Страница 34: ...00 422 6281 SERVICE If you need service contact your local BK Radio dealer equipped to service your radio If you find it impractical to have service performed by your local dealer contact BK Radio at the address below BK Radio ATTN Customer Service 7100 Technology Drive West Melbourne FL 32904 800 422 6281 ...

Страница 35: ...34 RELM Wireless Corp NOTES ...

Страница 36: ...GPH Plus Owner s Manual 35 NOTES ...

Страница 37: ......

Отзывы: