background image


10 

6. Setting The Dip Switches   
 

6-1. Setting the Dip Switches 


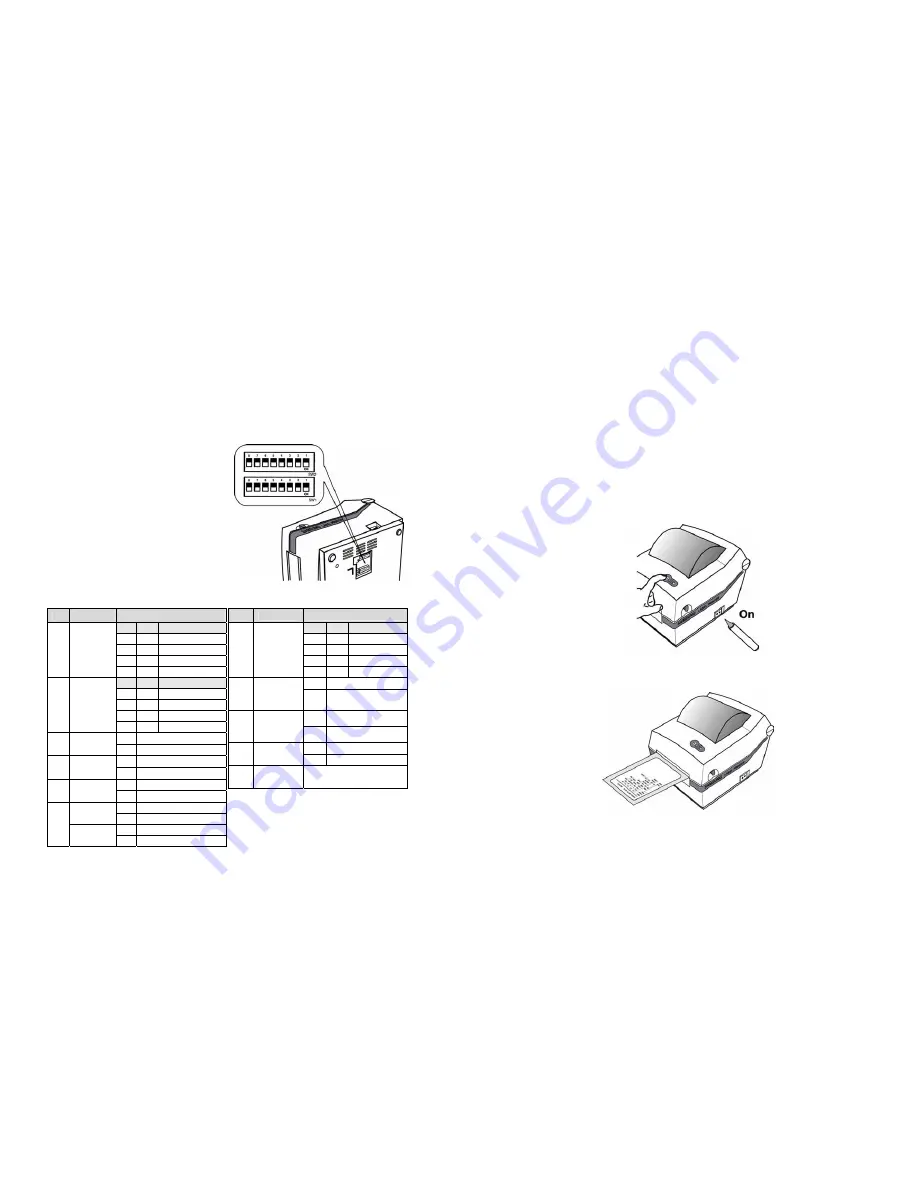
The Dip Switches are located on the bottom of the printer. The Dip Switches are used to 

set the Printer to perform various functions. Follow these steps when changing Dip 

Switches setting : 


1. Turn the printer power switch off. 

2. Remove the screw on the bottom 

  of the printer and open the bracket. 

3. Flip the Dip Switches using tweezers 

  or another narrow-ended tool. 

Switches are 

off

 when up and 

on 

when down in the Figure below. 

4. The new setting takes effect 

  when you turn on the printer. 


Note

 : Always change Dip Switch settings 

  only when the printer is turned off.   


6-2. Functions of Dip Switches 


6-2-1. Dip S/W 1                                                    6-2-2. Dip S/W 2 

No 

Functions 

Details 

Speed 

Off Off

2.5 

ips 

Off On

3.0 

ips 

On Off

4.0 

ips 

1,2 

Speed 

Selection 

On On

5.0 

ips 

Density 

Off Off

0(Low) 

Off On

On Off

13 

3,4 

Density 

Selection 

On On

20(High) 

Off Normal 

mode 

Exhibition 

Selection 

On Demo 

mode 

Off Label 

Paper 

Media 

Selection 

On Normal 

Paper 

Off  Without Auto Cuter 

7 Auto 

Cutter 

On  With Auto Cutter 
Off  Move to Cutting Position 

Position 

Selection 

On  Move to top of next page 
Off  Back Feeding printing 

With 

AutoCutter 

On Continuous 

printing 

No 

Functions 

Details 

Baud Rate 

Off

Off

9,600 bps 

Off

On

19,200 bps 

On

Off

57,600 bps 

1,2 

Baud 

Rate 

On

On

115,200 bps 

Off

Detect Gap only 

Media 

Detection 

On

Detect Gap and 

Black-mark 

Off

SRAM 

Memory 

Selection for

Image Store

On

Flash Rom 

Off

SAMSUNG  command

5 Emulation 

On

Emulation 

6~8 

Developer 

Mode 

Default --- off 


11

7. The Self Test   
 

The self-test checks whether the printer has any problems. (You cannot perform this 

procedure if using the printer’s label peel-off option) If the printer does not function 

properly, contact your dealer. The self-test checks the following; 

 
1. 


Make sure that paper roll has been installed properly. 

2. 


Turn on the power while holding(2sec) down the FEED button. The self-test begins.


3. 


The self-test prints the current printer status, which provides the control ROM version 

and the DIP switch setting. 


Содержание SRP 770 - B/W Direct Thermal Printer

Страница 1: ...JE68 00131B Rev 1 05 1 USER S MANUAL SRP 770 LABEL PRINTER www samsungminiprinters com...

Страница 2: ...you observe a strange smoke odor or noise from the printer unplug it before taking following measures Switch off the printer and unplug the set from the mains After the disappearance of the smoke call...

Страница 3: ...Option 14 11 Cleaning Head 15 12 Install and Uninstall Windows Driver 16 5 1 Unpacking Repacking Your printer box should include these items If any items are damaged or missing please contact your de...

Страница 4: ...y is not plugged into an electrical outlet And the power supply s rated voltage and your outlet s voltage do not match contact your dealer for assistance Then do not plug in the power cord Otherwise y...

Страница 5: ...l Bus USB Serial Interface RS 232 default setting is 19200 baud no parity 8 data bits and 1 stop bit Parallel Interface 9 5 Installing or Replacing the Paper Roll Open Cover Open Guides Install Roll C...

Страница 6: ...election On Demo mode Off Label Paper 6 Media Selection On Normal Paper Off Without Auto Cuter 7 Auto Cutter On With Auto Cutter Off Move to Cutting Position Position Selection On Move to top of next...

Страница 7: ...eler switch Remove the one a paper and Adjust the paper guides and close the cover insert the paper through slot remove 13 9 Using Fan Fold Paper Insert paper through both the rear slot and guides Adj...

Страница 8: ...lows Cautions 1 Turn Off the printer power before cleaning 2 Note that the thermal head becomes very hot during normal operation creating the danger of burn injury Be sure to wait for about 2 3 minute...

Страница 9: ...rer 2 Type http www samsungminiprinters com 3 Connect website 4 In Quick menu click download button 5 Download SRP 770_V3 X X exe in SRP 770 section 12 2 Install Windows Driver 12 2 1 Serial Parallel...

Страница 10: ...18 5 Select interface port type 6 Please reboot computer 19 12 2 2 USB interface A Windows 95 98 ME 1 Double click SRP 770_V3 X X exe file 2 Click Next Button...

Страница 11: ...ll Button 4 Select operating system type 21 5 Select USB interface port type 6 Please turn off printer and turn on printer 7 When Add new hardware wizard for install USB print support driver pops up c...

Страница 12: ...pport driver is installed your system automatically restart after 10 seconds 10 After the system restart please turn on printer B Windows NT 2000 1 Double click SRP 770_V3 X X exe file 2 Click Next Bu...

Страница 13: ...ff printer and turn on printer If you can see this dialog don t worry comment in dialog Printer and driver work well Please click Yes button 25 C Windows XP 2003 Server 1 Double click SRP 770_V3 X X e...

Страница 14: ...ype 6 Please turn off printer and turn on printer 27 If you can see this dialog don t worry comment in dialog Printer and driver work well Please click Continue Anyway button 7 If Add new hardware wiz...

Страница 15: ...Printer and driver work well Please click Continue Anyway button 29 9 Please click Finish button 12 3 Uninstall Windows Driver 1 Click on the Start button and then click on Settings Control Panel 2 D...

Страница 16: ...ngs 1 Measurement Select measurement of Top Margin Inch or millimeters 2 Top Margin top margin value of paper 3 Density Select density of printing quality 0 20 4 Media Type Select paper media type Bla...

Страница 17: ...tal conditions Humidity 30 80 RH Operating 10 90 RH Storage Except for paper LIFE Mechanism Head 10 000 000 lines 5 107 pulse 50km MCBF Mechanism 20 000 000 lines This marking shown on the product or...

Отзывы: