CB-100-1
41
4
Mounting
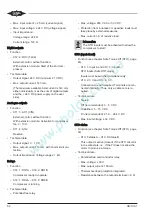
Information
Mount the VARIPACK frequency inverter always
vertically in an additional housing (e.g. switch
cabinet).
No open/free wall mounting possible!
The fixtures for the power connection cables and con-
trol cables are delivered as standard in the accessories
kit and must be mounted together with the ferrite core
or the ferrite cores (see figure 10, page 51) up to
VARIPACK housing size FJU+145, in order to achieve
the EMC class C2.
4.1
Transport and storage
!
!
NOTICE
Risk of damage to the VARIPACK frequency in-
verter!
Do not lift or set down the VARIPACK fre-
quency inverter at the connections.
Place it on clean, flat and dry surfaces only.
Storage in well-ventilated places and protected
from high temperatures, moisture, dust and
metal particles only!
Storage temperature: -25°C .. +55°C.
Transport temperature: -25°C .. +70°C.
4.2
Ventilation
!
!
NOTICE
The VARIPACK frequency inverters give off
heat in operation.
Insufficient or blocked air circulation and air sup-
ply at the ventilation slots and at the heat sink of
the VARIPACK frequency inverter can lead to
failure due to overheating!
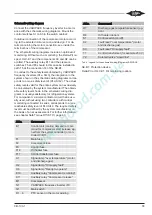
Observe the minimum clearances for ventilation
(see figure 2, page 41)!
When two or more VARIPACK frequency invert-
ers are mounted side by side, add up the clear-
ances!
When using filter fans, the required air volume flow
(m
3
/h) must be carefully determined to ensure sufficient
cooling of all electrical devices in the switch cabinet.
For protection from temperatures below 0°C and for
avoiding condensation, a switch cabinet heater may be
required, depending on the installation site and the cli-
matic conditions.
Rated values of the VARIPACK fans, see table 1, page
39.
B
A
C
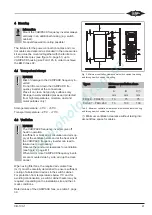
Fig. 2: Minimum ventilation clearances at switch cabinet mounting
and through-switch cabinet mounting
Types
Minimum ventilation clear-
ances
A
mm
B
mm
C ①
mm
FDU+6 .. FHU+73
10
75
75
FJU+87 .. FKU+260
10
100
100
Tab. 2: Minimum ventilation clearances at switch cabinet mounting
and through-switch cabinet mounting
①: Minimum ventilation clearance without taking into
account free space for cables.
Содержание VARIPACK FDU+12
Страница 12: ...CB 100 1 12 1 2 3 4 Abb 7 Steuremodul abmontieren...
Страница 46: ...CB 100 1 46 1 2 3 4 Fig 7 Dismounting the control module...
Страница 64: ...CB 100 1 64 Fig 17 Graphical representation of the general control functions of the extension module...
Страница 70: ...Notes...
Страница 71: ...Notes...


