background image

DB-300-9

32

7.1.3

OAHC series

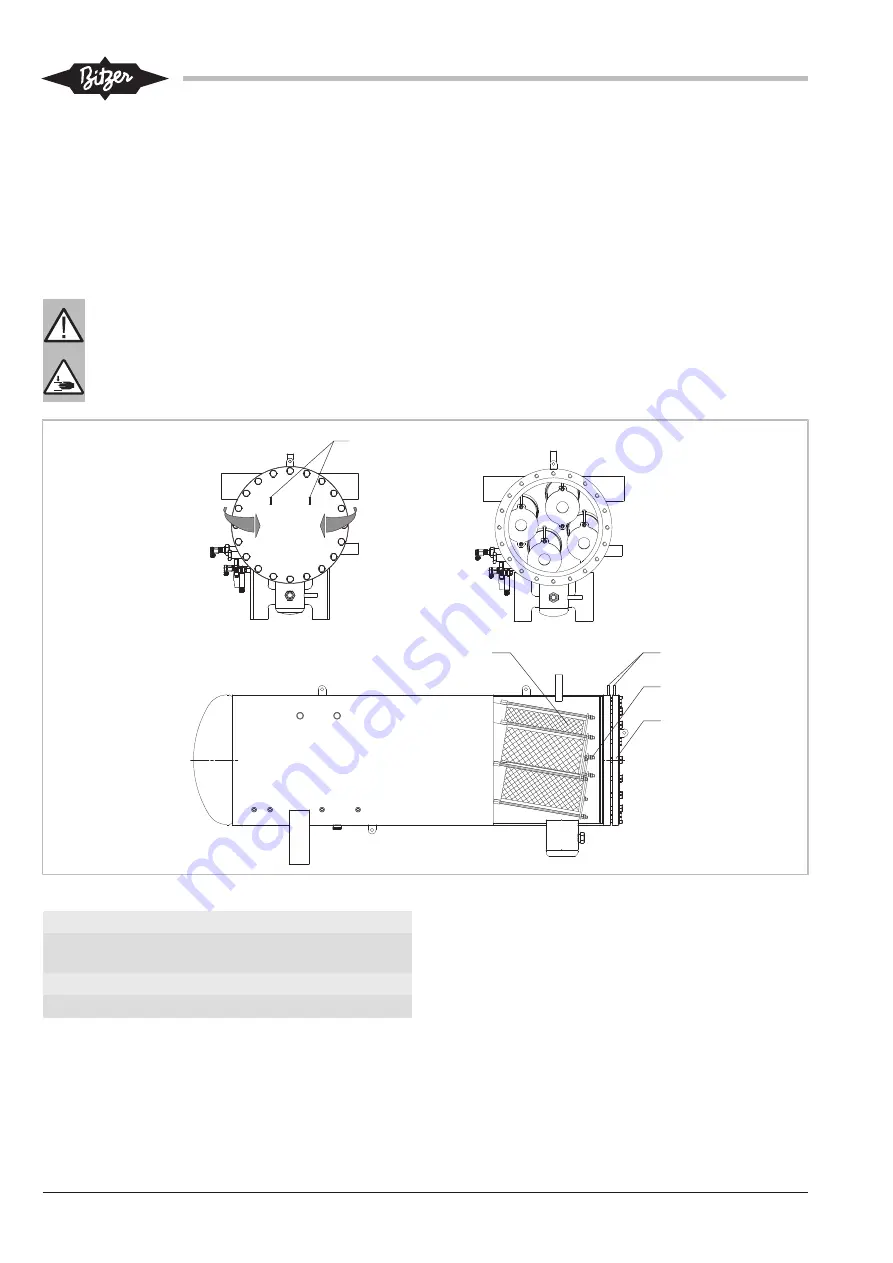
See see figure 22, page 32.

• To replace the filter cartridges, attach the eyelets (4)

of the cover (1) to a suitable lifting device.

• Loosen the screws on the cover (1) uniformly and re-

move the cover by pulling it forwards using the lifting
device.

WARNING
The cover is very heavy (100 kg)!
Risk of severe crushing!
Always use suitable devices to remove the
cover! Wear safety shoes!

• The OAHC.A contains 4 filter cartridges (3). Loosen

the fixing nuts and counter nuts (2) and take out the
cartridges (3) one after the other counter-clockwise.

• Install new filter cartridges accordingly. Tighten the

fixing nuts and counter nuts (2) (10 Nm).

• Insert a new gasket.

• Screw the cover (1) on (730 Nm).

3

2

1

4

4

Fig. 22: OAHC series: Changing the filter cartridges

1

Cover

2

Fixing nut with counter
nut

3

Filter cartridge

4

Eyelets

Содержание F062H(P)

Страница 1: ...ung Deutsch 34 Réservoirs sous pression Réservoirs de liquide et séparateurs d huile Traduction des instructions de service d origine Français 66 F062H P F3102N P F302G F1602G F202HA F3102NA F302K F1602K F182 F312 F212N3 FS33 FS268 FS36 P FS5502 P FS302K FS1602K OA1954 A OA25112 A OAF6288 OAF15211 OAC14011A OAC25112A OAS322 OAS3088 OAH2888 OAH7088 OAHC65051A OAHC100051A Installer Monteur Monteur ...

Страница 2: ...ion 11 4 7 Connecting the pipelines 11 4 7 1 Mounting the pressure relief valve 12 4 8 Oil separator 13 4 9 Liquid receiver connections 14 4 10 Connection dimensions for liquid receivers 17 4 11 Oil separator connections 20 4 12 Connection dimensions for oil separators 25 5 Commissioning 27 5 1 Charging with oil 27 5 2 Checking tightness 27 5 3 Evacuation 27 5 4 Charging refrigerant 28 5 5 Compres...

Страница 3: ...DB 300 9 3 8 Decommissioning 33 ...

Страница 4: ...thorized staff who have been trained and instructed accordingly Local regulations and guidelines apply with respect to the staff s qualification and expertise 2 2 Residual hazards The pressure equipment may present unavoidable re sidual risks That is why any person working on this device must carefully read these Operating Instruc tions The following regulations shall apply the relevant safety reg...

Страница 5: ... pipelines due to hydraulic overpressure Serious injuries are possible Make sure not to exceed maximum admissible pressures For work on the pressure device after having put the system into operation CAUTION Surface temperatures of more than 60 C or be low 0 C Risk of burns or frostbite Close off accessible areas and mark them Before performing any work on the pressure device switch off the install...

Страница 6: ...202HA F3102NA 1 2 A1 A2 A2L A3 B2L 28 bar 120 C 10 C F302K F1602K FS302K FS1602K 1 2 A1 A2 A2L A3 45 bar 33 bar 120 C 10 C 10 C 20 C OA1954 OA25112 OAF6288 OAF15211 OAH2888 OAH7088 1 2 A1 A2 A2L A3 28 bar 120 C 10 C OA1954A OA25112A OAS322 OAS3088 OAC14011A OAC25112A OAHC65051A OAH C100051A OAS322 OAS3088 1 2 A1 A2 A2L A3 B2L 28 bar 120 C 10 C OA1954 A OA25112 A OAF6288 OAF15211 OAH2888 OAH7088 OA...

Страница 7: ...d CO2 emission and uncontrolled deflating particularly in closed rooms Aerate closed machine rooms Make sure that the safety regulations in accord ance with EN 378 are complied with 3 2 System registration Liquid receivers and oil separators are pressure equip ment according to the EU Pressure Equipment Direct ive 2014 68 EU For this reason the entire system must be registered with the supervisory...

Страница 8: ...2H P F402HA FS402 P 39 III IV B D F552T P 54 III IV B D F562N P F562NA F562G F562K FS562 P 56 III IV B D F562N P 56 III IV B D F732N P FS732 P 73 III IV B D F902N P FS902 P 89 III IV B D F1052T P F1052TA F1052G F1052K 105 IV IV B D F1202N P 112 IV IV B D F1602N P F1602NA F1602G F1602K FS1602 P FS1602K 160 IV IV B D F2202N P FS2202 P 228 IV IV B D F3102N P F3102NA FS3102 P 320 IV IV B D FS33 2 6 I ...

Страница 9: ...3088 30 II III B D OAF6288 62 III IV B D OAF15211 152 IV IV B D OAH2888 112 IV IV B D OAH7088 228 IV IV B D OAHC65051A 630 IV IV B D OAHC80051A 1130 IV IV G OAHC100051A 2250 IV IV G Tab 2 Category and conformity assessment 4 Mounting 4 1 Transporting the pressure vessel Transport the pressure vessel screwed on a pallet Lift it using the eyebolts or the upper fastening brackets if available DANGER ...

Страница 10: ...e cases pressure relief devices should be in stalled to direct the refrigerant or the oil towards the low pressure side of the system emission reduction Safety switching devices for limiting the pressure According to the local regulations safety switching devices for pressure limiting must be provided 4 4 Removal clearance for probe Option Liquid receivers FS202 FS5502 If the probe for infinite li...

Страница 11: ...pipes in all com mon dimensions in millimetres and inches Brazed con nections have stepped diameters The pipe will im merge more or less depending on its dimensions If not required the end with the largest diameter can be cut off DANGER Risk of bursting the pressure device due to mechanical stress Serious injuries are possible Connect the pipeline to the pressure unit without stress First relieve ...

Страница 12: ...PTF Screw in the pressure re lief valve External thread 1 1 4 12 UNF Screw the pressure re lief valve into the adaptor Then fasten the adaptor at the pressure vessel with the union nut Available adaptors see figure 3 page 12 366 005 03 SW 22 1 2 14 NPTF 1 1 4 12 UNF 366 005 04 SW 12 G 1 2 1 1 4 12 UNF 366 005 05 SW 22 3 8 18 NPTF 1 1 4 12 UNF 366 005 01 SW 12 1 1 4 12 UNF 1 2 14 NPTF 366 005 02 SW...

Страница 13: ...rator for operation at low ambient temperatures or with high temperatures on the high pressure side during standstill e g heat pumps The oil level switch and the oil thermostat are sup plied separately and must be mounted on site Mounting position see figure 4 page 13 9 11 7 8 6 FZ 10 2 3 4 5 1 12 6 mm 1 4 Fig 4 Oil circuit with a compressor 1 Compressor 2 Oil filter 3 Oil flow switch 4 Oil soleno...

Страница 14: ...rked in the drawing facing down wards Keep the orientation of the connections as shown in the drawing 6 7 5 8 3 1 4 2 Fig 5 F062H P 7 6 5 8 5 3 1 4 2 1 Fig 6 F102H P F552H P F1052H P F1052T P F192T P F392T P F202HA F3102NA F202H P F552T P 2 3 1 4 6 7 5 5 5 Fig 7 F562N P F902N P F1202N P F3102N P F302G F1602G F182 F312 ...

Страница 15: ...DB 300 9 15 2 3 4 1 6 5 Fig 8 F302K F1602K 1 5 M10 2 3 6 Fig 9 FS33 FS38 FS83 FS36 P 4 1 3 2 6 Fig 10 FS56 FS76 FS126 FS48 FS68 FS78 FS128 FS188 FS268 FS302K FS1602K ...

Страница 16: ...Connection for pressure relief valve 5 Sight glass 6 Fixing Tab 3 Connection positions Dimensions if specified may have tolerances accord ing to EN ISO 13920 B The legend applies to all BITZER liquid receivers and contains connection positions that do not exist in each receiver series Fixing bracket Last letter N bottom Last letters H T bottom top ...

Страница 17: ...2H P 28 1 1 8 28 1 1 8 7 16 20 UNF see above 9 F402HA DN 25 1 1 8 DN 25 1 1 8 see above 9 F552T P 28 1 1 8 28 1 1 8 7 16 20 UNF see above 9 F562G 54 2 1 8 42 1 1 8 7 16 20 UNF see above 13 F562K 2 x 22 2 x 7 8 22 7 8 7 16 20 UNF see above 13 F562N 35 1 3 8 28 1 1 8 7 16 20 UNF see above 9 F562NP 42 1 5 8 35 1 3 8 see above 9 F562NA DN 40 1 5 8 DN 32 1 3 8 see above 9 F732N 35 1 3 8 28 1 1 8 7 16 2...

Страница 18: ...ove 13 FS126 P 12 1 2 12 1 2 7 16 20 UNF see above 13 FS128 16 5 8 12 1 2 7 16 20 UNF 13 FS128P 16 5 8 12 1 2 7 16 20 UNF see above 13 FS152 P 22 7 8 16 5 8 7 16 20 UNF see above 13 FS188 16 5 8 16 5 8 7 16 20 UNF 13 FS202 P 22 7 8 22 7 8 7 16 20 UNF see above 13 FS252 P 22 7 8 22 7 8 7 16 20 UNF see above 13 FS268 P 22 7 8 22 7 8 7 16 20 UNF see above 13 FS302 P 28 1 1 8 22 7 8 7 16 20 UNF see ab...

Страница 19: ... FS2202 P 76 3 1 8 54 2 1 8 1 4 18 NPTF see above 13 FS3102 P 76 3 1 8 54 2 1 8 1 4 18 NPTF see above 13 FS4002 P DN 100 76 3 1 8 1 4 18 NPTF see above 18 FS4752 P DN 100 76 3 1 8 1 4 18 NPTF see above 18 FS5502 P DN 100 76 3 1 8 1 4 18 NPTF see above 18 Connection for pressure relief valve upon request Tab 4 Connection dimensions for liquid receivers ...

Страница 20: ... oil separators of the OAS series with the fixing 12 marked in the drawing onto a vertical surface Keep the orientation of the connections as shown in the drawing 1 5 2 12 3 Fig 12 OAS322 OAS3088 8 4 7 6 3 9 2 5 1 12 Fig 13 OA1954 A OA4188 A OAF6288 12 8 4 7 6 3 9 2 1 5 Fig 14 OA9111 A OA25112 A OAF15211 7 6 3 4 10 8 1 2 11 12 9 5 DN20 Fig 15 OAC14011A OAC25112A ...

Страница 21: ...AH2888 OAH7088 X 460 372 521 100 100 1224 300 1425 1 3 4 12 UN 13 7 6 4 10 215 390 245 440 442 822 380 380 3 215 395 130 2 1 905 895 1 3 2 11 650 340 32 590 2175 916 DN15 DN25 9 DN25 7 8 7a 650 DN125 DN50 DN125 5 DN25 Fig 17 OAHC65051A ...

Страница 22: ... 300 508 7 4 7 2 DN25 9 DN32 6 7 8 447 483 455 444 1093 500 570 265 192 2 1 5 DN15 975 523 3 100 1224 475 2085 DN25 13 10 1 1 4 12 UNF 723 905 1180 1 3 2 500 11 X 650 475 34 610 2528 DN150 DN150 DN65 8a Fig 18 OAHC80051A ...

Страница 23: ...517 2157 1 3 4 12 UN 13 817 7 4 7 DN25 9 DN32 6 7 8 500 1057 5 DN15 7 8 3100 699 1382 760 320 253 1114 3 1 1 4 12 UNF 10 1000 1130 860 3 500 11 34 1407 X 900 547 3 2 DN200 DN65 1 DN200 DN65 2 DN200 1 DN200 8a Fig 19 OAHC100051A ...

Страница 24: ...on for oil level switch 9 Connection for pressure relief valve 10 Oil outlet secondary stage with OAHC tertiary stage 11 Maintenance flange for filter cartridges fil ters of the secondary stage with OAHC filters of the tertiary stage 12 Fixing hole 13 Oil drain Tab 5 Connection positions Dimensions if specified may have tolerances accord ing to EN ISO 13920 B The legend applies to all BITZER oil s...

Страница 25: ... 80 DN 32 DN 12 1 8 27 NPTF 3 8 18 NPTF 3 8 18 NPTF 1 1 4 12 UNF 13 OA9111A DN 100 DN 100 DN 40 DN 12 1 8 27 NPTF 3 8 18 NPTF 3 8 18 NPTF 1 1 4 12 UNF 14 OA14111A DN 100 DN 100 DN 50 DN 12 1 8 27 NPTF 3 8 18 NPTF 3 8 18 NPTF 1 1 4 12 UNF 14 OA25112A DN 125 DN 125 DN 80 DN 12 1 8 27 NPTF 3 8 18 NPTF 1 1 8 18 UNEF 1 1 4 12 UNF 14 OAC14011A DN 100 DN 100 DN 50 DN 12 1 8 27 NPTF 3 8 18 NPTF 3 8 18 NPT...

Страница 26: ... 25 3 8 18 NPTF 3 8 18 NPTF DN 25 OAHC80051A DN 150 DN 150 DN 65 DN 25 DN 25 3 8 18 NPTF 1 1 8 18 UNEF DN 32 OAHC100051A DN 200 DN 200 DN 65 DN 25 DN 25 3 8 18 NPTF 1 1 8 18 UNEF DN 32 External thread 1 1 4 12 UNF internal thread 3 8 18 NPTF Tab 6 Connection dimensions for oil separators ...

Страница 27: ...S1055 approx 1 0 l OAS1655 approx 1 0 l OAS3088 approx 1 5 l OAF6288 11 8 l OAF15211 31 8 l OAHC65051A 80 l OAHC80051A 180 l OAHC100051A 310 l 5 2 Checking tightness Check the refrigerant circuit assembly for tightness as a whole or in parts according to EN 378 2 or other applicable equivalent safety standards For this create an overpressure preferably using dried nitrogen DANGER Risk of bursting ...

Страница 28: ...Charge the condenser or receiver directly with liquid refrigerant on systems with flooded evaporator maybe also the evaporator Blends must be taken out of the charging cylinder as a solid liquid After commissioning it may be necessary to add re frigerant While the compressor is running charge with refrigerant on the suction side preferably at the evaporator inlet 5 5 Compressor start 5 5 1 Checkin...

Страница 29: ... in combined and secondary oil sep arators must be changed when the pressure drop ex ceeds 0 5 bar 7 1 Changing the filter cartridges Close the shut off valves before and after the oil sep arator Depressurize the oil separators For this extract the refrigerant and dispose of it properly Remove the filter cartridges Install new cartridges accordingly Complete oil charge see chapter Charging with oi...

Страница 30: ...connecting piece 6 Take out the lower filter cartridge The lower guide bar 7 remains in the combined oil separator Remove the other cartridge pairs accordingly Once the sealing nut 2 and the centring piece 3 have been removed the respective cartridge pair can be tilted Install new filter cartridges accordingly Tighten the sealing nuts 2 10 Nm Screw the service flange 1 on 98 Nm 1 2 4 5 6 7 OAC2511...

Страница 31: ...ine 4 Open the flange 1 Collect any remaining oil OAS332 and OAS744 Unscrew the filter cartridge 3 OAS1055 OAS3088 Remove the screw 2 Pull out the filter cartridge 3 downwards 1 2 3 4 Fig 21 OAS series Changing the filter cartridges 1 Flange 2 Fixing screw 3 Filter cartridge 4 Oil return ...

Страница 32: ...Risk of severe crushing Always use suitable devices to remove the cover Wear safety shoes The OAHC A contains 4 filter cartridges 3 Loosen the fixing nuts and counter nuts 2 and take out the cartridges 3 one after the other counter clockwise Install new filter cartridges accordingly Tighten the fixing nuts and counter nuts 2 10 Nm Insert a new gasket Screw the cover 1 on 730 Nm 3 2 1 4 4 Fig 22 OA...

Страница 33: ...frigerant pipes and oil pipes before and behind the oil cooler Keep a pan ready Drain oil collect oil and dispose of it prop erly WARNING The pressure equipment is under pressure Serious injuries are possible Depressurise the pressure equipment Wear safety goggles 8 Decommissioning In case of damage the pressure vessel must be separ ated from the refrigerator system and replaced For this extract t...

Страница 34: ...lterpatrone 43 4 6 Lieferzustand 43 4 7 Rohrleitungen anschliessen 43 4 7 1 Druckentlastungsventil montieren 44 4 8 Ölabscheider 45 4 9 Anschlüsse Flüssigkeitssammler 46 4 10 Anschlussmaße für Flüssigkeitssammler 49 4 11 Anschlüsse Ölabscheider 52 4 12 Anschlussmaße für Ölabscheider 57 5 In Betrieb nehmen 59 5 1 Öl einfüllen 59 5 2 Dichtheit prüfen 59 5 3 Evakuieren 59 5 4 Kältemittel einfüllen 60...

Страница 35: ...DB 300 9 35 8 Außer Betrieb nehmen 65 ...

Страница 36: ...alifikation und Sachkunde des Fachpersonals gelten die jeweils landesüblichen Vorschriften und Richtlinien 2 2 Restgefahren Vom Druckgerät können unvermeidbare Restgefahren ausgehen Jede Person die an diesem Gerät arbeitet muss deshalb diese Betriebsanleitung sorgfältig lesen Es gelten zwingend die einschlägigen Sicherheitsvorschriften und Nor men z B EN 378 die allgemein anerkannten Sicherheitsre...

Страница 37: ...eilen und Rohrleitungen durch hydraulischen Überdruck Schwere Verletzungen möglich Maximal zulässige Drücke nicht überschreiten Bei Arbeiten am Druckgerät nachdem die Anlage in Betrieb genommen wurde VORSICHT Oberflächentemperaturen von über 60 C bzw unter 0 C Verbrennungen und Erfrierungen möglich Zugängliche Stellen absperren und kennzeich nen Vor Arbeiten am Druckgerät Anlage ausschal ten und a...

Страница 38: ... F3102NA 1 2 A1 A2 A2L A3 B2L 28 bar 120 C 10 C F302K F1602K FS302K FS1602K 1 2 A1 A2 A2L A3 45 bar 33 bar 120 C 10 C 10 C 20 C OA1954 OA25112 OAF6288 OAF15211 OAH2888 OAH7088 1 2 A1 A2 A2L A3 28 bar 120 C 10 C OA1954A OA25112A OAS322 OAS3088 OAC14011A OAC25112A OAHC65051A OAH C100051A OAS322 OAS3088 1 2 A1 A2 A2L A3 B2L 28 bar 120 C 10 C OA1954 A OA25112 A OAF6288 OAF15211 OAH2888 OAH7088 OAS322 ...

Страница 39: ... zu hoher Konzentrationen Austritt von CO2 und unkontrolliertes Abblasen v a in geschlossen Räumen vermeiden Geschlossene Maschinenräume belüften Sicherheitsbestimmungen gemäß EN 378 ein halten 3 2 Anlage anmelden Flüssigkeitssammler und Ölabscheider sind Druckgerä te im Sinne der EU Druckgeräterichtlinie 2014 68 EU Deshalb muss die gesamte Anlage entsprechend den örtlichen Vorschriften bei der Au...

Страница 40: ...B D F552T P 54 III IV B D F562N P F562NA F562G F562K FS562 P 56 III IV B D F562N P 56 III IV B D F732N P FS732 P 73 III IV B D F902N P FS902 P 89 III IV B D F1052T P F1052TA F1052G F1052K 105 IV IV B D F1202N P 112 IV IV B D F1602N P F1602NA F1602G F1602K FS1602 P FS1602K 160 IV IV B D F2202N P FS2202 P 228 IV IV B D F3102N P F3102NA FS3102 P 320 IV IV B D FS33 2 6 I II A2 FS36 P 3 0 I II A2 FS48 ...

Страница 41: ... 62 III IV B D OAF15211 152 IV IV B D OAH2888 112 IV IV B D OAH7088 228 IV IV B D OAHC65051A 630 IV IV B D OAHC80051A 1130 IV IV G OAHC100051A 2250 IV IV G Tab 2 Kategorie und Konformitätsbewertung 4 Montage 4 1 Druckbehälter transportieren Druckbehälter verschraubt auf der Palette transportie ren Wenn vorhanden an Transportösen oder oberen Befestigungswinkeln anheben GEFAHR Schwebende Last Nicht ...

Страница 42: ...einrichtun gen eingesetzt werden die das Kältemittel oder das Öl auf die Niederdruckseite der Anlage leiten Emissions minderung Sicherheitsschalteinrichtungen Entsprechend den örtlichen Vorschriften müssen druck begrenzende Sicherheitsschalteinrichtungen vorgese hen werden 4 4 Ausbaufreiraum für Messsonde Option Flüssikeitssammler FS202 FS5502 Wenn die Sonde für stufenlose Überwachung des Flüs sig...

Страница 43: ...hre in den gängigen Millimeter und Zollabmessungen ver wendet werden können Lötanschlüsse haben gestufte Durchmesser Je nach Abmessung wird das Rohr mehr oder weniger tief eintauchen Im Bedarfsfall kann das Buchsenende mit dem größeren Durchmesser auch abgesägt werden GEFAHR Berstgefahr des Druckgeräts durch mechani sche Spannungen Schwere Verletzungen möglich Rohrleitungen spannungsfrei an das Dr...

Страница 44: ...nengewinde 3 8 18 NPTF Druckentlastungsventil einbauen Außengewinde 1 1 4 12 UNF Druckentlastungsventil in Adapter einschrauben Dann Adapter mit Überwurfmut ter am Druckbehälter befestigen Lieferbare Adapter siehe Abbildung 3 Seite 44 366 005 03 SW 22 1 2 14 NPTF 1 1 4 12 UNF 366 005 04 SW 12 G 1 2 1 1 4 12 UNF 366 005 05 SW 22 3 8 18 NPTF 1 1 4 12 UNF 366 005 01 SW 12 1 1 4 12 UNF 1 2 14 NPTF 366...

Страница 45: ... niedrigen Umgebungstemperaturen oder mit hohen Temperaturen auf der Hochdruckseite während des Stillstands z B Wärmepumpen Der Ölniveauwächter und der Ölthermostat werden separat geliefert und müssen auf der Baustelle mon tiert werden Einbauposition siehe Abbildung 4 Seite 45 9 11 7 8 6 FZ 10 2 3 4 5 1 12 6 mm 1 4 Abb 4 Ölkreislauf mit einem Verdichter 1 Verdichter 2 Ölfilter 3 Öldurchflusswächte...

Страница 46: ...h unten auf eine waagrechte Fläche montieren Die Ausrichtung der An schlüsse der Zeichnung entsprechend beibehalten 6 7 5 8 3 1 4 2 Abb 5 F062H P 7 6 5 8 5 3 1 4 2 1 Abb 6 F102H P F552H P F1052H P F1052T P F192T P F392T P F202HA F3102NA F202H P F552T P 2 3 1 4 6 7 5 5 5 Abb 7 F562N P F902N P F1202N P F3102N P F302G F1602G F182 F312 ...

Страница 47: ...DB 300 9 47 2 3 4 1 6 5 Abb 8 F302K F1602K 1 5 M10 2 3 6 Abb 9 FS33 FS38 FS83 FS36 P 4 1 3 2 6 Abb 10 FS56 FS76 FS126 FS48 FS68 FS78 FS128 FS188 FS268 FS302K FS1602K ...

Страница 48: ... für Druckentlastungsventil 5 Schauglas 6 Befestigung Tab 3 Anschlusspositionen Maßangaben falls angegeben können Toleranzen entsprechend EN ISO 13920 B aufweisen Legende gilt für alle BITZER Flüssigkeitssammler und enthält Anschlusspositionen die nicht in jeder Samm lerserie vorkommen Befestigungswinkel Endbuchstabe N unten Endbuchstabe H T unten oben ...

Страница 49: ...02H P 28 1 1 8 28 1 1 8 7 16 20 UNF s o 9 F402HA DN 25 1 1 8 DN 25 1 1 8 s o 9 F552T P 28 1 1 8 28 1 1 8 7 16 20 UNF s o 9 F562G 54 2 1 8 42 1 1 8 7 16 20 UNF s o 13 F562K 2 x 22 2 x 7 8 22 7 8 7 16 20 UNF s o 13 F562N 35 1 3 8 28 1 1 8 7 16 20 UNF s o 9 F562NP 42 1 5 8 35 1 3 8 s o 9 F562NA DN 40 1 5 8 DN 32 1 3 8 s o 9 F732N 35 1 3 8 28 1 1 8 7 16 20 UNF s o 9 F732NP 42 1 5 8 35 1 3 8 s o 9 F902...

Страница 50: ... o 13 FS128 16 5 8 12 1 2 7 16 20 UNF 13 FS128P 16 5 8 12 1 2 7 16 20 UNF s o 13 FS152 P 22 7 8 16 5 8 7 16 20 UNF s o 13 FS188 16 5 8 16 5 8 7 16 20 UNF 13 FS202 P 22 7 8 22 7 8 7 16 20 UNF s o 13 FS252 P 22 7 8 22 7 8 7 16 20 UNF s o 13 FS268 P 22 7 8 22 7 8 7 16 20 UNF s o 13 FS302 P 28 1 1 8 22 7 8 7 16 20 UNF s o 13 FS302K 2 x 22 2 x 7 8 22 7 8 7 16 20 UNF s o 13 FS402 P 28 1 1 8 22 7 8 7 16 ...

Страница 51: ... 6 Befesti gung Ø FS3102 P 76 3 1 8 54 2 1 8 1 4 18 NPTF s o 13 FS4002 P DN 100 76 3 1 8 1 4 18 NPTF s o 18 FS4752 P DN 100 76 3 1 8 1 4 18 NPTF s o 18 FS5502 P DN 100 76 3 1 8 1 4 18 NPTF s o 18 Anschluss für Druckentlastungventil auf Anfrage Tab 4 Anschlussmaße Flüssigkeitssammler ...

Страница 52: ...r der OAS Serie mit der in der Zeichnung gekennzeichneten Be festigung 12 an eine senkrechte Fläche montieren Die Ausrichtung der Anschlüsse der Zeichnung ent sprechend beibehalten 1 5 2 12 3 Abb 12 OAS322 OAS3088 8 4 7 6 3 9 2 5 1 12 Abb 13 OA1954 A OA4188 A OAF6288 12 8 4 7 6 3 9 2 1 5 Abb 14 OA9111 A OA25112 A OAF15211 7 6 3 4 10 8 1 2 11 12 9 5 DN20 Abb 15 OAC14011A OAC25112A ...

Страница 53: ...AH2888 OAH7088 X 460 372 521 100 100 1224 300 1425 1 3 4 12 UN 13 7 6 4 10 215 390 245 440 442 822 380 380 3 215 395 130 2 1 905 895 1 3 2 11 650 340 32 590 2175 916 DN15 DN25 9 DN25 7 8 7a 650 DN125 DN50 DN125 5 DN25 Abb 17 OAHC65051A ...

Страница 54: ... 300 508 7 4 7 2 DN25 9 DN32 6 7 8 447 483 455 444 1093 500 570 265 192 2 1 5 DN15 975 523 3 100 1224 475 2085 DN25 13 10 1 1 4 12 UNF 723 905 1180 1 3 2 500 11 X 650 475 34 610 2528 DN150 DN150 DN65 8a Abb 18 OAHC80051A ...

Страница 55: ...517 2157 1 3 4 12 UN 13 817 7 4 7 DN25 9 DN32 6 7 8 500 1057 5 DN15 7 8 3100 699 1382 760 320 253 1114 3 1 1 4 12 UNF 10 1000 1130 860 3 500 11 34 1407 X 900 547 3 2 DN200 DN65 1 DN200 DN65 2 DN200 1 DN200 8a Abb 19 OAHC100051A ...

Страница 56: ...chluss für Ölniveauwächter 9 Anschluss für Druckentlastungsventil 10 Ölaustritt Sekundärstufe bei OAHC aus Tertiärstufe 11 Wartungsflansch für Filterpatronen Filter der Sekundärstufe bei OAHC Filter der Tertiärstufe 12 Befestigungsloch 13 Ölablass Tab 5 Anschlusspositionen Maßangaben falls angegeben können Toleranzen entsprechend EN ISO 13920 B aufweisen Legende gilt für alle BITZER Ölabscheider u...

Страница 57: ...N 32 DN 12 1 8 27 NPTF 3 8 18 NPTF 3 8 18 NPTF 1 1 4 12 UNF 13 OA9111A DN 100 DN 100 DN 40 DN 12 1 8 27 NPTF 3 8 18 NPTF 3 8 18 NPTF 1 1 4 12 UNF 14 OA14111A DN 100 DN 100 DN 50 DN 12 1 8 27 NPTF 3 8 18 NPTF 3 8 18 NPTF 1 1 4 12 UNF 14 OA25112A DN 125 DN 125 DN 80 DN 12 1 8 27 NPTF 3 8 18 NPTF 1 1 8 18 UNEF 1 1 4 12 UNF 14 OAC14011A DN 100 DN 100 DN 50 DN 12 1 8 27 NPTF 3 8 18 NPTF 3 8 18 NPTF 1 1...

Страница 58: ...DN 25 DN 25 3 8 18 NPTF 3 8 18 NPTF DN 25 OAHC80051A DN 150 DN 150 DN 65 DN 25 DN 25 3 8 18 NPTF 1 1 8 18 UNEF DN 32 OAHC100051A DN 200 DN 200 DN 65 DN 25 DN 25 3 8 18 NPTF 1 1 8 18 UNEF DN 32 Außengewinde 1 1 4 12 UNF Innengewinde 3 8 18 NPTF Tab 6 Anschlussmaße für Ölabscheider ...

Страница 59: ...0 5 l OAS744 ca 1 0 l OAS1055 ca 1 0 l OAS1655 ca 1 0 l OAS3088 ca 1 5 l OAF6288 11 8 l OAF15211 31 8 l OAHC65051A 80 l OAHC80051A 180 l OAHC100051A 310 l 5 2 Dichtheit prüfen Kältekreislauf Baugruppe als Ganzes oder in Teilen auf Dichtheit prüfen entsprechend EN 378 2 oder gültigen äquivalenten Sicherheitsnormen Dazu vor zugsweise mit getrocknetem Stickstoff einen Überdruck erzeugen GEFAHR Berstg...

Страница 60: ...üssiges Kältemittel direkt in den Verflüssiger bzw Sammler füllen bei Anlagen mit überflutetem Ver dampfer evtl auch in den Verdampfer Gemische dem Füllzylinder als blasenfreie Flüssig keit entnehmen Nach Inbetriebnahme kann es notwendig werden Kältemittel zu ergänzen Bei laufendem Verdichter Kältemittel auf der Saugseite einfüllen am besten am Verdampfereintritt 5 5 Verdichteranlauf 5 5 1 Ölnivea...

Страница 61: ...bi und Sekundärölabschei dern müssen gewechselt werden wenn der Druckabfall 0 5 bar übersteigt 7 1 Filterpatronen wechseln Absperrventile vor und nach dem Ölabscheider schließen Ölabscheider auf drucklosen Zustand bringen Dazu Kältemittel absaugen und umweltgerecht entsorgen Filterpatronen ausbauen Neue Patronen entsprechend einbauen Ölfüllung ergänzen siehe Kapitel Öl einfüllen Seite 59 Gebraucht...

Страница 62: ...gs stück 6 entfernen Untere Filterpartone herausneh men Der untere Führungsstab 7 bleibt im Kombiöl abscheider Die weiteren Patronenpaare entsprechend entfer nen Sobald Verschlussmutter 2 und Zentrierstück 3 entfernt sind kann das jeweilige Patronenpaar ge kippt werden Neue Filterpatronen entsprechend einbauen Ver schlussmuttern 2 anziehen 10 Nm Service Flansch 1 verschrauben 98 Nm 1 2 4 5 6 7 OAC...

Страница 63: ...ablassen Flansch 1 öffnen Dabei restliches Öl auffangen OAS332 und OAS744 Filterpatrone 3 ausschrau ben OAS1055 OAS3088 Schraube 2 entfernen Filterpatrone 3 nach unten herausziehen 1 2 3 4 Abb 21 OAS Serie Filterpatronen wechseln 1 Flansch 2 Befestigungsschraube 3 Filterpatrone 4 Ölrückführung ...

Страница 64: ...möglich Deckel nur mit geeigneten Hilfsmitteln entfer nen Sicherheitsschuhe tragen Im OAHC A befinden sich 4 Filterpatronen 3 Be festigungs und Kontermuttern 2 lösen und Patro nen 3 nacheinander gegen den Uhrzeigersinn her ausnehmen Neue Filterpatronen entsprechend einbauen Befes tigungs und Kontermuttern 2 anziehen 10 Nm Neue Dichtung einsetzen Deckel 1 verschrauben 730 Nm 3 2 1 4 4 Abb 22 OAHC S...

Страница 65: ...lleitungen vor und hinter dem Druckgerät absperren Wanne bereithalten Öl ab lassen dabei auffangen und umweltgerecht entsorgen WARNUNG Druckgerät steht unter Druck Schwere Verletzungen möglich Druckgerät auf drucklosen Zustand bringen Schutzbrille tragen 8 Außer Betrieb nehmen Im Schadensfall muss der Druckbehälter vom Kältesys tem getrennt und ausgetauscht werden Dazu Kältemit tel absaugen und Öl...

Страница 66: ...vraison 76 4 7 Raccorder les conduites 76 4 7 1 Monter la soupape de décharge 77 4 8 Séparateur d huile 78 4 9 Raccords réservoirs de liquide 79 4 10 Cotes de raccordement pour réservoirs de liquide 82 4 11 Raccords séparateurs d huile 85 4 12 Cotes de raccordement pour séparateur d huile 90 5 Mettre en service 92 5 1 Remplir d huile 92 5 2 Contrôler l étanchéité 92 5 3 Tirage à vide 93 5 4 Rempli...

Страница 67: ...DB 300 9 67 8 Mettre hors service 98 ...

Страница 68: ...t installations frigorifiques Les qualifications et compétences des personnels spéciali sés sont décrites dans les réglementations et directives nationales 2 2 Dangers résiduels Des dangers résiduels inévitables sont susceptibles d être causés par les équipements sous pression Toute personne travaillant sur cet appareil doit donc lire attentivement ces instructions de service Doivent être absolume...

Страница 69: ... tuyaux dû à une surpression hydraulique Risque de blessures graves Ne pas dépasser les pressions maximales ad missibles Pour les travaux sur l équipement sous pression après la mise en service de l installation ATTENTION Les températures de surface peuvent dépasser 60 C ou passer en dessous de 0 C Risque de brûlures ou de gelures Fermer et signaler les endroits accessibles Avant tout travail sur ...

Страница 70: ...0 C F202HA F3102NA 1 2 A1 A2 A2L A3 B2L 28 bar 120 C 10 C F302K F1602K FS302K FS1602K 1 2 A1 A2 A2L A3 45 bar 33 bar 120 C 10 C 10 C 20 C OA1954 OA25112 OAF6288 OAF15211 OAH2888 OAH7088 1 2 A1 A2 A2L A3 28 bar 120 C 10 C OA1954A OA25112A OAS322 OAS3088 OAC14011A OAC25112A OAHC65051A OAHC100051A OAS322 OAS3088 1 2 A1 A2 A2L A3 B2L 28 bar 120 C 10 C OA1954 A OA25112 A OAF6288 OAF15211 OAH2888 OAH708...

Страница 71: ...te in contrôlée en particulier dans les pièces fer mées Ventiler les locaux de machines fermés Respecter les exigences de sécurité spécifiées par la norme EN 378 3 2 Déclaration de l installation Les réservoirs de liquide et les séparateurs d huile sont des réservoirs sous pression d après la directive équi pements sous pression 2014 68 UE Par conséquent l ensemble de l installation devra être déc...

Страница 72: ...39 III IV B D F552T P 54 III IV B D F562N P F562NA F562G F562K FS562 P 56 III IV B D F562N P 56 III IV B D F732N P FS732 P 73 III IV B D F902N P FS902 P 89 III IV B D F1052T P F1052TA F1052G F1052K 105 IV IV B D F1202N P 112 IV IV B D F1602N P F1602NA F1602G F1602K FS1602 P FS1602K 160 IV IV B D F2202N P FS2202 P 228 IV IV B D F3102N P F3102NA FS3102 P 320 IV IV B D FS33 2 6 I II A2 FS36 P 3 0 I I...

Страница 73: ...D OAH7088 228 IV IV B D OAHC65051A 630 IV IV B D OAHC80051A 1130 IV IV G OAHC100051A 2250 IV IV G Tab 2 Catégorie et évaluation de la conformité 4 Montage 4 1 Transport du réservoir sous pression Transporter le réservoir sous pression vissé sur une palette Utiliser les œillets de suspension ou les équerres de fixation de dessus si disponibles pour soulever le réservoir DANGER Charge suspendue Ne p...

Страница 74: ...st supérieure à 90 de la contenance du réservoir sous pression à 20 C La contenance si gnifie le volume entre les vannes pouvant être fer mées en fonctionnement en amont et en aval d un réservoir sous pression Dans le cas de deux réser voirs montés en série cela correspond au volume des deux réservoirs et de la conduite Dans ces cas il faudrait préconiser l emploi de sys tèmes de décharge qui diri...

Страница 75: ...732 1530 mm 34740504 FS2202 FS4002 1640 mm 34740505 FS902 FS4752 1740 mm 34740506 FS1122 1280 mm 34740503 FS1602 FS5502 2040 mm 34740507 FS3102 2140 mm 34740508 4 5 Espace pour retrait de la cartouche filtrante Séparateur d huile pour NH3 OAC14011A OAC25112A OAS322 OAS3088 OAHC65051A OAHC100051A Il faut monter les séparateurs d huile combinés et se condaires de telle manière que les cartouches fil...

Страница 76: ...ement sous pression Évacuer tout d abord la surpression du réservoir sous pression Ouvrir les raccords prudemment AVERTISSEMENT L équipement sous pression est sous pression Risque de blessures graves Évacuer la pression de l équipement sous pres sion Porter des lunettes de protection Retirer les vannes d arrêt et ou les raccords à braser AVIS Risque de réactions chimiques en cas d intro duction d ...

Страница 77: ...adaptateur Puis fixer l adaptateur sur le réservoir sous pression avec l écrou raccord Adaptateurs disponibles voir figure 3 page 77 366 005 03 SW 22 1 2 14 NPTF 1 1 4 12 UNF 366 005 04 SW 12 G 1 2 1 1 4 12 UNF 366 005 05 SW 22 3 8 18 NPTF 1 1 4 12 UNF 366 005 01 SW 12 1 1 4 12 UNF 1 2 14 NPTF 366 005 02 SW 22 G 1 2 1 1 4 12 UNF Fig 3 Adaptateur pour la soupape de décharge ...

Страница 78: ...ement à température ambiante basse ou en cas de températures élevées du côté haute pres sion pendant l arrêt par ex pompes à chaleur Le contrôleur de niveau d huile et le thermostat d huile sont livrés séparément et doivent être montés sur place Position de montage voir figure 4 page 78 9 11 7 8 6 FZ 10 2 3 4 5 1 12 6 mm 1 4 Fig 4 Circuit d huile avec un compresseur 1 Compresseur 2 Filtre à huile ...

Страница 79: ...indiquée sur le dessin poin tant vers le bas Maintenir l orientation des raccords comme illustré au croquis coté 6 7 5 8 3 1 4 2 Fig 5 F062H P 7 6 5 8 5 3 1 4 2 1 Fig 6 F102H P F552H P F1052H P F1052T P F192T P F392T P F202HA F3102NA F202H P F552T P 2 3 1 4 6 7 5 5 5 Fig 7 F562N P F902N P F1202N P F3102N P F302G F1602G F182 F312 ...

Страница 80: ...DB 300 9 80 2 3 4 1 6 5 Fig 8 F302K F1602K 1 5 M10 2 3 6 Fig 9 FS33 FS38 FS83 FS36 P 4 1 3 2 6 Fig 10 FS56 FS76 FS126 FS48 FS68 FS78 FS128 FS188 FS268 FS302K FS1602K ...

Страница 81: ...décharge 5 Voyant 6 Fixation Tab 3 Positions de raccordement Les cotes indiquées sont susceptibles de présenter une tolérance selon la norme EN ISO 13920 B La légende vaut pour tous les réservoirs de liquide BITZER et comprend des positions de raccordement qui ne sont pas disponibles sur toutes les séries de ré servoirs Équerre de fixation Lettre finale N en bas Lettre finale H T en bas en haut ...

Страница 82: ...6 20 UNF c f plus haut 9 F402HA DN 25 1 1 8 DN 25 1 1 8 c f plus haut 9 F552T P 28 1 1 8 28 1 1 8 7 16 20 UNF c f plus haut 9 F562G 54 2 1 8 42 1 1 8 7 16 20 UNF c f plus haut 13 F562K 2 x 22 2 x 7 8 22 7 8 7 16 20 UNF c f plus haut 13 F562N 35 1 3 8 28 1 1 8 7 16 20 UNF c f plus haut 9 F562NP 42 1 5 8 35 1 3 8 c f plus haut 9 F562NA DN 40 1 5 8 DN 32 1 3 8 c f plus haut 9 F732N 35 1 3 8 28 1 1 8 ...

Страница 83: ...us haut 13 FS128 16 5 8 12 1 2 7 16 20 UNF 13 FS128P 16 5 8 12 1 2 7 16 20 UNF c f plus haut 13 FS152 P 22 7 8 16 5 8 7 16 20 UNF c f plus haut 13 FS188 16 5 8 16 5 8 7 16 20 UNF 13 FS202 P 22 7 8 22 7 8 7 16 20 UNF c f plus haut 13 FS252 P 22 7 8 22 7 8 7 16 20 UNF c f plus haut 13 FS268 P 22 7 8 22 7 8 7 16 20 UNF c f plus haut 13 FS302 P 28 1 1 8 22 7 8 7 16 20 UNF c f plus haut 13 FS302K 2 x 2...

Страница 84: ...c f plus haut 13 FS3102 P 76 3 1 8 54 2 1 8 1 4 18 NPTF c f plus haut 13 FS4002 P DN 100 76 3 1 8 1 4 18 NPTF c f plus haut 18 FS4752 P DN 100 76 3 1 8 1 4 18 NPTF c f plus haut 18 FS5502 P DN 100 76 3 1 8 1 4 18 NPTF c f plus haut 18 Raccord pour soupape de décharge sur demande Tab 4 Cotes de raccordement réservoirs de liquide ...

Страница 85: ... huile de la série OAS doivent être montés sur une surface verticale à l aide de la fixation 12 indiquée sur le dessin Maintenir l orientation des raccords comme illustré au croquis co té 1 5 2 12 3 Fig 12 OAS322 OAS3088 8 4 7 6 3 9 2 5 1 12 Fig 13 OA1954 A OA4188 A OAF6288 12 8 4 7 6 3 9 2 1 5 Fig 14 OA9111 A OA25112 A OAF15211 7 6 3 4 10 8 1 2 11 12 9 5 DN20 Fig 15 OAC14011A OAC25112A ...

Страница 86: ...AH2888 OAH7088 X 460 372 521 100 100 1224 300 1425 1 3 4 12 UN 13 7 6 4 10 215 390 245 440 442 822 380 380 3 215 395 130 2 1 905 895 1 3 2 11 650 340 32 590 2175 916 DN15 DN25 9 DN25 7 8 7a 650 DN125 DN50 DN125 5 DN25 Fig 17 OAHC65051A ...

Страница 87: ... 300 508 7 4 7 2 DN25 9 DN32 6 7 8 447 483 455 444 1093 500 570 265 192 2 1 5 DN15 975 523 3 100 1224 475 2085 DN25 13 10 1 1 4 12 UNF 723 905 1180 1 3 2 500 11 X 650 475 34 610 2528 DN150 DN150 DN65 8a Fig 18 OAHC80051A ...

Страница 88: ...517 2157 1 3 4 12 UN 13 817 7 4 7 DN25 9 DN32 6 7 8 500 1057 5 DN15 7 8 3100 699 1382 760 320 253 1114 3 1 1 4 12 UNF 10 1000 1130 860 3 500 11 34 1407 X 900 547 3 2 DN200 DN65 1 DN200 DN65 2 DN200 1 DN200 8a Fig 19 OAHC100051A ...

Страница 89: ...rôleur de niveau d huile 9 Raccord pour la soupape de décharge 10 Sortie d huile étage secondaire pour OAHC étage tertiaire 11 Bride de service pour cartouches de fil trage filtre de l étage secondaire pour OAHC filtre de l étage tertiaire 12 Trou de fixation 13 Vidange d huile Tab 5 Positions de raccordement Les cotes indiquées sont susceptibles de présenter une tolérance selon la norme EN ISO 13...

Страница 90: ... DN 80 DN 32 DN 12 1 8 27 NPTF 3 8 18 NPTF 3 8 18 NPTF 1 1 4 12 UNF 13 OA9111A DN 100 DN 100 DN 40 DN 12 1 8 27 NPTF 3 8 18 NPTF 3 8 18 NPTF 1 1 4 12 UNF 14 OA14111A DN 100 DN 100 DN 50 DN 12 1 8 27 NPTF 3 8 18 NPTF 3 8 18 NPTF 1 1 4 12 UNF 14 OA25112A DN 125 DN 125 DN 80 DN 12 1 8 27 NPTF 3 8 18 NPTF 1 1 8 18 UNEF 1 1 4 12 UNF 14 OAC14011A DN 100 DN 100 DN 50 DN 12 1 8 27 NPTF 3 8 18 NPTF 3 8 18 ...

Страница 91: ... 3 8 18 NPTF 3 8 18 NPTF DN 25 OAHC80051A DN 150 DN 150 DN 65 DN 25 DN 25 3 8 18 NPTF 1 1 8 18 UNEF DN 32 OAHC100051A DN 200 DN 200 DN 65 DN 25 DN 25 3 8 18 NPTF 1 1 8 18 UNEF DN 32 Filet extérieur 1 1 4 12 UNF filet intérieur 3 8 18 NPTF Tab 6 Cotes de raccordement pour séparateur d huile ...

Страница 92: ...huile tertiaire Type Charge de service OA1954 A 18 l OA4188 A 40 l OA9111 A 90 l OA14111 A 140 l OA25112 A 250 l OAC14011A 140 l OAC25112A 250 l OAH2888 28 l OAH7088 70 l OAS322 env 0 5 l OAS744 env 1 0 l OAS1055 env 1 0 l OAS1655 env 1 0 l OAS3088 env 1 5 l OAF6288 11 8 l OAF15211 31 8 l OAHC65051A 80 l OAHC80051A 180 l OAHC100051A 310 l 5 2 Contrôler l étanchéité Contrôler l étanchéité du circui...

Страница 93: ...esseur Mettre en circuit le réchauffeur d huile au niveau du compresseur et du séparateur d huile Contrôler le niveau d huile dans le compresseur Remplir directement le fluide frigorigène dans le condenseur ou le réservoir ainsi que le cas échéant pour les installations avec évaporateur noyé dans l évaporateur Retirer le mélange du cylindre de remplissage en tant que phase liquide et sans bulles A...

Страница 94: ...condaires doivent être remplacées lorsque la décharge de pression dépasse 0 5 bar 7 1 Remplacer les cartouches filtrantes Fermer les vannes d arrêt avant et après le sépara teur d huile Évacuer la pression du séparateur d huile Pour cela il faut aspirer le fluide frigorigène et le recycler de fa çon adaptée Démonter les cartouches filtrantes Insérer des cartouches neuves Compléter la charge d huil...

Страница 95: ...er la cartouche fil trante inférieure 4 La barre de guidage inférieure 7 reste dans le séparateur d huile combiné Répéter les étapes pour enlever les autres paires de cartouches Une fois enlevés l écrou de verrouillage 2 et l élé ment de centrage 3 la paire de cartouches corres pondante peut être basculée Insérer les cartouches filtrantes neuves Serrer les écrous de fermeture 2 10 Nm Visser fermem...

Страница 96: ...4 Ouvrir la bride 1 Récupérer l huile restante OAS332 et OAS744 Dévisser la cartouche filtrante 3 OAS1055 OAS3088 Retirer la vis 2 Retirer la cartouche filtrante 3 en la tirant vers le bas 1 2 3 4 Fig 21 Série OAS Remplacer les cartouches filtrantes 1 Bride 2 Vis de fixation 3 Cartouche filtrante 4 Retour d huile ...

Страница 97: ...vercle qu à l aide des dispositifs appropriés Porter des chaussures de sécurité 4 cartouches filtrantes 3 se trouvent dans le OAHC A Desserrer les écrous de fixation et les contre écrous 2 et enlever les cartouches 3 l une après l autre dans le sens contraire des aiguilles d une montre Insérer les cartouches filtrantes neuves Serrer les écrous de fixation et les contre écrous 2 10 Nm Insérer les j...

Страница 98: ...r d huile Préparer une gouttière à l huile Vider l huile la collecter et l éliminer dans le res pect de l environnement AVERTISSEMENT L équipement sous pression est sous pression Risque de blessures graves Évacuer la pression de l équipement sous pres sion Porter des lunettes de protection 8 Mettre hors service En cas de sinistre le le réservoir sous pression doit être isolé du système de refroidi...

Страница 99: ...Notes ...

Страница 100: ...ingen Germany Tel 49 0 70 31 932 0 Fax 49 0 70 31 932 147 bitzer bitzer de www bitzer de Subject to change Änderungen vorbehalten Toutes modifications réservées 80491105 07 2017 80491105 07 2017 Subject to change Änderungen vorbehalten Toutes modifications réservées ...

Отзывы: