


power Switch
The power buttons are located on the top of
the upper handle and top of grip on hand vac.
settings include:
(O) = OFF
(i) = suction & brush ON
Using your stick vacuum
1.
Push the power button ON (i) to easily clean
hard floors, low pile carpet, and area rugs.
2.
When finished cleaning, turn power button
OFF (O).
3.
Keep unit charged by cradling on the charging
base between cleanings.
Using your hand vacuum
1.
Remove the hand vac by pressing the release
button.
2.
The power button is located on top of the grip
area – push ON (i) to start cleaning.
3.
easily clean messes on furniture, stairs, and
other hard to reach areas.
4.
To use the accessory tools, simply insert the
base of the tool into the end of the nozzle.
TiP: Accessories can be combined together or
used individually.
5.
When done cleaning, simply push the power
button to OFF (O) and replace the hand vac on
the body of the product.
Operations
www.bissell.com
0844.888.6644
6
4.
2.
1.
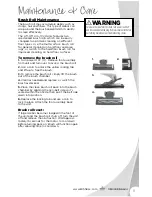
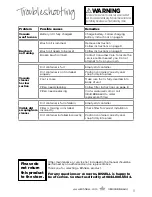
WaRnInG
Do not operate cleaner with damp or wet filters or
without vacuum bags and all filters in place.