Biostar M7VIT 800 V7.X Скачать руководство пользователя страница 10

M

M

M

7

7

7

V

V

V

I

I

I

T

T

T


8

8

8

0

0

0

0

0

0


8

Jumpers, Headers, Connectors & Slots 

Floppy Disk Connector: FDD1 

The motherboard provides a standard floppy disk connector that supports 360K, 
720K, 1.2M, 1.44M and 2.88M floppy disk types. This connector supports the 
provided floppy drive ribbon cables. 
 

Hard Disk Connectors: IDE1/ IDE2 

The motherboard has a 32-bit Enhanced PCI IDE Controller that provides PIO 
Mode 0~4, Block Mode, Bus Master, and Ultra DMA 33/ 66/ 100/ 133 functionality. 
It has two HDD connectors IDE1 (primary) and IDE2 (secondary).     
The IDE connectors can connect a master and a slave drive, so you can connect 
up to four hard disk drives. The first hard drive should always be connected to 
IDE1. 
 

Peripheral Component Interconnect Slots: PCI 1-5 

This motherboard is equipped with 5 standard PCI slots. PCI stands for Peripheral 
Component Interconnect, and it is a bus standard for expansion cards. This PCI 
slot is designated as 32 bits. 
 

Accelerated Graphics Port Slot: AGP1 

Your monitor will attach directly to that video card. This motherboard supports 
video cards for PCI slots, but it is also equipped with an Accelerated Graphics Port 
(AGP). An AGP card will take advantage of AGP technology for improved video 
efficiency and performance, especially with 3D graphics. 


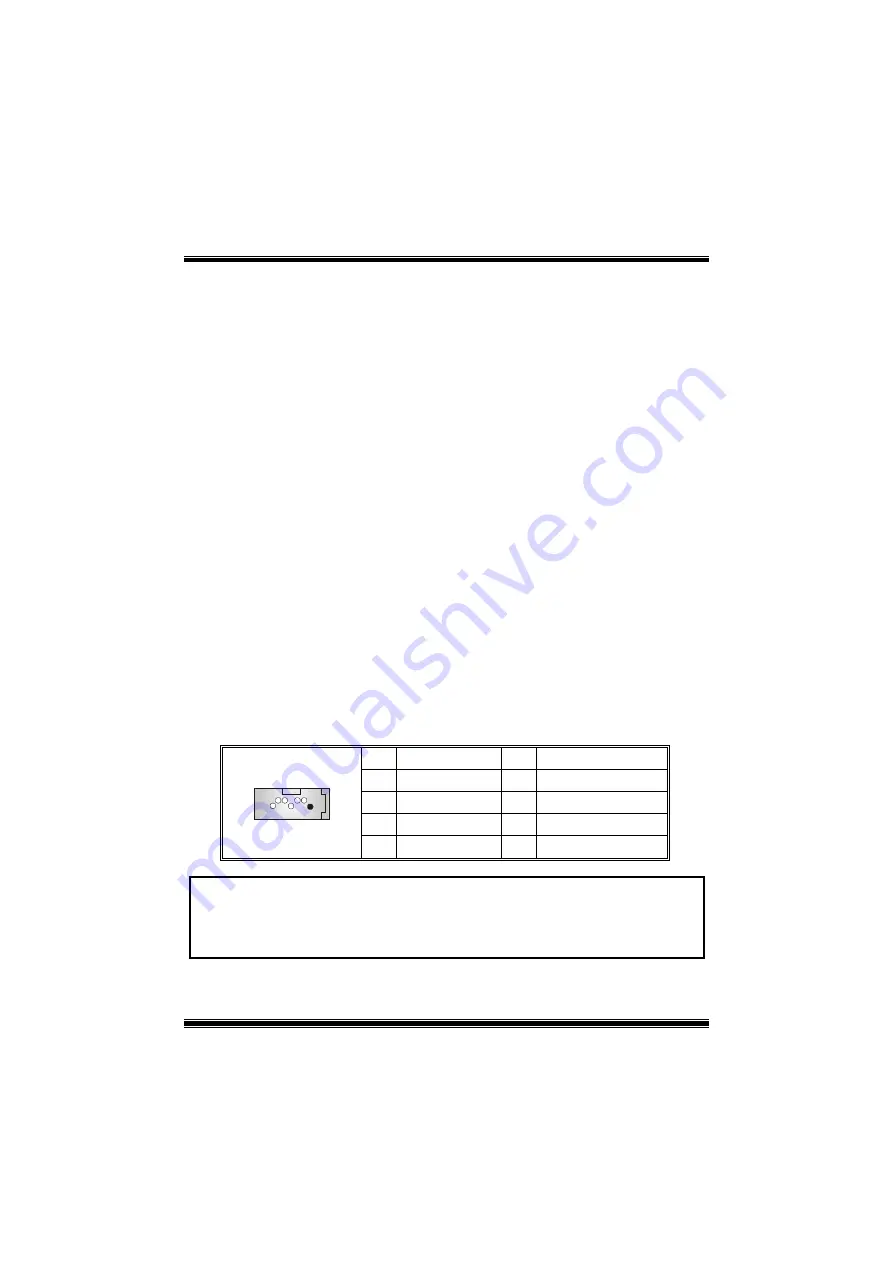
Serial ATA Connector: JSATA1/ JSATA2 (Optional)


The motherboard has a PCI to SATA Controller with 2 channels SATA interface, it 
satisfies the SATA 1.0 spec and can transfer data with 1.5 Gb/s speed. 

Pin Assignment Pin 

Assignment 

Ground 

TX+ 

TX- 

Ground 

RX- 

RX+ 


1

2

3

4

5

6

7


JSATA1/ JSATA2 

Ground  


Note

 1.


When plugging SATA HDD on JSATA1 connector, SATA BIOS will 

automatically detect as channel 1. 
              2. When plugging SATA HDD on JSATA2 connector, SATA BIOS will 
automatically detect as channel 0. 


Содержание M7VIT 800 V7.X

Страница 1: ...io communications There is no guarantee that interference will not occur in a particular installation The vendor makes no representations or warranties with respect to the contents here of and special...

Страница 2: ...UCTURE 3 ENGLISH 4 M7VIT 800 Features 4 Package contents 5 How to set up Jumper 6 CPU Installation 6 DDR DIMM Modules DDR1 DDR2 7 Installing DDR Module 7 Jumpers Headers Connectors Slots 8 FRAN AIS 13...

Страница 3: ...M M M7 7 7V V VI I IT T T 8 8 80 0 00 0 0 1 Layout of M7VIT 800 NOTE represents the first pin...

Страница 4: ...L System FAN Header JSFAN1 D Digital Audio Connector JSPDIF1 M Serial ATA Connectors JSATA1 2 E Front Audio Header JAUDIO1 N Front USB Header JUSB2 JUSB3 F Accelerated Graphics Port Slot AGP1 O IDE C...

Страница 5: ...M M M7 7 7V V VI I IT T T 8 8 80 0 00 0 0 3 M7VIT 800 System Structure...

Страница 6: ...Super I O Chip U2 ITE8705F Provides the most commonly used legacy Super I O functionality Environment Control initiatives H W Monitor ITE s Smart Guardian function Slots Five 32 bit PCI bus master slo...

Страница 7: ...ports 1 front audio header 1 S PDIF Out header Optional Dimensions ATX Form Factor 19 1cm X 29 3cm W X L B BIOS Software BIOS Award legal BIOS Supports APM1 2 Supports ACPI Supports USB Function Soft...

Страница 8: ...mper open Jumper close Pin1 2 close CPU Installation Step1 Pull the lever sideways away from the socket and then raise the lever up to a 90 degree angle Step2 Look for the white dot cut edge The white...

Страница 9: ...3200 Type required DRAM Type 64MB 128MB 256MB 512MB 1GB DIMM Module 184 pin DIMM Socket Location DDR Module Total Memory Size MB DDR 1 64MB 128MB 256MB 512MB 1GB 1 DDR 2 64MB 128MB 256MB 512MB 1GB 1 M...

Страница 10: ...standard PCI slots PCI stands for Peripheral Component Interconnect and it is a bus standard for expansion cards This PCI slot is designated as 32 bits Accelerated Graphics Port Slot AGP1 Your monito...

Страница 11: ...5V 1 11 10 20 ATX1 10 12V 20 5V SPK PWR_LED HLED SLP RST 2 24 IR 1 23 IR ON OFF Pin Assignment Function Pin Assignment Function 1 5V 2 Sleep Control 3 NA 4 Ground Sleep Button 5 NA 6 NA NA 7 Speaker S...

Страница 12: ...per to Pin 2 3 Close 3 Wait for five seconds 4 Set the jumper to Pin 1 2 Close 5 Power on the AC 6 Reset your desired password or clear the CMOS data Case Open Connector JCI1 Pin Assignment 1 Case Ope...

Страница 13: ...Speaker Out Left 10 Left Line Out Speaker Out Left 11 Right Line In Rear Speaker Right 12 Right Line In Rear Speaker Right 13 Left Line In Rear Speaker Left 14 Left Line In Rear Speaker Left Front USB...

Страница 14: ...T T 8 8 80 0 00 0 0 12 Back Panel Connectors PS 2 Keyboard PS 2 Mouse Speaker Out Line In Mic In Printer Port COM1 USB LAN USB 6 Channel Speakers Speaker Out Right Left Line In Rear Speaker Left Righ...

Страница 15: ...E S Puce U2 ITE8705F Interface de Comptage de Broche Faible Offre la fonctionnalit Super E S h rit e la plus couramment utilis e Initiatives de Controle d Environnement Moniteur H W Fonction Smart Gu...

Страница 16: ...orts USB2 0 1 Embase Audio 1 Embase de Sortie S PDIF optionnel Dimensions Facteur de forme ATX 19 5 cm x 29 3 cm W x L B BIOS et logiciel BIOS Award legal Bios APM1 2 ACPI Fonction USB Logiciel Prise...

Страница 17: ...hipset information Also in the About panel you can get detail descriptions about BIOS model and chipsets In addition the frequency status of CPU memory AGP and PCI along with the CPU speed are synchro...

Страница 18: ...lease click Next button and follow the default procedure to install 2 When you see the following dialog in setup procedure it means setup is completed If the Launch the WarpSpeeder Tray Utility checkb...

Страница 19: ...only for reference the screen printed in this user manual will change according to your motherboard on hand WarpSpeeder includes 1 tray icon and 5 panels 1 Tray Icon Whenever the Tray Icon utility is...

Страница 20: ...Icon utility if selected 2 Main Panel If you click the tray icon WarpSpeeder utility will be invoked Please refer do the following figure the utility s first window you will see is Main Panel Main Pan...

Страница 21: ...he button will be highlighted and the Voltage Panel will slide out to up as the following figure In this panel you can decide to increase CPU core voltage and Memory voltage or not The default setting...

Страница 22: ...M7 7 7V V VI I IT T T 8 8 80 0 00 0 0 20 4 Overclock Panel Click the Overclock button in Main Panel the button will be highlighted and the Overclock Panel will slide out to left as the following figu...

Страница 23: ...nually overclock is potentially dangerous especially when the overclocking percentage is over 110 We strongly recommend you verify every speed you overclock by click the Verify button Or you can just...

Страница 24: ...r can click this button and WarpSpeeder will proceed a testing for current frequency If the testing is ok then the current frequency will be saved into system registry If the testing fail system will...

Страница 25: ...he real time status information of your system The information will be refreshed every 1 second 6 About Panel Click the About button in Main Panel the button will be highlighted and the About Panel wi...

Страница 26: ...onitor features are controlled by several separate chipset WarpSpeeder divide these features to separate panels If one chipset is not on board the correlative button in Main panel will be disabled but...

Страница 27: ...isk to disk controller board Make sure both ends are securely plugged in check the drive type in the standard CMOS setup Backing up the hard drive is extremely important All hard disks are capable of...

Страница 28: ...M M M7 7 7V V VI I IT T T 8 8 80 0 00 0 0 26 03 19 2004...

Отзывы: