8 |
Chapter 2: Hardware installation
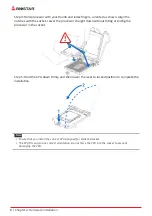
Step 4: Hold processor with your thumb and index fingers, oriented as shown. Align the
notches with the socket. Lower the processor straight down without tilting or sliding the
processor in the socket.
Step 5: Hold the CPU down firmly, and then lower the lever to locked position to complete the
installation.
Note
»
Ensure that you install the correct CPU designed for LGA1150 socket.
»
The CPU fits only in one correct orientation. Do not force the CPU into the socket to prevent
damaging the CPU.
Содержание H81MHV3 3.0
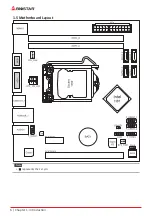
Страница 6: ...6 Chapter 1 Introduction 1 5 Motherboard Layout Note represents the 1st pin ...
Страница 36: ...6 Глава 1 Введение 1 5 Компоновка материнской платы представляет собой 1 й контакт ...
Страница 63: ...챕터 1 들어가는 글 7 H81MHV3 3 0 1 5 마더보드 레이아웃 는 첫번째 핀을 표시합니다 ...
Страница 84: ...28 챕터 4 유용한 도움말 이 페이지는 의도적으로 비워 둔 것입니다 ...
Страница 90: ...6 第一章 主板介绍 1 5 主板結構圖 標示為針腳1 ...


