


26 | Chapter 4: Useful help
Chapter 4: Useful help
4.1
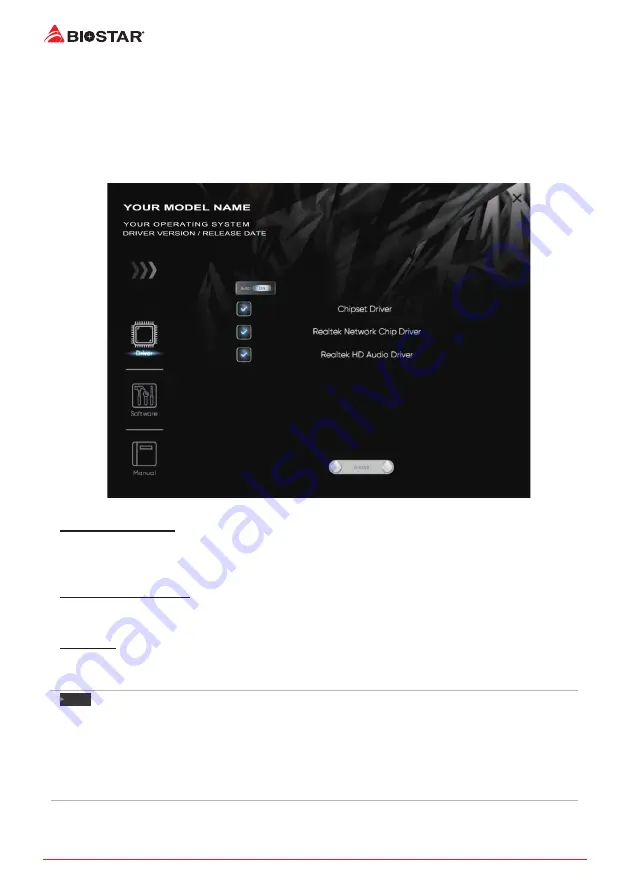
Driver Installation
After you installed your operating system, please insert the Fully Setup Driver DVD into your
optical drive and install the driver for better system performance.
You will see the following window after you insert the DVD
The setup guide will auto detect your motherboard and operating system.
A. Driver Installation
To install the driver, please click on the Driver icon. The setup guide will list the compatible
driver for your motherboard and operating system. Click on each device driver to launch the
installation program.
B. Software Installation
To install the software, please click on the Software icon. The setup guide will list the software
available for your system, click on each software title to launch the installation program.
C. Manual
Aside from the paperback manual, we also provide manual in the Driver DVD. Click on the
Manual icon to browse for available manual.
Note
»
»
If this window didn’t show up after you insert the Driver DVD, please use file browser to locate and
execute the file SETUP.EXE under your optical drive.
»
»
You will need Acrobat Reader to open the manual file. Please download the latest version of Acrobat
Reader software from http://get.adobe.com/reader/
»
»
The motherboard used in the illustrations may not resemble the actual board. these illustrations are
for reference only.
Содержание B760MH D4
Страница 38: ...6 Глава 1 Введение 1 5 Motherboard Layout B760MX E D4 B760MX2 E D4 B760 Note represents the 1st pin ...
Страница 39: ...Глава 1 Введение 7 B760MX E D4 B760MH D4 B760MX2 E D4 B760MH D4 B760 Note represents the 1st pin ...
Страница 60: ......
Страница 67: ...챕터 1 들어가는 글 7 B760MX E D4 B760MH D4 B760MX2 E D4 1 5 마더보드 레이아웃 B760MX E D4 B760MX2 E D4 B760 는 첫번째 핀을 표시합니다 ...
Страница 68: ...8 챕터 1 들어가는 글 B760MH D4 B760 는 첫번째 핀을 표시합니다 ...
Страница 90: ......
Страница 97: ...第一章 主板介绍 7 B760MX E D4 B760MH D4 B760MX2 E D4 1 5 主板結構圖 B760MX E D4 B760MX2 E D4 B760 標示為針腳1 ...
Страница 98: ...8 第一章 主板介绍 B760MH D4 B760 標示為針腳1 ...
Страница 100: ...10 第二章 硬體安裝 步驟 4 將 CPU 保護蓋蓋上 步驟 5 取下塑膠保護殼 步驟 6 將 ILM 拉桿完全閉合 請確保安裝為LGA1700插座設計的CPU CPU必須按正確的方向放入 請勿強行將CPU放進插槽以免造成CPU損壞 ...


